Hello! Welcome back to our journey with React Router.
In our last lesson, we built a sophisticated "Help" section with a nested layout using the <Outlet> component. We even created a contact form on our /help/contact page. However, clicking the "Submit" button doesn't do anything yet. In a real application, you'd want to handle that submission and then guide the user to another page, perhaps the homepage, with a success message.
This lesson focuses on exactly that: triggering navigation based on an event or application logic, not just a user clicking a link. You will learn how to navigate programmatically using the useNavigate hook. This is a fundamental skill for handling form submissions, post-login redirects, and any scenario where your code needs to take control of the user's journey through your app.
1. Why Programmatic Navigation?
So far, we've used <Link> and <NavLink> for navigation. These are great when a user explicitly decides to go to another page by clicking something. But what about when the application needs to decide?
Consider these common scenarios:
- After a user successfully submits a form.
- After a user logs in, they should be redirected to their dashboard.
- If a user tries to access a protected page without being logged in, they should be sent to the login page.
- After a certain action, you might want to send the user back to the previous page they were on.
In all these cases, the navigation is triggered by logic within your component. This is called programmatic navigation, and the primary tool for it in modern React Router is the useNavigate hook.
To understand the concept and its importance, let's watch a short introductory video.
ReactJS Tutorial 74: React Router Part 6 useNavigate Hook In React
The video "ReactJS Tutorial 74: React Router Part 6 useNavigate Hook In React" by Ashutosh Pawar clearly explains why programmatic navigation is necessary and introduces the useNavigate hook as the solution.
Watch the first 1 minute and 28 seconds (00:00 - 01:28). Focus on the distinction the presenter makes between navigation via a link and navigation triggered by an event.
2. Basic Navigation with useNavigate
Using the hook is straightforward. You import it, call it within your component to get a navigate function, and then call that function with the path you want to go to.
Here are the steps:
- Import the hook:
import { useNavigate } from 'react-router-dom'; - Get the navigate function:
const navigate = useNavigate(); - Call it when needed:
navigate('/some-path');
Let's apply this to the contact form we created in the previous lesson. We'll make the "Submit" button redirect the user to the homepage.
First, update your ContactPage.jsx to include an event handler.
// src/pages/ContactPage.jsx
import { useNavigate } from 'react-router-dom'; // 1. Import the hook

function ContactPage() {
  const navigate = useNavigate(); // 2. Get the navigate function

  const handleSubmit = (event) => {
    event.preventDefault(); // Prevent the default browser form submission

    // Here you would normally process the form data (e.g., send to a server)
    console.log('Form submitted!');

    // 3. Navigate to the homepage
    navigate('/');
  };

  return (
    <div className="contact">
      <h3>Contact Us</h3>
      <form onSubmit={handleSubmit}> {/* Attach the handler to the form's onSubmit event */}
        <label>
          <span>Your email:</span>
          <input type="email" name="email" required />
        </label>
        <label>
          <span>Your message:</span>
          <textarea name="message" required></textarea>
        </label>
        <button>Submit</button>
      </form>
    </div>
  );
}

export default ContactPage;
Now, run your app, go to the /help/contact page, fill out the form, and click "Submit". You should be instantly redirected to the homepage.
3. Advanced Navigation Options
The navigate function is more powerful than just taking a path. It can also accept a second argument, an options object, to give you more control over the navigation behavior.
A. Replacing History (replace: true)
By default, navigate('/path') acts like a "push" action. It pushes a new entry onto the browser's history stack. This is why you can click the "back" button to go from the homepage back to the contact form.
Sometimes, you want to "replace" the current entry in the history stack instead. A common use case is a login page. After logging in, you don't want the user to be able to click the back button and return to the login screen.
You can achieve this with { replace: true }.
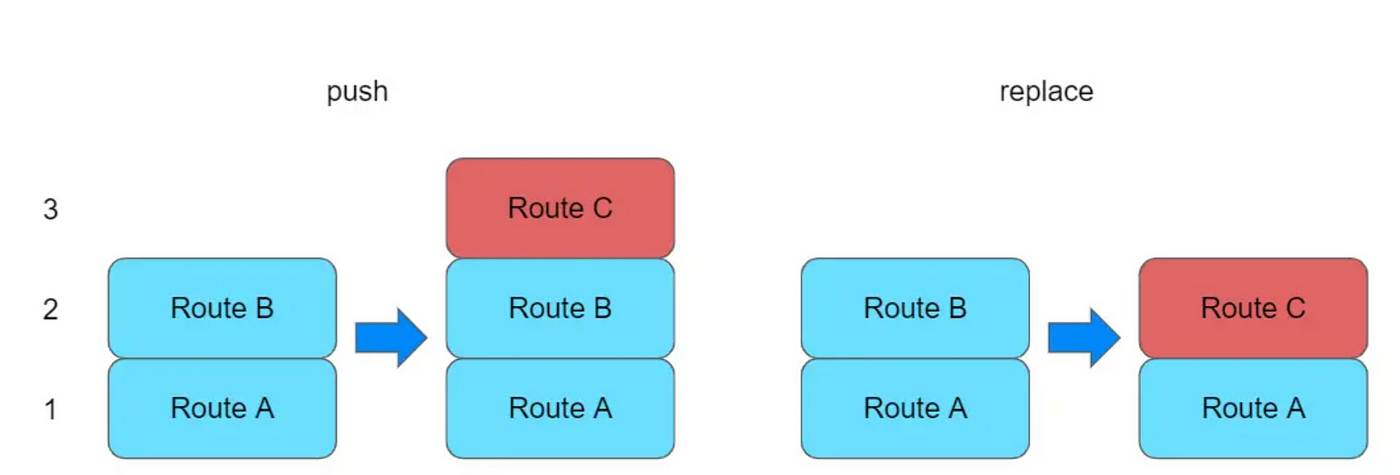
Let's modify our form submission to use replace:
// In ContactPage.jsx, inside handleSubmit
navigate('/', { replace: true });
With this change, after submitting the form, the user won't be able to go back to the contact page using the browser's back button.
B. Navigating Through History
You can also use navigate to move programmatically through the history stack, just like clicking the browser's back and forward buttons.
navigate(-1): Go back one entry (equivalent to clicking "back").navigate(-2): Go back two entries.navigate(1): Go forward one entry.
This is useful for a "Cancel" button on a form that should always return the user to wherever they came from.
// Example of a cancel handler
const handleCancel = () => {
  navigate(-1);
};
C. Passing State During Navigation
What if you want to pass some data to the next page that isn't part of the URL? For example, showing a "Thank you for your submission!" message on the homepage only after the user comes from the contact form.
You can pass data using the state property in the options object. This data is then accessible on the destination component using another hook: useLocation.
The following video provides a complete walkthrough of this pattern, from passing the state with useNavigate to receiving it with useLocation.
ReactJS Tutorial 74: React Router Part 6 useNavigate Hook In React
Let's watch a section of the "useNavigate Hook In React" video from Ashutosh Pawar. It provides a crystal-clear example of passing form data as state and displaying it on the destination page.
Watch from 03:36 to 07:55. Pay close attention to: How the state object is added to the navigate function call. How the useLocation hook is used in the destination component. How to safely access the state with location.state (the || {} part is a good defensive practice).
4. Practical Application: A Success Message
Let's apply this state passing technique to our app. We will navigate the user to the homepage after form submission and show a success message that disappears after a few seconds.
1. Update ContactPage.jsx to pass state:
Modify the navigate call to include a state object. This acts as a flag for the homepage.
// src/pages/ContactPage.jsx

//... inside the handleSubmit function
navigate('/', { state: { success: true } });
2. Update HomePage.jsx to receive and use the state:
We'll use useLocation to check for our success flag. If it's present, we'll display a message. We'll also use useState and useEffect to make the message disappear after a few seconds.
// src/pages/HomePage.jsx
import { useLocation } from 'react-router-dom';
import { useState, useEffect } from 'react';

function HomePage() {
  const location = useLocation();
  const [showMessage, setShowMessage] = useState(false);

  // This effect runs when the component loads
  useEffect(() => {
    // Check if we were redirected from the contact form
    if (location.state?.success) {
      setShowMessage(true);
      // Set a timer to hide the message after 3 seconds
      const timer = setTimeout(() => {
        setShowMessage(false);
      }, 3000);

      // Cleanup the timer if the component unmounts
      return () => clearTimeout(timer);
    }
  }, [location.state]); // Re-run the effect if location.state changes

  return (
    <div className="home-page">
      {/* Conditionally render the success message */}
      {showMessage && (
        <div className="success-banner">
          Thank you for your message! We'll get back to you soon.
        </div>
      )}

      <h1>Welcome to Our Store!</h1>
      <p>Browse our collection of amazing products.</p>
      {/* You can add some styling for the banner in your App.css */}
    </div>
  );
}

export default HomePage;
Optional: To make the banner look nice, add this to your index.css or App.css:
.success-banner {
  background-color: #d4edda;
  color: #155724;
  padding: 15px;
  border: 1px solid #c3e6cb;
  border-radius: 4px;
  margin-bottom: 20px;
}
Now when you submit the contact form, you'll land on the homepage and see a nice confirmation message that fades away.
Conclusion
You've now mastered programmatic navigation, a critical part of creating dynamic and user-friendly React applications.
Key Takeaways:
- Programmatic Navigation is when your application's logic, not a user's click on a
<Link>, triggers a route change. - The
useNavigatehook is the primary tool for this. It returns anavigatefunction. - The basic usage is
navigate('/path'). - You can control history with
navigate('/path', { replace: true })to prevent users from going "back" to a page like a login form. - You can move through history with
navigate(-1)(back) ornavigate(1)(forward). - You can pass data with
navigate('/path', { state: { ... } })and access it on the destination page using theuseLocationhook.
Next Up:
We've seen how to redirect a user after a successful action. The next logical step is to redirect them based on their status, such as whether they are authenticated. In our next lesson, we will combine our knowledge of components, hooks, and navigation to create a protected route component, a cornerstone of almost every real-world web application.