Hello! Welcome back to your advanced course on the Power Platform.
In our last lesson, we explored the HTTP action in Power Automate, learning how to make ad-hoc calls to external REST APIs using various authentication methods. While powerful, this approach can lead to repetitive configurations and maintenance challenges when the same API is used across multiple apps and flows.
Today, we'll build on that foundation by taking a more professional and scalable approach. We will address the learning outcome: Create a custom connector for a REST API using API Key or Basic authentication.
A custom connector allows you to wrap a web API into a first-class citizen within the Power Platform. This makes the API's operations easily discoverable and usable for anyone building apps or flows, without them needing to understand the underlying details of HTTP requests and authentication. Given your background in building and consuming APIs with C#, you'll find the process of defining these wrappers quite intuitive.
We will walk through the five-step wizard for creating a custom connector, focusing on:
- Defining the connector's general information (host, base URL).
- Configuring security for API Key and Basic authentication.
- Defining actions using the "Import from sample" feature.
- Testing the connector to ensure it works correctly.
1. From HTTP Action to Custom Connector
Before we dive in, let's quickly solidify why we're doing this. Why build a custom connector when the HTTP action works? A custom connector provides:
- Reusability: Define the API connection once and use it everywhere.
- Abstraction: App makers can use the connector without knowing API details like endpoint URLs or authentication headers.
- ALM (Application Lifecycle Management): Custom connectors can be included in solutions, making them easily transportable between development, testing, and production environments.
- Discoverability: The connector appears alongside standard connectors like 'SharePoint' or 'Dataverse' when building an app or flow.
The short introduction of the following video provides a good summary of the role custom connectors play.
Create a Custom API Connector in Power Apps
Watch the first minute of this video, "Create a Custom API Connector in Power Apps" by Darren Neese, to get a high-level overview of why and when you would create a custom connector.
Watch from the beginning until 00:59. Focus on the explanation of how custom connectors extend the Power Platform's capabilities when a standard connector isn't available.
2. The Custom Connector Creation Wizard
Creating a custom connector in the Power Platform is a guided, five-step process. You'll work through the following tabs: General, Security, Definition, Code, and Test.
For this walkthrough, we'll follow the process of creating a connector for an API that calculates required cubic feet per minute (CPM), a scenario directly from the PL-400 curriculum. The following resources provide a complete, end-to-end guide, one as a video and the other as a written lab. You can choose whichever format you prefer, or use both to reinforce the concepts.
- Video Guide: A step-by-step video demonstration.
- Written Lab: A detailed, text-based practice lab from the official Microsoft Learning repository for PL-400.
Both resources start by creating a simple Azure Function to act as our API. Since your background is strong in C#, you'll understand the function's code immediately. We won't spend time building the function itself, but will focus on the process of creating the connector that calls it.
PL-400 Exam Prep: Creating a Custom Connector for an Azure Function
This video, "PL-400 Exam Prep: Creating a Custom Connector for an Azure Function" by CRM Chap, is an excellent walkthrough. It covers creating the Azure Function API, building the custom connector, and using it in a flow.
Watch from 05:40 to 13:33. This covers the entire custom connector creation and testing process, from the initial setup to using it in a Power Automate flow.
Practice Lab 9 – Azure | PL-400_Microsoft-Power-Platform ...
As an alternative or supplement to the video, this official PL-400 practice lab provides a detailed, step-by-step written guide to achieve the same outcome.
Read through the section 'Exercise 7: Create the Custom Connector'. It details every step in the wizard, from naming the connector to testing the final operation. You can follow these steps in your own Power Platform environment.
Let's break down the key steps from these resources.
Step 1: General
Here you define the connector's metadata.
- Connector Name: A user-friendly name for your connector.
- Description: Helps others understand what the API does.
- Host: The root domain of the API (e.g.,
my-api.azurewebsites.net). The wizard is strict about formatting; do not includehttps://or any path information. - Base URL: The path prefix for all API calls (e.g.,
/api). If your API endpoints are at the root, you can leave this as/.
Step 2: Security
This is where you define how users will authenticate. For today's lesson, we're focusing on API Key and Basic authentication.
API Key Authentication:
This is the most common method for simple, non-user-specific API access.
- Authentication type: Select
API Key. - Parameter label: A user-friendly name for the key, like "API Key". This is what the user sees when creating a connection.
- Parameter name: The actual name of the key that the API expects. For the Azure Function in the resources, this is
code. - Parameter location: This is crucial. It specifies how the key is sent.
Query: The key is added to the URL as a query parameter (e.g.,?code=...).Header: The key is sent as an HTTP request header (e.g.,x-functions-key: ...). This is the more common and secure practice.
Step 3: Definition
Here you define what your connector can actually do by creating Actions.
- New Action: Each action corresponds to a specific API operation (e.g.,
GetWeather,CreateUser). - General: Provide a
Summary(becomes the action name in Power Automate/Apps), aDescription, and anOperation ID(a unique internal name for the function, often camelCase, e.g.,getRequiredCPM). - Request - Import from sample: This is the most important feature on this tab. Instead of defining the request manually, you provide the wizard with a sample call:
- Verb:
GET,POST,PUT, etc. - URL: The full URL of the API endpoint, including any query parameters.
- Headers: Any required headers, like
Content-Type: application/json. - Body: A sample JSON payload for
POSTorPUTrequests.
- Verb:
- Response - Add default response: Similarly, you provide a sample JSON response body.
The wizard uses these samples to automatically generate the schemas for inputs and outputs, which provides the strong typing and intellisense you see in Power Apps and Power Automate.
Step 4: Code (Optional)
This tab allows you to write C# code to execute complex transformations on the request or response, or to implement logic that goes beyond standard policy templates. For today, we'll skip this, but it's a powerful feature to be aware of for more advanced scenarios.
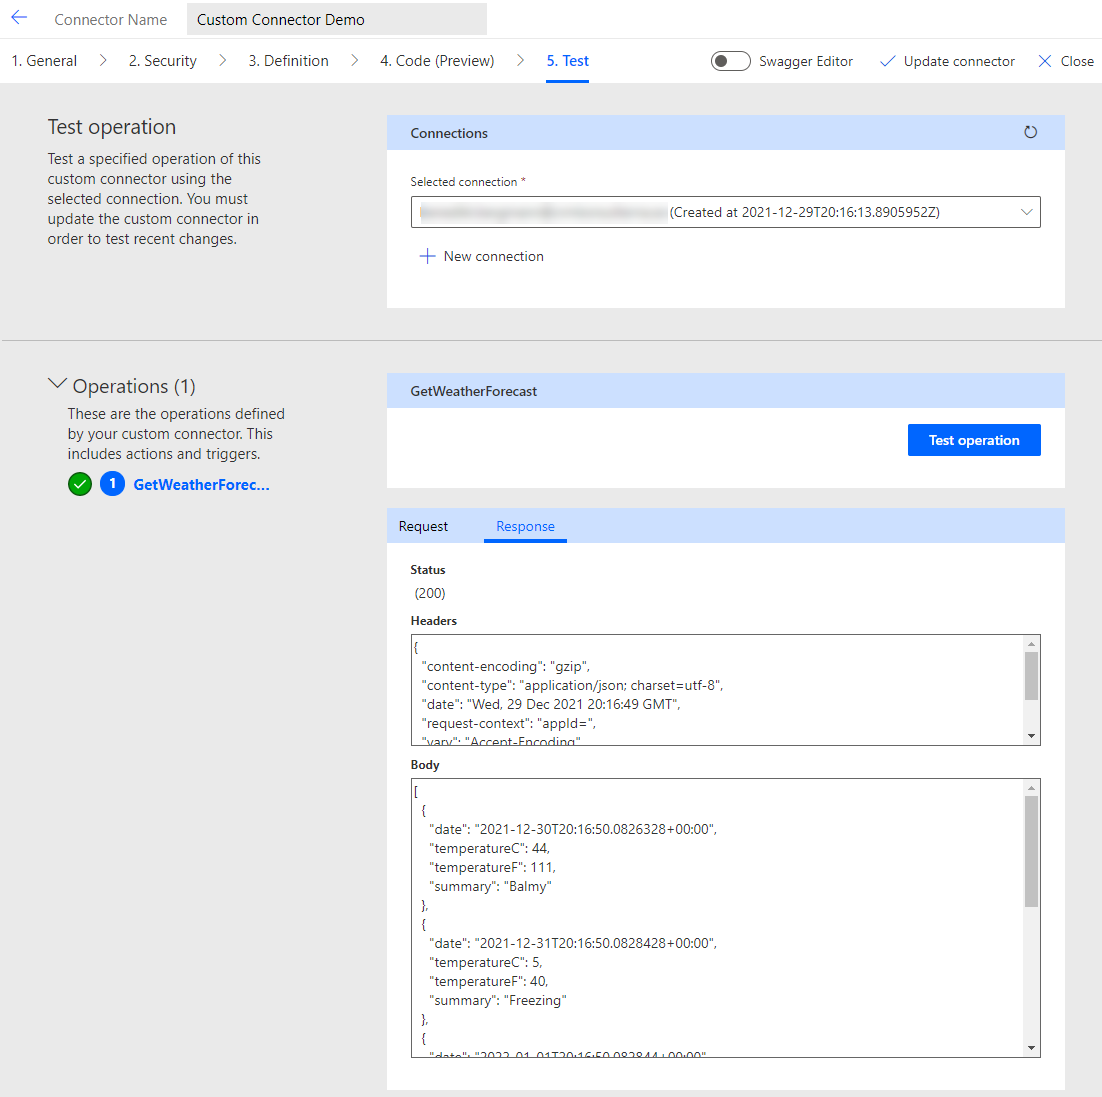
Step 5: Test
Before using the connector, you must test it.
- Create the connector: You must click "Create connector" or "Update connector" before you can test.
- New connection: The wizard will prompt you to create a connection. This is where you'll provide the secret (the API Key in our example).
- Test operation: Once the connection is created, you can fill in the input parameters for your action and click "Test operation".
You should see a 200 OK status and a response body that matches the sample you provided in the Definition step.
Test your understanding!
When defining a request for a custom connector action, why is using "Import from sample" generally preferred over defining the parameters and body manually?
Show answer
Using "Import from sample" is preferred because it significantly accelerates development and reduces errors. By providing a real request URL, headers, and body, the wizard automatically parses this information to:
- Identify and create input parameters (from the query string and body).
- Infer data types for those parameters.
- Generate the correct JSON schema for the request body.
This automated process is much faster and less error-prone than manually creating each parameter and building the schema by hand.
3. Configuring Basic Authentication
The second authentication type for this lesson is Basic. The creation process is identical to what we've just seen, with the only change being on the Security tab.
Instead of selecting API Key, you would choose Basic authentication.
When a user creates a connection to your connector, they will be prompted for a Username and Password. The Power Platform then automatically handles the process of combining them (username:password), Base64 encoding the string, and adding the appropriate Authorization: Basic <encoded_string> header to every API call. This abstracts the complexity away from both the connector creator and the end-user.
Conclusion
You have now learned the end-to-end process of encapsulating a REST API into a reusable custom connector using API Key and Basic authentication. This is a core skill for any Power Platform developer, enabling you to integrate with a vast range of external services in a structured and professional manner.
Key Takeaways:
- Custom connectors are the professional way to integrate APIs, promoting reusability, security, and ease of use.
- The creation process follows a five-step wizard: General, Security, Definition, Code, and Test.
- The "Import from sample" feature is the most efficient way to define the request and response for your actions.
- For API Key authentication, you specify the parameter name and its location (Header or Query).
- For Basic authentication, the platform handles the Base64 encoding and
Authorizationheader automatically. - Always test your connector within the wizard before attempting to use it in an app or flow.
What's Next
While API Key and Basic auth are common, the modern standard for securing APIs, especially those involving user-delegated permissions, is OAuth 2.0. The configuration for OAuth 2.0 is more involved, requiring you to set up an Azure AD App Registration and configure redirect URLs.
In our next lesson, we will tackle this challenge head-on and learn how to configure OAuth 2.0 authentication for a custom connector to securely connect to a third-party service. This is a critical topic for the PL-400 exam and for real-world enterprise integrations.