Hello! Welcome to the next lesson in your preparation for the PL-400 exam.
In our previous session, we made our approval workflows dynamic by retrieving approvers from a Dataverse table. This was a crucial step in building scalable and maintainable automations. We moved from hardcoded logic to a configuration-driven approach, a key principle in professional development.
Today, we step into Module 7, "Advanced Automation and Custom Connectors," and tackle a fundamental developer skill within the Power Platform. This lesson is designed to help you master the learning outcome: Use the HTTP action to call external REST APIs with various authentication methods.
Given your extensive experience with C# and REST APIs, you're already familiar with the concepts of HTTP methods, headers, and authentication. This lesson will focus on how to apply that knowledge within Power Automate, showing you the platform-specific tools and patterns for integration. This skill is not only vital for complex automations but is also the direct foundation for our next topic: building reusable custom connectors.
We will cover:
- An overview of the different HTTP actions available in Power Automate.
- Making calls to public APIs without authentication.
- Implementing requests using API Key and Basic authentication.
- Handling OAuth 2.0, both with built-in helpers for Azure AD and through a manual flow for third-party APIs.
1. The HTTP Action Landscape in Power Automate
Before we dive into a specific implementation, it's important to understand that Power Automate offers several actions for making HTTP requests. Choosing the right one is the first step in building a robust integration.
The video below provides a great overview of the main HTTP-related connectors.
Power Automate HTTP action beginner tutorial
Watch this introductory segment from the video "Power Automate HTTP action beginner tutorial" by Deepak Shrivastava. It will quickly introduce the three primary HTTP connectors we'll be discussing.
Watch from the beginning to 01:17, and then the recap from 17:33 to 18:16. This will frame our discussion by outlining the purpose of each connector.
To summarize, you have three main choices:
- Send an HTTP request to SharePoint: Highly optimized for the SharePoint REST API. It handles authentication seamlessly within the SharePoint context.
- HTTP with Azure AD: Designed for calling APIs secured by Azure Active Directory, most notably the Microsoft Graph API. It simplifies authentication by using the logged-in user's identity or a pre-configured service principal.
- HTTP (Generic): This is the most flexible action and the primary focus of our lesson. It can call any RESTful endpoint and provides several built-in authentication options, or allows you to handle authentication manually.
2. Calling a Public API (No Authentication)
Let's start with the simplest case: a public API that doesn't require any authentication. This allows us to focus on the core mechanics of the generic HTTP action.
The key parameters you'll configure are:
- Method: The HTTP verb (
GET,POST,PUT,PATCH,DELETE). - URI: The URL of the API endpoint.
- Headers: Key-value pairs, such as
Content-Type. - Body: The payload for
POSTorPUTrequests, typically in JSON format. - Queries: URL query parameters, which can be added to the URI or defined in this field.
This video demonstrates a practical example of calling a public API.
Guide to Connecting Any API to Power Platform: Power Automate, Apps, Custom Connectors & Copilot
The following clip from DamoBird365's video, "Guide to Connecting Any API to Power Platform," shows how to use browser developer tools to discover an API and then call it from Power Automate using the HTTP action.
Watch from 00:00 to 03:48. You'll see how to inspect a web page's network traffic to find an API endpoint and then replicate that call in a flow, making parts of the URL dynamic.
This first step is straightforward and serves as a good warm-up for the more complex scenarios involving authentication.
3. Implementing API Key and Basic Authentication
Now, let's add a layer of security. Many APIs use either an API Key or Basic Authentication.
API Key Authentication
An API key is a simple token that the client provides when making API calls. It's often used to identify the calling project for usage and billing purposes. The key is typically sent in one of two ways:
- As a query parameter in the URL (e.g.,
?api_key=YOUR_KEY). - As a custom HTTP header (e.g.,
X-API-Key: YOUR_KEY). Sending the key in the header is generally the more secure and standard practice.
The next segment of the video you just watched demonstrates using an API key as a query parameter.
Guide to Connecting Any API to Power Platform: Power Automate, Apps, Custom Connectors & Copilot
Let's return to the DamoBird365 video to see API key authentication in action with The Movie Database API.
Watch from 05:00 to 07:38. Notice how the API key is obtained from the service provider and included directly in the request URI.
Basic Authentication
This method uses a standard Authorization header containing a Base64-encoded string of username:password. While you could construct this header manually, the Power Automate HTTP action has built-in support for it, which simplifies the process considerably.
The following article provides a clear, practical guide to implementing both Basic Auth and API Key Auth (via headers) in the HTTP action.
MS Power Automate HTTP Request Action Authentication Types
This article by Joe Shields, "MS Power Automate HTTP Request Action Authentication Types," details how to configure the HTTP action for different authentication schemes. It provides excellent, to-the-point examples.
Read the section titled 'Basic Authentication with the MS Power Automate HTTP Request Action'. It covers two essential patterns: Using the built-in 'Basic' authentication type with a username and password (or personal access token). Setting the authentication to 'None' and passing a token (like an API key) in a custom header.
4. Handling OAuth 2.0 Authentication
OAuth 2.0 is the industry standard for authorization. For a developer, handling the OAuth flow is a common task. In Power Automate, you have two primary ways to approach this.
Method 1: Using Built-in Azure AD / OAuth Helpers
For APIs secured with Azure Active Directory (AAD), Power Automate provides fantastic built-in support that handles the token acquisition flow for you.
HTTP with Azure ADConnector: As mentioned earlier, this is the simplest way to call Microsoft Graph. It uses the connection's identity to authenticate automatically. The video below shows how to use it.
Power Automate HTTP action beginner tutorial
Let's revisit the "Power Automate HTTP action beginner tutorial" to see how the HTTP with Azure AD connector works.
Watch from 07:01 to 12:16. The presenter demonstrates calling the Microsoft Graph API to get planner tasks, highlighting the simplicity of this action where authentication is managed for you.
- Generic HTTP action with
Active Directory OAuth: For more control, the generic HTTP action has a dedicated authentication type for AAD. You provide details like the Tenant ID, Audience, Client ID, and Client Secret from an Azure App Registration, and the action performs the token exchange behind the scenes.
MS Power Automate HTTP Request Action Authentication Types
Now, let's look at the article by Joe Shields again to see how to configure the generic HTTP action for Active Directory OAuth.
Read the section 'Azure Active Directory / Oauth2 Authentication with the MS Power Automate HTTP Request Action'. This shows the specific fields you need to configure to connect to an AAD-protected API like Microsoft Graph.
Method 2: The Manual OAuth 2.0 Flow
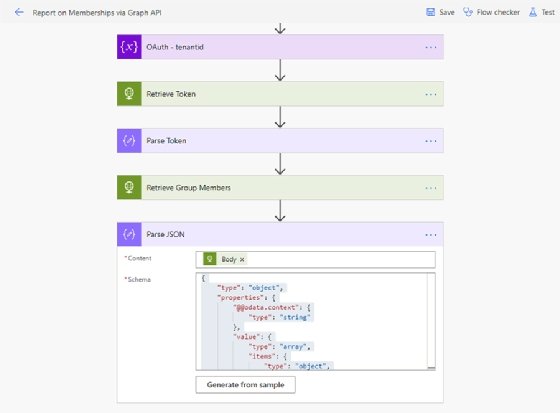
For many third-party APIs that use OAuth 2.0 but are not on Azure AD, you'll need to perform the authentication flow manually. This typically involves a two-step process, which will be very familiar from your .NET development experience:
- Step 1: Get the Bearer Token. Make an initial HTTP
POSTrequest to the API's token endpoint. You'll typically send yourclient_id,client_secret,grant_type(e.g., 'client_credentials'), andscopein the request body. The response will contain anaccess_token. - Step 2: Call the API. Make the actual API call (e.g., a
GETrequest to fetch data), including theaccess_tokenfrom Step 1 in theAuthorizationheader, prefixed with "Bearer ".
This pattern is essential for a Power Platform developer. The following article provides a superb walkthrough.
How to Call API in Power Automate? - IAmMika.blog
The article "How to Call API in Power Automate?" from IAmMika.blog demonstrates this two-step manual OAuth 2.0 pattern perfectly.
Read the sections titled 'Getting the Bearer Token (Authentication)', 'Parsing the Bearer Token', and 'Calling the API Endpoint (POST Request)'. This guide clearly shows: The initial POST request to the token endpoint. Using the Parse JSON action to easily extract the access_token from the response. Using the extracted token in the Authorization header of the subsequent API call.
The flow for this pattern typically looks like this:
Test your understanding!
You need to integrate with a third-party API that uses OAuth 2.0 Client Credentials flow. The API provider gives you a Client ID, a Client Secret, and a token endpoint URL. Which authentication method or pattern would you use in Power Automate, and what would be the sequence of actions?
Show answer
You would use the Manual OAuth 2.0 Flow.
The sequence of actions would be:
- HTTP Action (POST):
- URI: The token endpoint URL.
- Headers:
Content-Type: application/x-www-form-urlencoded. - Body:
grant_type=client_credentials&client_id=YOUR_ID&client_secret=YOUR_SECRET.
- Parse JSON Action:
- Content: The
Bodyfrom the previous HTTP action. - Schema: Define a schema to extract the
access_token.
- Content: The
- HTTP Action (GET/POST/etc.):
- URI: The actual API endpoint you want to call.
- Headers:
Authorization: Bearer @{body('Parse_JSON')?['access_token']}.
This two-step process is the standard way to handle this common authentication scenario in Power Automate.
Conclusion
You've now seen how to use Power Automate's HTTP actions to connect to virtually any REST API, handling the most common authentication schemes. This is a powerful capability that dramatically extends the reach of your automations.
Key Takeaways:
- Choose the right tool for the job: use the specialized SharePoint or Azure AD HTTP actions when applicable, and the generic HTTP action for everything else.
- The generic HTTP action has built-in support for Basic and Active Directory OAuth, which simplifies configuration.
- API Keys can be passed as query parameters or, more securely, as custom request headers.
- For many third-party APIs using OAuth 2.0, you must implement the manual two-step flow: one action to get the token, and a second to use it.
What's Next
While the HTTP action is incredibly flexible, using it repeatedly for the same API across multiple flows can lead to duplicated effort and maintenance headaches. A much more professional and scalable approach is to encapsulate the API's definition and authentication logic into a reusable component.
In our next lesson, we will do exactly that. We'll learn how to create a custom connector for a REST API using API Key or Basic authentication, turning the ad-hoc calls we made today into a first-class citizen in the Power Platform connector ecosystem.