Hello! Welcome back to our journey through Power Automate.
In our last lesson, we built a standard approval workflow, mastering the Start and wait for an approval action and learning how to handle different approval types. However, we hardcoded the approvers' email addresses, which isn't flexible for real-world business applications where roles and responsibilities change.
Today, we'll address that limitation head-on. This lesson is designed to meet the learning outcome: Modify an approval workflow to use dynamic approvers retrieved from a Dataverse table. This moves us from static, brittle flows to dynamic, configuration-driven automations—a core principle of scalable and maintainable system design that is essential for the PL-400 exam.
1. The "Approval Matrix" Pattern in Dataverse
Instead of embedding business logic (like who should approve a request) directly into our flow, a much better practice is to store this information in a configuration table. This is often called an "Approval Matrix." When approval rules change, you simply update a row in a table instead of editing and redeploying the Power Automate flow. Given your background in building configurable systems, you'll recognize this as a key pattern for separating logic from data.
Let's design a simple Approval Matrix table in Dataverse. We could call it Approval Configuration. It would contain the following columns:
- Name (Primary Column, Text): The type of request (e.g., "Expense Report > $1000", "New Hardware Request").
- Approvers (Many-to-Many Relationship to the
Usertable): This allows you to assign one or more users as approvers for this request type. Using a M:N relationship is more flexible than a simple lookup. - Approval Type (Choice): With options like "First to Respond" and "Everyone Must Approve".
- Requires Manager Approval (Yes/No): To handle multi-stage scenarios.
The video below demonstrates this concept perfectly using a SharePoint list. We will adapt this logic for our Dataverse-centric approach.
Dynamic Approvals in Power Automate | SharePoint List based Approval Tutorial
This video from Reza Dorrani is an excellent guide to the entire dynamic approval pattern. First, let's watch the section where he designs the approval matrix. As you watch, imagine creating these columns in a Dataverse table instead of a SharePoint list.
Watch from 01:05 to 03:18. Pay attention to the columns he creates and the purpose of each one. This forms the blueprint for our dynamic approval logic.
2. Retrieving Approval Configuration and Approvers
With our Approval Matrix table designed, the first step in our flow (right after the trigger) is to fetch the correct configuration for the incoming request.
For this, we'll use the Dataverse List rows action.
-
Filter the Configuration: We'll use the
Filter Queryfield to find the specific row in ourApproval Configurationtable that matches the request. For example, if our trigger is "When a row is added" for an Expense Report table, and the report'sCategoryis 'Travel', our filter query might look likecrXXX_name eq 'Travel Expense'. This is the OData syntax equivalent of aWHEREclause in SQL. -
Extract the Emails Efficiently: A naive approach would be to get the configuration row, then loop through the related approvers and use a
Get a row by IDaction on the User table for each one to get their email. This is inefficient, slow, and can quickly burn through your Power Platform API request limits.A much more professional and performant method is to use an
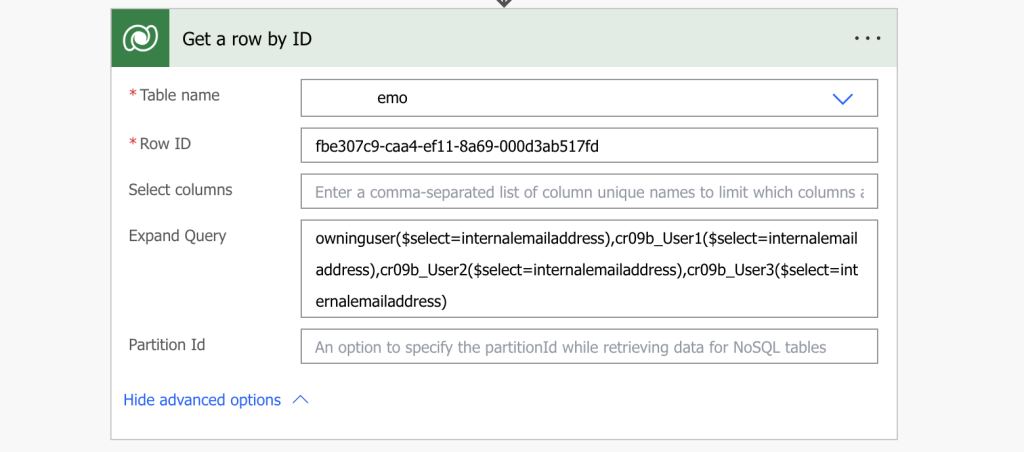
Expand Query. This powerful OData feature allows you to retrieve data from related tables in a single call. In ourList rowsaction, we can expand the N:N relationship to the User table to pull back the approvers' emails simultaneously.
The article below explains this concept clearly.
Get email of user stored in Dataverse column with Power Automate
This article from Tom Riha explains how to use the Expand Query to efficiently fetch email addresses from related User records in Dataverse. This is a critical performance optimization technique.
Read the section 'Use the Expand query'. Note the syntax: relationship_schema_name($select=internalemailaddress). This is the key to avoiding extra API calls.
Here is an image showing what this looks like in the flow designer. Note how multiple user fields are being expanded in one go.
3. Formatting Approver Emails for the Approval Action
The Expand Query will give us an array of User objects, each containing an email address. However, the 'Start and wait for an approval' action requires a single string of semicolon-separated email addresses in its Assigned to field.
To transform our array into this string, we use a two-step pattern:
- Select Action: This data operation takes an array and creates a new array containing only the properties you specify. We'll use it to create a simple array of just the email addresses.
join()Expression: This expression takes an array and a separator and concatenates the array items into a single string.
The following video segment demonstrates this Select and Join pattern, along with how to dynamically set the approval type.
Dynamic Approvals in Power Automate | SharePoint List based Approval Tutorial
Let's return to Reza Dorrani's video. He demonstrates exactly how to query the matrix, extract and format the approver emails, and dynamically configure the approval action.
Watch from 03:42 to 05:05 and then from 09:20 to 12:20. Focus on: Querying the matrix (Get items in SharePoint is equivalent to List rows in Dataverse). Extracting the configuration for a single record using a Compose action and the first() expression. Using the Select action to create an array of approver emails. Using the join() expression to create the semicolon-separated string of emails. Dynamically setting the Approval Type using an if() expression. This is an advanced technique you can use instead of a Condition/Switch block.
Test your understanding!
Your List rows action (with an Expand Query) returns an array of User objects in a Compose action named Approval Config. The output looks like this:
[
  {
    "crXXX_approvers": [
      { "internalemailaddress": "alice@example.com" },
      { "internalemailaddress": "bob@example.com" }
    ]
  }
]
- What expression would you use in a
Selectaction'sFromfield to get the array of approvers? - What expression would you use in the
Mapfield of thatSelectaction to extract the email address? - What expression would you use to join the output of the
Selectaction (let's say it's namedSelect_Emails) into a string for the approval action?
Show answer
- From field:
first(outputs('Approval_Config'))?['crXXX_approvers'](This gets the first item from the main array and then accesses thecrXXX_approversproperty, which is our array of users). - Map field:
item()?['internalemailaddress'] - Join expression:
join(body('Select_Emails'), ';')
4. Updating the Dataverse Record
After the approval is complete, the final step is to update the original Dataverse record with the outcome. As we saw in the previous lesson, we use a Condition to check the Outcome of the approval and then use the Update a row action.
A common challenge when using the Update a row action is providing the correct Row ID. You must pass the unique identifier (GUID) of the record that triggered the flow.
This short video demonstrates the full Dataverse-centric pattern, including the crucial step of correctly identifying the Row ID for the update action.
Power Automate Approval Flow on Dataverse tables
This video provides a concise walkthrough of an approval flow triggered from Dataverse, including how to update the original record.
Watch from 05:20 to 09:55. Although the video uses a static approver, pay close attention to how the presenter correctly gets the Row ID of the triggering record using a Compose action and the expression triggerOutputs()?['body/your_table_id']. This is a vital detail for making your Dataverse flows work.
Conclusion
Today we have significantly leveled up our approval workflow. By externalizing the approval rules into a Dataverse configuration table, we've created a solution that is robust, scalable, and easy to maintain.
Key Takeaways:
- The Approval Matrix pattern separates your business rules from your automation logic, a professional development best practice.
- Use the
List rowsaction with aFilter Queryto retrieve the specific approval configuration for a request. - Leverage the
Expand Queryto fetch data from related tables (like User emails) in a single, performant API call. - Use the
Selectandjoin()pattern to transform the array of approver objects into the semicolon-separated string required by the approval action. - Remember to use the correct trigger output to get the
Row IDwhen updating the original Dataverse record.
What's Next
So far, our flows have primarily interacted with services that have pre-built connectors like Dataverse and Approvals. But what happens when you need to connect to a custom in-house API or a third-party service that doesn't have a dedicated connector?
In our next lesson, we will begin Module 7 by learning how to use the generic HTTP action to call external REST APIs. This will open up a vast new world of integration possibilities for your Power Automate flows.