Hello! Welcome to our next lesson on building with Power Automate.
In our last session, we mastered the art of creating modular and reusable logic with child flows. We saw how breaking down large processes makes them more maintainable and scalable—a principle you're very familiar with from your work in C# and JavaScript development.
Today, we'll dive into one of the most common and essential automation patterns: approvals. This lesson directly addresses the learning outcome: Implement a standard approval workflow using the Power Automate Approvals connector. While you've likely built approval-style logic using classic Dynamics 365 workflows, the modern Approvals connector in Power Automate offers a much more powerful, flexible, and user-friendly experience across the Microsoft 365 ecosystem. This is a foundational skill for the PL-400 exam and for building robust business applications on the Power Platform.
1. The Anatomy of a Standard Approval Flow
At its core, a standard approval workflow follows a predictable pattern:
- Trigger: An event occurs that requires an approval (e.g., a new record is created, a file is uploaded, a button is clicked).
- Start Approval: An approval task is created and assigned to one or more people. The flow then pauses and waits for them to respond.
- Process Outcome: Once the approvers have responded, the flow resumes.
- Conditional Logic: The flow checks the outcome (e.g., 'Approve' or 'Reject') and takes different actions based on the decision.
- Final Actions: The flow performs final tasks, such as notifying the original requestor or updating the status of the source record.
To get a quick overview of this structure from Microsoft's official documentation, let's review a short guide.
Create and test an approval workflow with Power Automate
This Microsoft Learn article outlines the quintessential approval workflow. It uses SharePoint as an example, but the core principles are the same for any data source, including Dataverse.
Please read the initial overview section ('Create an approval flow') to see the high-level steps. Then, quickly scan the sections 'Add an approval action' and 'Add an email action for approvals' to familiarize yourself with the main components: the 'Start and wait for an approval' action and the 'Condition' that follows it. Don't worry about the step-by-step details; we will cover those in a video.
2. Building a Practical Approval Flow with Dataverse
Now, let's build this out in a context that's highly relevant to your background: a Dataverse-triggered approval. We'll follow a great tutorial from Reza Dorrani that showcases a leave request system.
This video is packed with practical techniques, so we'll watch it in segments to focus on specific concepts.
Power Automate: Send Approval Responses in HTML Email
First, let's see how to initiate the flow from a new Dataverse record and configure the most common approval action, 'Start and wait for an approval'.
Watch the video from 00:37 to 05:39. Pay close attention to: The trigger: 'When a row is added, modified or deleted' for a Dataverse table. The 'Start and wait for an approval' action and its key parameters: Approval type, Title, and Assigned to. The Condition control that checks the Outcome dynamic property from the approval action. Notice the best practice of checking if the outcome does not contain 'Reject' to handle the 'Everyone must approve' case.
The core of the logic lies in checking the Outcome property. The value of this property depends on the approval type and the responses received. For the simple 'Approve/Reject' types, the outcome will be a simple string like "Approve" or "Reject".
3. Exploring Different Approval Types
The "standard" approval can take several forms depending on the business need. The Start and wait for an approval action provides several built-in types to handle these scenarios without complex custom logic.
Let's explore the most common ones using the same video.
Power Automate: Send Approval Responses in HTML Email
Now, let's examine the different approval types available and see how they behave. The video does an excellent job of demonstrating each one.
Please watch from 13:08 to 18:47. The video will walk you through: Approve/Reject - First to respond (13:08): The first response determines the entire outcome. Useful when any single person from a group can authorize a request. Custom Responses - Wait for all responses (14:29): Allows you to define your own options (e.g., 'Yes', 'No', 'Needs More Info') and waits for everyone to reply. Sequential Approval (16:32): Creates a multi-stage approval process where the request moves from one approver (or group) to the next only upon approval. This is a very powerful pattern for hierarchical approvals.
The sequential approval pattern is a common requirement in enterprise scenarios. The flowchart below clearly visualizes how such a process works, with decision points at each stage.
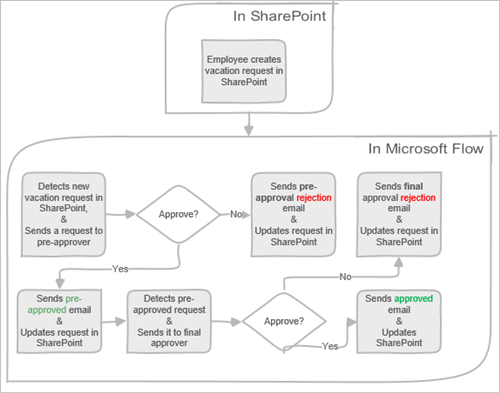
4. Enhancing Notifications with Detailed Responses
For auditing and transparency, simply telling a user their request was "Approved" is often not enough. You need to provide details: who approved it, when, and what comments they left.
The Start and wait for an approval action returns a rich array of data called Responses that contains all of this information. You can parse this array to build detailed, professional notifications.
Power Automate: Send Approval Responses in HTML Email
This is a key technique for professional-grade flows. Let's watch how to transform the raw 'Responses' data into a clean, formatted HTML table to include in an email.
Watch the video from 06:58 to 10:13. This is a crucial section. Focus on: The use of the 'Create HTML table' action. Setting the 'From' field to the Responses dynamic content. Manually defining columns (Header and Value) to select specific data from the responses array, like responses approver name, responses approver response, and responses comments. Adding some basic CSS in a 'Compose' action to style the table.
This technique elevates your flow from a simple notification to a comprehensive communication tool. It's a practice-focused detail that adds significant business value and is exactly the kind of implementation knowledge tested in the PL-400 exam.
Test your understanding!
You've set up an 'Approve/Reject - Everyone must approve' workflow for a document review assigned to three people: Alice, Bob, and Charlie.
- Alice approves with the comment "Looks good."
- Bob approves with the comment "Minor typo on page 2, but okay to proceed."
- Charlie rejects with the comment "Financial data is incorrect, needs rework."
- What will be the final
Outcomeof the 'Start and wait for an approval' action? - If you use the 'Create HTML table' action on the
Responsesarray, how many rows will the resulting table have? - Which branch of your
Conditionwill the flow execute: the 'If yes' (True) or 'If no' (False) branch, assuming your condition isOutcome is equal to 'Approve'?
Show answer
- The final
Outcomewill be 'Reject'. Because the approval type is 'Everyone must approve', a single rejection is enough to cause the entire approval to be rejected. - The HTML table will have three rows, one for each person's response (Alice, Bob, and Charlie). The
Responsesarray captures every individual response regardless of the final outcome. - The flow will execute the 'If no' (False) branch, because the
Outcome('Reject') is not equal to 'Approve'.
Conclusion
In this lesson, we have implemented a complete, standard approval workflow. You have seen how to trigger the process, configure the core Start and wait for an approval action, and handle the results.
Key Takeaways:
- The standard approval pattern consists of a Trigger, the
Start and wait for an approvalaction, and a Condition to process theOutcome. - The Approvals connector supports multiple scenarios out-of-the-box, including first-to-respond, everyone must approve, and sequential approvals.
- The
Responsesoutput property is a powerful array containing detailed information about each approver's decision, which can be formatted into an HTML table for professional email notifications. - Thinking back to our last lesson, this entire approval process could be encapsulated within a child flow to create a standardized, reusable "Approval Service" for your organization.
What's Next
So far, we've assigned approvals to hardcoded email addresses. In a real-world application, the approver is often determined by the data itself (e.g., the requestor's manager, a department head, or a project owner).
In our next lesson, we will build directly on what we learned today to modify an approval workflow to use dynamic approvers retrieved from a Dataverse table. This will make our automations truly dynamic and adaptable to changing business structures.