Hello! Welcome to the next lesson in your advanced Power Platform journey.
In our last session, we created custom connectors using API Key and Basic authentication, providing a reusable and simplified way to interact with APIs. While effective for many services, these methods don't support the common scenario where an application needs to act on behalf of a user in a secure, consent-based manner.
Today, we will address that gap by tackling a crucial industry-standard protocol. This lesson directly addresses the learning outcome: Configure OAuth 2.0 authentication for a custom connector to securely connect to a third-party service.
OAuth 2.0 is the framework that allows services like Google, Microsoft, or LinkedIn to grant limited access to your data without you having to share your password. Mastering its configuration is essential for a Power Platform developer and a key topic for your PL-400 exam. The process is more involved than what we've seen before, typically requiring a two-part setup:
- Registering an application with the identity provider (e.g., Microsoft Entra ID, Google Identity Platform).
- Configuring the custom connector in the Power Platform with the details from the app registration.
Your experience with REST APIs and application architecture will be beneficial here, as you'll recognize the patterns of client IDs, secrets, and callback URLs.
1. Understanding the OAuth 2.0 Authorization Code Flow
Before diving into the configuration, it's helpful to understand the "dance" that happens behind the scenes. The most common OAuth 2.0 flow used by connectors is the Authorization Code Grant. Here's a high-level overview of the steps:
- Authorization Request: A user in a Power App or Power Automate flow triggers an action that requires access to an external service. The Power Platform redirects the user to the service's Authorization URL.
- User Consent: The user signs in and grants the application the permissions it's requesting (defined by the Scope).
- Authorization Code: The service redirects the user back to the Power Platform's Redirect URL, providing a temporary authorization code.
- Token Exchange: The Power Platform backend sends the authorization code, along with its own Client ID and Client Secret, to the service's Token URL.
- Access Token: The service validates the information and, if correct, issues an Access Token and a Refresh Token.
- API Call: The Power Platform uses the Access Token to make authenticated calls to the target API on behalf of the user. When the token expires, it uses the Refresh Token to get a new one without requiring the user to sign in again.
This flow ensures that the user's credentials are never exposed to the Power App or flow itself.
2. Case Study: Connecting to a Microsoft Service with Microsoft Entra ID
The most frequent use case you'll encounter is connecting to a service secured by Microsoft Entra ID (formerly Azure Active Directory), such as Microsoft Graph or the Azure Resource Manager API.
The following Microsoft Learn article provides a complete walkthrough. We will break it down into its three crucial parts.
Authenticate your API and connector with Microsoft Entra ID
This article, "Authenticate your API and connector with Microsoft Entra ID," will be our primary guide. It details the end-to-end process of setting up an app registration and configuring the connector.
Read the sections titled 'Enable authentication in Microsoft Entra ID', 'Create a custom connector', and 'Set the reply URL in Azure'. We will discuss the key steps from each section.
Step A: Register the Application in Azure
First, you must register your connector as an application within Microsoft Entra ID. This registration establishes a trust relationship and provides the credentials your connector will use.
As you read in the 'Enable authentication in Microsoft Entra ID' section of the article, this process involves:
- Navigating to App registrations in the Azure portal.
- Creating a new registration and giving it a name.
- Copying the Application (client) ID. This uniquely identifies your application.
- Granting it delegated permissions to the target API (e.g.,
Access Azure Service Management as organization users). - Creating a new client secret. This is a password for your application. Crucially, you must copy this value immediately as it will be hidden forever after you navigate away.
Step B: Configure the Custom Connector Security
Next, you use the credentials from the app registration to configure your custom connector.
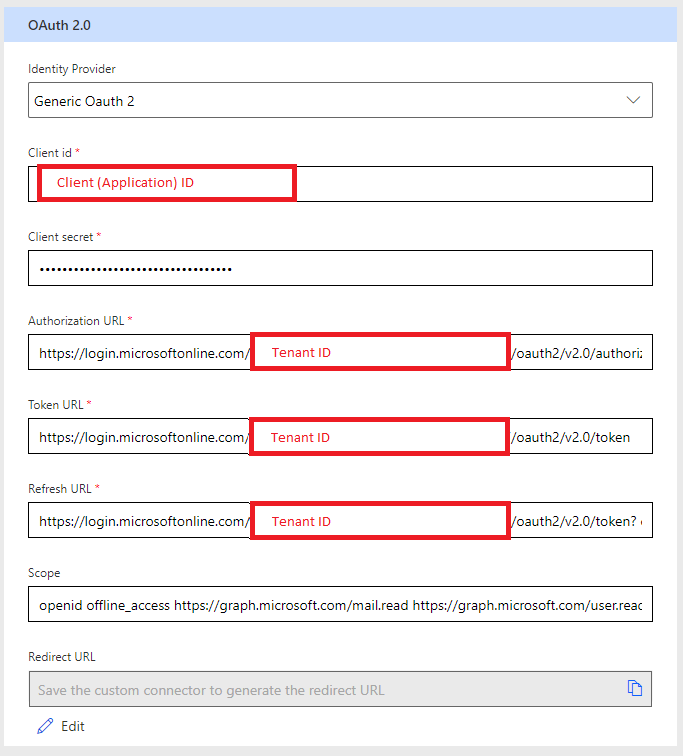
Following the steps in the 'Create a custom connector' section of the article, you'll populate the Security tab as follows:
- Authentication type:
OAuth 2.0 - Identity Provider:
Azure Active Directory - Client id: The Application (client) ID you copied from your app registration.
- Client secret: The client secret value you copied.
- Resource URL: The unique URI that identifies the target API. For Microsoft Graph, this is
https://graph.microsoft.com. For the Azure Resource Manager API used in the article, it'shttps://management.core.windows.net/. - Scope: You can leave this blank when using the
Azure Active Directoryprovider, as permissions are managed by the API Permissions in the app registration itself.
After you fill in these details and save the connector, a Redirect URL will be generated. This URL is the key to the final step.
Step C: Complete the Loop - Set the Redirect URL
The final, critical step is to inform Microsoft Entra ID that it's safe to send authorization codes back to the Power Platform. You do this by adding the connector's Redirect URL to your app registration in Azure.
As detailed in the 'Set the reply URL in Azure' section, you must:
- Copy the Redirect URL from the custom connector's Security page.
- Go back to your app registration in the Azure portal.
- Navigate to the Authentication tab.
- Click Add a platform, select Web, and paste the Redirect URL into the Redirect URIs field.
- Save the changes.
This completes the configuration loop. Your connector is now ready to be tested and used.
3. Generalizing the Pattern for Third-Party Services
The same OAuth 2.0 pattern applies to non-Microsoft services like Google, Spotify, or Twitter. The main difference is that you'll get your credentials and endpoint URLs from that service's developer portal and use the "Generic" OAuth 2.0 provider in the connector settings.
This blog post provides an excellent example using the Google Photos API.
Configuring OAuth 2.0 Authentication for Microsoft Power Platform Custom Connectors
To see how this pattern applies to other services, read this post from the Microsoft Tech Community. It demonstrates the same concepts using Google's API.
Read the sections titled 'First step [1]' and 'Second Step [2]'. Focus on how the core OAuth 2.0 parameters are identified from the API's documentation and mapped to the connector settings.
As the article illustrates, the key differences are:
- Identity Provider: You select
Generic Oauth 2. - Authorization URL, Token URL, Refresh URL: You must get these specific URLs from the third-party API's documentation.
- Scope: You must provide a space-separated list of permission strings defined by the API (e.g.,
https://www.googleapis.com/auth/photoslibrary.readonly).
The fundamental process remains the same: create an application in the provider's portal, configure the connector with the provided credentials and URLs, and finally, add the connector's Redirect URL back into the provider's application settings.
Test your understanding!
You are building a custom connector for a third-party API that uses OAuth 2.0. You have configured the Client ID and Client Secret, but when you test the connection, you are successfully redirected to the API's login page, you approve the consent, but then you are met with an error page from the API provider saying "invalid_redirect_uri" or "redirect_uri_mismatch".
What is the most likely cause of this error, and what single step did you probably forget?
Show answer
The most likely cause is that you forgot to complete the final step of the configuration loop. After creating the custom connector in the Power Platform, it generates a unique Redirect URL. You must copy this URL and add it to the list of authorized redirect URIs in the application's configuration within the third-party API's developer portal. This error occurs because the API provider does not recognize the Power Platform URL as a valid destination to send the authorization code to after the user gives consent.
4. Advanced: Service Principal Authentication
For scenarios that don't involve a signed-in user (e.g., automated, backend processes), you can enable Service Principal authentication. This uses application permissions instead of delegated user permissions.
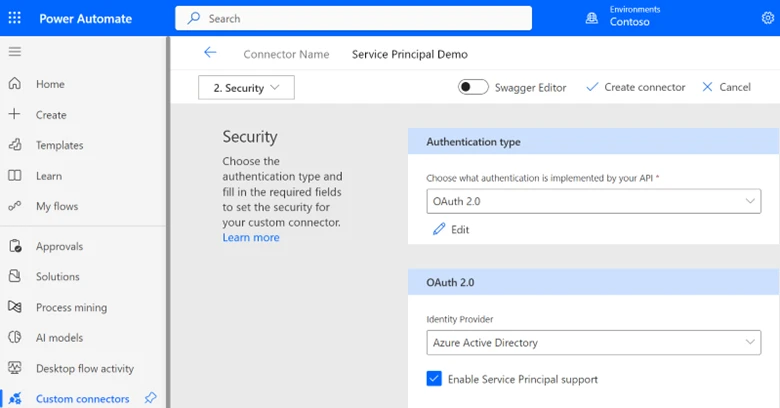
This is an advanced topic but is good to be aware of for enterprise scenarios, aligning with professional DevOps and ALM practices. It requires configuring "Application permissions" (instead of "Delegated permissions") in your Entra ID app registration and granting admin consent.
Conclusion
You have now learned how to implement the most common and secure authentication standard for modern APIs: OAuth 2.0. This is a significant step up from the simpler authentication methods and is a core competency for a Power Platform developer.
Key Takeaways:
- OAuth 2.0 enables secure, delegated access to APIs without sharing user credentials.
- Configuration is a two-part process: registering an application with the identity provider (e.g., Microsoft Entra ID) and configuring the custom connector.
- The Redirect URL is the critical link that connects the Power Platform to the identity provider, and it must be configured in the app registration.
- The core parameters are the Client ID, Client Secret, Authorization URL, Token URL, and Scope.
- The pattern is the same whether connecting to a Microsoft service or a third-party API.
What's Next
So far in this module, we've built a solid foundation for creating custom connectors and securing them with various authentication methods. In the next lesson, we will shift our focus back to the Definition tab of the custom connector wizard. We will learn how to define actions, triggers, and parameters, including how to handle dynamic values and create more sophisticated and flexible connector operations.