Hello! Welcome back to our series on advanced Power Platform development.
In the last lesson, we focused on the Security tab of the custom connector wizard, configuring the robust OAuth 2.0 protocol to handle user-delegated authentication. Now that we know how to establish a secure connection, it's time to define what our connector can actually do.
This lesson moves to the heart of the connector's functionality, the Definition tab. We will directly address the learning outcome: Define actions, triggers, and parameters in a custom connector definition.
Think of the work we've done so far as setting up the connection string to a database. Today, we're writing the functions that will actually query and manipulate the data. For your PL-400 exam, a deep understanding of how to map an API's capabilities to a connector's definition is fundamental. Your background in C# and API development will be a great asset here; you'll find that defining an action is conceptually similar to defining a public method in a class, complete with parameters and a return type.
We will cover:
- Creating actions to expose the API's operations to Power Apps and Power Automate.
- Configuring request and response parameters to create a user-friendly experience.
- Understanding the two types of triggers—Polling and Webhook—that can initiate Power Automate flows.
1. The Anatomy of a Connector Definition
After configuring the General and Security tabs, you land on the Definition tab. This is where you bring your connector to life.

Here, you will define two primary components:
- Actions: These are the operations the connector can perform, initiated by a user or another process. They are the "verbs" of your connector, corresponding directly to API calls like
GET /users/{id}orPOST /orders. Actions can be used in both Power Apps and Power Automate. - Triggers: These are events that start a Power Automate flow. For example, a flow could be triggered "When a new file is added" in a custom storage system. Triggers are only for Power Automate.
2. Defining Actions: The Core of Your Connector
Actions are the most common component you'll create. Let's walk through the process of defining one.
The most efficient way to define an action is using the Import from sample feature. This lets Power Platform infer the parameters and response schema directly from a sample API call.
Create a custom connector from scratch
The Microsoft Learn documentation provides a clear, step-by-step guide on this process. We'll use it as our reference text.
Read the sections 'Create an action' and 'Update the definition'. Pay close attention to how the request and response are defined using sample JSON, and how the parameters are later refined.
Step-by-Step: Creating an Action
Let's break down the process you just read about.
-
General Information: You start by providing metadata for your action:
- Summary: A short, user-friendly description of what the action does (e.g., "Get my user profile"). This appears as the action title in Power Automate/Apps.
- Description: A more detailed explanation.
- Operation ID: A unique internal name for the action, like a method name in C#. It must be unique within the connector (e.g.,
GetUserProfile). - Visibility: Controls how the action appears to the end-user (
none,advanced,internal).internalis useful for helper actions that shouldn't be exposed directly.
-
Request: This defines the API call itself.
- Click Import from sample.
- Verb: Select the HTTP method (
GET,POST,PUT,DELETE, etc.). - URL: Paste the full request URL, including any query parameters (e.g.,
https://api.example.com/v1/users?status=active). - Headers: Add any required headers (e.g.,
Content-Type). - Body: For
POSTorPUTrequests, paste a sample JSON body.
The platform will parse this information to identify path parameters (like
{id}in/users/{id}), query parameters, and the body schema. -
Response: This defines the structure of the data returned by the API.
- Click Add default response.
- Paste a sample JSON response from the API.
- Click Import.
This step is crucial. Defining the response creates a schema that Power Apps and Power Automate use to understand the output. It's what populates the "Dynamic content" list in Power Automate and allows you to reference output properties with dot notation (e.g.,
MyConnector.MyAction().User.DisplayName) in Power Apps.
A Practical Demonstration
The following video provides an excellent demonstration of creating both a simple GET action and a more complex POST action with a request body, and then refining the parameters.
Power Platform Custom Connectors (Power Apps, Power Automate)
Watch this segment from Deepak Shrivastava's video. It walks through creating two actions for the Microsoft Graph API and shows how to improve the user experience by editing the generated parameters.
Watch from 00:13:18 to 00:21:09. Observe how he first creates a simple 'My Profile' GET action. Then, pay close attention to how he creates a 'Search' POST action and subsequently hides the 'Content-Type' parameter from the end user by setting its visibility to 'internal' and providing a default value.
Test your understanding!
You are defining an action for an API that requires a Content-Type header with a fixed value of application/json for all POST requests. After importing your request from a sample, you notice that the Content-Type header appears as a field that the end-user must fill in.
How would you configure this parameter so that it is always sent with the correct value but is hidden from the user in Power Apps and Power Automate?
Show answer
You would edit the Content-Type parameter in the Request section. In the parameter's properties, you would:
- Set the Default value to
application/json. - Set Is required? to "Yes".
- Change the Visibility to "internal".
This ensures the correct header is always sent without cluttering the user interface with a technical detail they don't need to manage.
3. Defining Triggers: Starting Automated Workflows
While actions are initiated by a user, triggers start a flow automatically in response to an event. There are two types.
Custom Connectors – Deep Dive & Demo
To understand the fundamental concepts of triggers, let's watch this brief explanation from the Microsoft Power Platform channel.
First, watch from 00:02:28 to 00:03:50 for a clear definition of actions versus triggers. Then, jump to 00:09:55 and watch until 00:13:17 for a detailed breakdown of the two trigger types: Polling and Webhook.
A. Polling Triggers
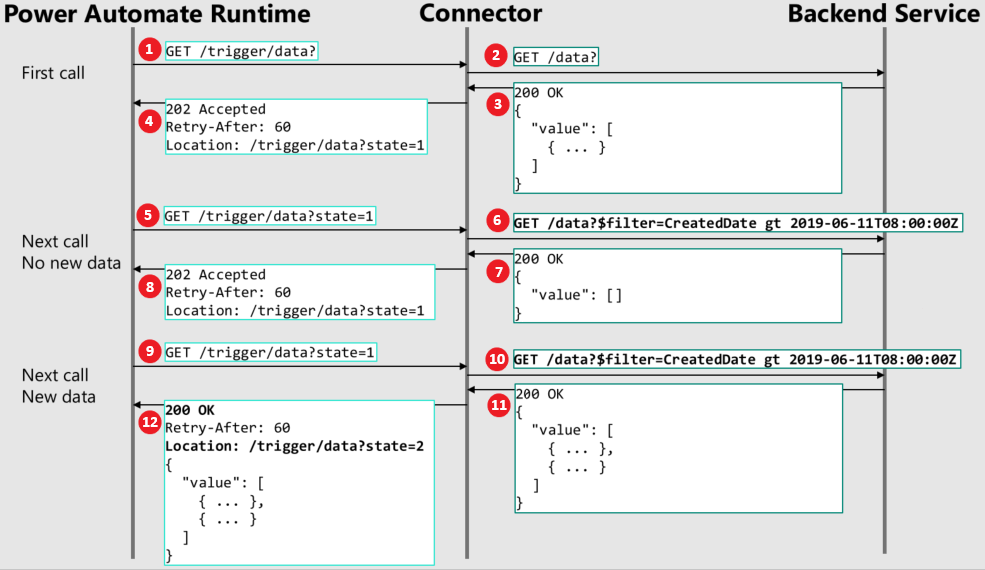
This is the most common type of trigger. It works by having Power Automate call your API at a regular interval (e.g., every 5 minutes) to check for new items.
To implement a polling trigger, your API needs an endpoint that can return items created or modified since a certain point in time. For example, GET /invoices?modified_since={timestamp}.
When you configure the polling trigger, you specify:
- The action that fetches the new data.
- The parameter in that action that will receive the timestamp or token from the previous poll (the "trigger state").
- The array in the response that contains the new items. Power Automate will run the flow once for each item in this array.
B. Webhook Triggers
Webhooks (or "push" triggers) are more efficient. Instead of Power Automate polling your service, your service notifies Power Automate when an event occurs.
To implement a webhook trigger, your API must have a specific contract:
- An endpoint to register a webhook (a
POSTrequest), where Power Automate can send a callback URL. - An endpoint to unregister a webhook (a
DELETErequest), which Power Automate calls when the flow is turned off or deleted.
When the event happens on your backend, your service makes a POST request to the stored callback URL with the event payload. This is a more advanced pattern that requires control over the source API's architecture.
4. Hands-On Lab Example
The best way to solidify these concepts is to see them in a practical lab context. The official PL-400 labs include an excellent exercise where you build a custom connector for an Azure Function.
Practice Lab: Create the Custom Connector
This lab exercise provides a complete, hands-on scenario. You'll create a custom connector for an Azure Function that calculates a value, securing it with an API key and defining a POST action.
Read through 'Exercise 7: Create the Custom Connector'. This task consolidates everything by having you create the connector, add API key security, and then define a POST action by importing a sample request and response.
This lab exercise perfectly illustrates the workflow: create the connector, configure security, and then use the Definition tab to define a POST action, importing the request body and the expected response structure from sample JSON.
Conclusion
You have now learned how to use the Definition tab to give your custom connector its purpose. By defining actions and triggers, you expose an API's functionality to the Power Platform, enabling powerful new integrations and automations.
Key Takeaways:
- Actions are user-initiated operations that map to API endpoints; they are the core functions of your connector.
- Triggers are events that automatically start a Power Automate flow. They can be Polling (periodic checks) or Webhook (push notifications).
- Using Import from sample for both the Request and Response is the most effective way to build your definitions.
- Defining a Response is critical for making the output data available as structured objects and dynamic content in apps and flows.
- Refining parameters (setting default values, visibility, etc.) is key to creating a polished, user-friendly connector.
What's Next
We have defined the basic structure and behavior of our connector's operations. But what if we need to modify the request or response in flight? For example, what if we need to add a timestamp to every outgoing request or reformat a date in the response?
In our next lesson, we will explore this by learning how to implement policy templates to modify the behavior of a custom connector at runtime. This adds another layer of powerful, no-code transformation capabilities to your connectors.