Hello! Welcome back to our advanced Power Platform developer course.
In our last lesson, we empowered our copilot to provide intelligent answers by connecting it to knowledge bases like SharePoint using Generative Answers. We focused on enabling the copilot to retrieve and summarize information.
Today, we take the next logical step: we will teach our copilot how to take action. You will learn how to extend Copilot Studio capabilities with plugin actions built from custom connectors or Power Automate flows. This moves your copilot from being an informational resource to a functional assistant that can interact with other systems to perform tasks, a critical skill for passing the PL-400 exam and for building powerful enterprise solutions.
1. From Answering to Acting: Introducing Plugin Actions
Plugin actions are reusable components—like Power Automate flows, custom connectors, or even pre-built Power Platform connectors—that your copilot can intelligently call upon to fulfill a user's request.
The key technology that makes this so powerful is Dynamic Chaining. Unlike classic bots where you had to define rigid trigger phrases for every topic, dynamic chaining allows the copilot's underlying Large Language Model (LLM) to:
- Infer the user's intent from natural conversation.
- Identify the correct plugin action to call from the available tools.
- Extract the necessary parameters from the user's message.
- Prompt the user for missing information if needed.
- Execute the action.
This architecture allows for much more fluid and natural conversations, where the copilot can seamlessly transition between providing information and performing actions.

The user interface for adding these actions makes the concept clear. You select from available "tools" to grant your copilot new abilities.
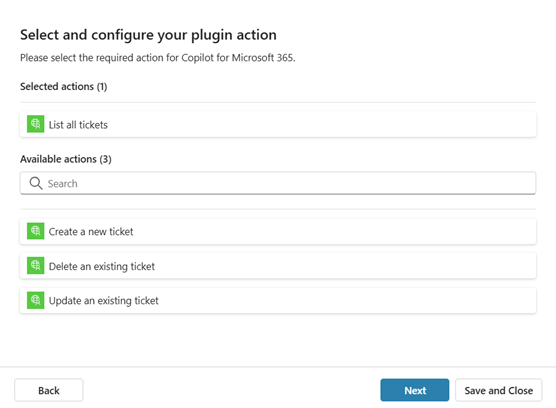
To begin, let's watch a short video that explains the concept of plugins and the magic of dynamic chaining.
Chat with external systems using plugin actions (preview) in Copilot Studio 😎
Scott Durow, a leading expert in the Power Platform community, provides a concise explanation of what plugin actions are and how they empower copilots.
Watch from 0:14 to 4:30. Focus on: The different types of plugins available. The explanation of 'Action Plugins' for custom copilots. The concept of 'dynamic chaining' and how it eliminates the need for rigid, linear conversation design. This is a significant evolution from the classic workflow and plugin development you're familiar with in Dynamics 365.
2. Extending with Custom Connectors
Given your extensive background in C# and developing with REST APIs, using custom connectors will be a natural way for you to extend Copilot Studio. A custom connector is essentially a wrapper around a REST API that allows it to be used easily within the Power Platform, including as a plugin action for your copilot.
The process involves these main steps:
- General: Provide basic information like an icon, description, and the API's host and base URL.
- Security: Define the authentication method (e.g., API Key, OAuth 2.0).
- Definition: Define the actions (API operations) your connector can perform. For each action, you specify the request (verb, URL, headers, body) and a sample response. This is analogous to defining the method signatures and data contracts in a C# interface.
- Test: Validate the connector to ensure it works as expected.
For a detailed, step-by-step guide you can refer to later, the Microsoft Learn article "Create a custom connector from scratch" is an excellent resource.
Now, let's see this in action. The following video segment demonstrates building a plugin action based on a custom connector that connects to a custom API for managing orders.
Chat with external systems using plugin actions (preview) in Copilot Studio 😎
Continuing with Scott Durow's video, this part provides a practical, end-to-end demonstration of integrating a custom connector as a plugin action.
Watch from 4:30 to 12:10. Pay close attention to: The Setup (4:30-6:14): Notice how a standard custom connector is used first in a Power App and then repurposed for the copilot. Adding the Plugin (6:14-7:56): See how the custom connector's actions are selected and how descriptive text is added to help the AI understand what the action does and what its parameters mean. Dynamic Chaining in Action (7:56-11:00): This is the key part. Observe how enabling 'dynamic chaining' allows the copilot to invoke the correct action based on natural language, maintain context, and ask for missing parameters (like the Order ID). Customizing the Response (11:00-12:10): The demonstration of using an Adaptive Card for the response is a great example of creating a richer user experience, using Power Fx to format the output from the API call.
Test your understanding!
You have built a custom connector with an action UpdateOrderStatus that requires two parameters: orderId (number) and newStatus (text). You've added it as a plugin action to your copilot and enabled dynamic chaining.
A user types: "Please update order 12345 to shipped." The copilot correctly calls the action.
Later, another user types: "Set the status of my order to delivered." What will the copilot's most likely next response be, and why?
Show answer
The copilot will most likely respond by asking for the Order ID (e.g., "What is the ID of the order you want to update?").
Because dynamic chaining is enabled, the copilot understood the user's intent to call the UpdateOrderStatus action and successfully extracted the newStatus parameter ("delivered"). However, the orderId parameter was missing from the user's message. Instead of failing, the copilot intelligently prompts the user for the missing required information before executing the action.
3. Extending with Power Automate (Agent Flows)
While custom connectors are perfect for exposing a specific API, you'll often need to perform more complex, multi-step business logic. This is where Agent Flows come in. An Agent Flow is a special type of Power Automate cloud flow that is designed to be called by a copilot.
You should choose an Agent Flow over a custom connector when you need to:
- Orchestrate a sequence of actions across multiple services (e.g., Dataverse, SharePoint, Outlook, Teams).
- Implement complex conditional logic (if/else, switch cases).
- Leverage the vast library of over 1000 pre-built connectors available in Power Automate.
- Incorporate AI Builder actions or advanced approval processes within your automation.
Agent Flows are created directly within the Copilot Studio interface and are solution-aware by default. A key difference from standard flows is that they are triggered by the agent and can receive inputs from, and return outputs to, the copilot conversation.
The following practical lab guide will walk you through building an Agent Flow that posts an Adaptive Card to a Teams channel. While the full lab describes an autonomous agent, we will focus on the part that is directly relevant to our learning outcome: creating a flow that is used as a tool.
Lab 4.2 - Notify a Teams channel using an adaptive card
This lab from the 'Agent Academy' provides a hands-on exercise for creating an Agent Flow. We will focus on the second part of the lab, which details the creation of a flow that acts as a tool.
Please read and follow the steps in 'Lab 4.2 - Notify a Teams channel using an adaptive card'. Focus on these key steps: Creating the Agent Flow: Notice it starts from the 'Tools' section of a copilot. Defining Inputs: See how input parameters (ResumeId, ResumeTitle, etc.) are defined in the 'When an agent calls the flow' trigger. This is how the copilot passes data into the flow. Performing Actions: The flow uses the 'Post card in a chat or channel' action, populating an adaptive card with the input parameters. Responding to the Agent: The flow ends by sending an output back, which can be used to confirm completion to the user. This lab provides an excellent, self-contained example of building a reusable Power Automate action for your copilot.
Conclusion
In this lesson, we have significantly expanded our copilot's abilities, moving it from a passive information provider to an active participant in business processes. You've learned how to connect it to the outside world and give it the power to execute tasks.
Key Takeaways:
- Plugin Actions are the mechanism for enabling a copilot to perform actions by calling tools like custom connectors and flows.
- Dynamic Chaining is the AI-powered feature that allows the copilot to intelligently understand user intent and invoke the correct plugin without needing rigid trigger phrases.
- Use Custom Connectors to expose any RESTful API to your copilot, which is ideal for single-purpose interactions with external or custom-built systems. Your existing API development skills are directly transferable here.
- Use Agent Flows (Power Automate) when you need to orchestrate complex, multi-step logic that involves multiple services and connectors within the Power Platform ecosystem.
What's Next?
You have now built a topic with manual triggers, integrated generative answers for dynamic Q&A, and added plugin actions to perform tasks. You have all the core components of a sophisticated copilot. In our next lesson, we will focus on bringing it all together by learning how to Test, debug, and publish a chatbot to a channel like a custom website. We will explore tools like the Monitor to trace conversations and ensure all your powerful new features work together seamlessly before you deploy your copilot for users.