Hello! Welcome back to our final module, "Professional ALM and DevOps."
In our previous lesson, we focused on diagnosing post-deployment issues by exploring solution layers. You learned how to use the "See solution layers" feature to understand why a component might not behave as expected in a target environment. That skill is crucial for troubleshooting. Now, we'll shift our focus from diagnosing deployed solutions to the developer-centric tools you'll use to build, manage, and prepare solutions for deployment in the first place.
Your learning outcome for this lesson is to use the Power Platform CLI to pack, unpack, and manage solution files. For a developer with your background in C# and traditional CRM development, the Power Platform Command Line Interface (CLI) is the gateway to treating Power Platform solutions as code. It's the foundational tool that enables modern source control, automated builds, and deployment pipelines—all key topics for the PL-400 exam and your professional growth.
The Shift to a Code-First Workflow
Manually exporting and importing solution zip files through the maker portal is sufficient for simple projects, but it doesn't scale for professional team development. It lacks version control, repeatability, and automation. The Power Platform CLI bridges this gap by allowing you to script and automate every aspect of solution management.
Let's begin by getting acquainted with the CLI and its core capabilities for solution management.
Power Platform CLI Exposed: Solutions
This video from the Microsoft Developer channel, 'Power Platform CLI Exposed: Solutions', features one of the engineering managers responsible for the CLI. It provides an excellent, practical walkthrough of the essential solution commands.
Please watch the first seven minutes of the video (00:00 - 07:01). Focus on: The cross-platform nature of the CLI (a key advantage). The process of authenticating with pac auth create. How to switch between environments using pac org select. This will set the stage for all subsequent commands.
As you saw, before you can manage solutions, you must establish an authenticated context. The pac auth and pac org command groups are your tools for managing connections. A best practice is to create one authentication profile per credential and then use pac org select to switch between target environments within that tenant.
From Environment to Source Control: Unpacking Solutions
The first and most critical step in adopting a source control strategy is to convert your solution from a binary .zip file into a structured, text-based format that tools like Git can effectively manage. This process is called unpacking.
The Power Platform CLI offers two primary ways to achieve this:
pac solution clone: This is a high-level command that combines exporting from an environment and unpacking into a single step. It also creates a.cdsprojfile, which essentially turns your solution into a buildable project, something you'll be familiar with from your .NET experience.pac solution export+pac solution unpack: This is a two-step process where you first export a solution to a.zipfile and then explicitly unpack it.
So, when should you use each?
The official Microsoft documentation provides a clear distinction between clone and export. Understanding this is key to choosing the right tool for the job.
Please read the section titled 'Differences between pac solution clone and export'. It clearly outlines the intended scenarios for each command.
To summarize the key distinction:
- Use
pac solution clonewhen you are setting up a project for the first time or when you need to add new components (like a plugin assembly) to your solution project file (.cdsproj). - Use
pac solution exportfollowed bypac solution unpackwhen you are only modifying existing components within the solution and don't need to update the project structure. In an automated pipeline, you will often seeexportandunpackused as distinct steps.
Let's see the clone command in action and discuss the resulting file structure.
Power Platform CLI Exposed: Solutions
Continuing with the 'Power Platform CLI Exposed' video, let's watch the demonstration of cloning a solution.
Watch from 07:01 to 08:56. The presenter uses pac solution clone to export and unpack a solution. Notice how it creates a folder structure ready for development.
The Unpacked Solution Structure
After running clone or unpack, you are left with a folder structure that represents your solution on the file system. This is what you will commit to your source control repository.
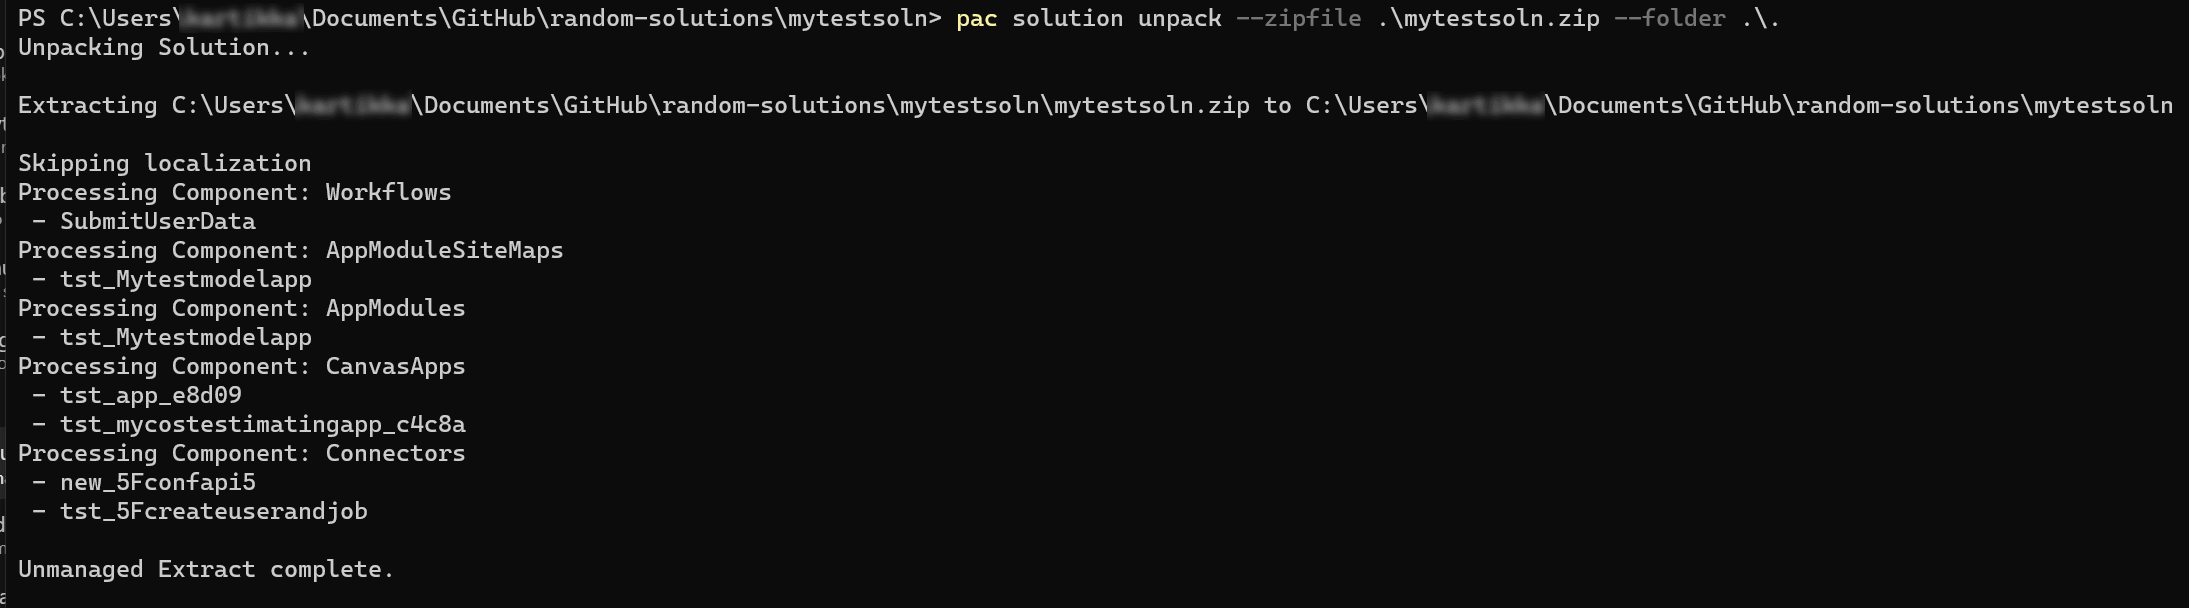
The resulting directory is highly organized.
Dataverse Git integration (Preview) - How are solution ...
This blog post, 'Dataverse Git integration (Preview) - How are solution components are saved?', provides a great description of the unpacked folder structure.
Read the sections 'The manual approach - pac solution clone' and the description of the folder structure that follows. Focus on the roles of the .cdsproj file and the src folder.
As the article explains, you get a root folder containing:
- A
.cdsprojfile: The project file that references all solution components. - A
.gitignorefile: To prevent build artifacts (like the packed.zipfile) from being committed to source control. - An
srcfolder: This contains subfolders for each type of component (Entities, WebResources, PluginAssemblies, etc.), with component definitions stored as XML or their original file formats (e.g.,.jsfor JavaScript).

This structured, text-based representation is ideal for source control, as it allows you to see line-by-line changes, merge work from multiple developers, and track the history of every component.
From Source Control to Environment: Packing and Importing
Once your solution is in source control and you've made your changes, you need to reverse the process: pack the source files back into a deployable .zip file and import it into a target environment.
pac solution pack: This command reads your unpacked solution folder and creates asolution.zipfile. You can specify whether to create aManagedorUnmanagedsolution using the--packagetypeparameter.pac solution import: This command takes asolution.zipfile and imports it into your currently selected Dataverse environment.
For a developer, a more common workflow is to simply build the project. Running dotnet build or msbuild on the folder containing the .cdsproj file will automatically restore dependencies and run the pack command for you, producing the solution zip file in the bin/Debug or bin/Release folder.
Let's see how the import command works and explore some of its powerful options.
Power Platform CLI Exposed: Solutions
Let's return to the video to see the import command and its key parameters.
Watch from 08:56 to 11:54. Pay close attention to the parameters discussed: --force-overwrite: Forcing an update over an existing version. --publish: To publish all customizations after import. --async: Crucial for large solutions to avoid client-side timeouts. --deployment-settings-file: This allows you to provide environment-specific values for connection references and environment variables, a topic from our previous module.
Ensuring Quality: Checking and Versioning
Before you import, you can programmatically check your solution for issues.
pac solution check: This command submits your solution.zipto the Power Apps Checker service and reports any violations of best practices related to performance, security, or reliability. Integrating this into a build pipeline is a key DevOps practice.pac solution version: This command allows you to programmatically update the solution version number, often by incrementing the build or revision number. This is useful for ensuring each build has a unique version.
These commands are demonstrated in the final part of the video.
Power Platform CLI Exposed: Solutions
This final segment of the video covers checking and versioning your solution via the CLI.
Watch from 11:54 to 19:07. This section covers pac solution version, pac solution check, and a very useful command, pac solution create-settings, which generates the JSON file for your deployment settings.
Test your understanding!
You are tasked with moving an existing Power Platform solution into a Git repository for the first time. The solution contains several custom tables, a model-driven app, and a C# plugin assembly. After this initial setup, you need to deploy it as a managed solution to a QA environment.
Outline the primary pac solution commands you would use to accomplish this, from getting the solution out of the dev environment to deploying it in QA.
Show answer
Here is a typical sequence of commands for this workflow:
pac auth create --url <your-dev-env-url>: Authenticate to your development environment.pac solution clone --name <YourSolutionName>: Clone the solution from the dev environment. This is the best choice for the initial setup because it creates the.cdsprojfile, making it a buildable project ready to accept new components like your plugin. You would then commit the resulting folder to your Git repository.- (After making changes in your source code...)
pac solution pack --folder . --zipfile YourSolution_managed.zip --packagetype Managed: Pack the source-controlled files into a managed solution zip. (Alternatively, you could usedotnet buildto achieve this).pac solution check --path YourSolution_managed.zip: Run the solution checker against the packed file as a quality gate before deployment.pac auth select --url <your-qa-env-url>: Switch your CLI's context to the target QA environment.pac solution import --path YourSolution_managed.zip: Import the managed solution into the QA environment.
Conclusion
In this lesson, you've learned how to use the Power Platform CLI as your primary tool for managing the lifecycle of a solution. This code-first approach is the bedrock of professional Power Platform development and a prerequisite for automation.
Key Takeaways:
- The Power Platform CLI enables you to script and automate solution management tasks.
pac solution cloneorpac solution unpackare used to convert a solution into a source-controllable format. The unpacked structure is organized by component type.pac solution pack(ordotnet build) recompiles the source files into a deployable managed or unmanaged.zipfile.pac solution importandpac solution checkare used to programmatically deploy and validate your solution, forming the basis of a CI/CD pipeline.
What's Next?
You now know how to get your solution into a format suitable for source control. The next logical step is to do just that. In our next lesson, we will set up a source control repository (e.g., in Azure DevOps or GitHub) for a Power Platform solution. You'll take the unpacked solution files from this lesson and commit them to a repository, establishing a single source of truth and taking your first step towards building a fully automated build pipeline.