Hello! Welcome back to the final module on "Professional ALM and DevOps."
In our last lesson, you successfully established a source control repository for your Power Platform solution. This was a critical step, creating a "single source of truth" that now holds the unpacked, human-readable definition of your application.
Today, we transition from storing our code to building it. Our learning outcome is to create a build pipeline in Azure DevOps to automate the export and packing of a managed solution. This process, often called Continuous Integration (CI), is where the real power of DevOps begins. We will configure an automated pipeline that takes the source code from your repository, validates it, and produces a deployable, managed solution—the essential artifact for any professional deployment.
From Source Code to Build Artifact
The goal of a build pipeline in Power Platform ALM is to produce a consistent, versioned, and managed solution package. While you can manually export managed solutions from a development environment, this is error-prone and lacks traceability. A build pipeline formalizes this process.
The standard pattern involves these key stages:
- Trigger: The pipeline starts automatically when changes are committed to a specific branch in your repository (e.g.,
main). - Pack: It takes the unpacked solution files from your source control repository and "packs" them into a single unmanaged solution
.zipfile. - Validate: It imports this unmanaged solution into a clean, dedicated "build" environment. This step validates that all components and dependencies are present and correct in source control.
- Export Managed: After a successful import and publish in the build environment, the pipeline exports the solution again, but this time as a managed solution.
- Publish Artifact: The final managed solution
.zipfile is published as a "build artifact," making it available for the release pipeline to deploy to downstream environments like test and production.
Prerequisites for Your Build Pipeline
Before we construct the pipeline, let's ensure the foundational elements are in place. Your experience with Azure DevOps (ADO) means you'll be familiar with these concepts.
- Azure DevOps Project: You should have an ADO project with an initialized Git repository containing your unpacked solution, as set up in the previous lesson.
- Power Platform Build Tools: This free extension from the Visual Studio Marketplace must be installed in your ADO organization. It provides all the necessary pipeline tasks for Power Platform.
- Service Connections: You need to establish a secure connection between Azure DevOps and your Power Platform environments. The best practice is to use a Service Principal (SPN). You will need at least two connections: one for your development environment and one for your dedicated build environment.
For a detailed walkthrough of creating the Azure AD app registration and configuring the service connection, this guide is an excellent resource.
Set up Azure DevOps Pipeline for Power Platform - Continuous Integration (Part 1)
This article, 'Set up Azure DevOps Pipeline for Power Platform', provides clear, step-by-step instructions for the prerequisite authentication setup. Focus on the first two major sections.
Review the sections on 'Azure AD App Registration', 'Create system user in Dataverse', and 'Install Power Platform Build Tools extension'. You don't need to perform the steps if you've done this before, but it's a good refresher on creating an application user with a client secret and assigning it the System Administrator role.
Constructing the Build Pipeline with YAML
Given your development background, we will focus on creating the pipeline using YAML. This "pipeline-as-code" approach is standard practice, allowing for versioning, reusability, and clarity.
The following resource provides a perfect template for the two main pipelines in a Power Platform ALM strategy. We will focus on the second pipeline, "Import To Build Env And Export Managed," as this aligns with our goal of creating a managed artifact.
How to Deploy PowerApps Solutions Using Azure DevOps
The article 'How to Deploy PowerApps Solutions Using Azure DevOps' outlines a professional, two-pipeline strategy. We will build the second pipeline described.
Read the section titled 'Import To Build Env And Export Managed'. Pay close attention to the sequence of tasks in the YAML file: Pack, Import, Publish, Export (Managed), and Publish Artifact. This is the exact workflow we will implement.
Let's break down the YAML into its essential tasks.
The Core Pipeline Tasks
Here is a breakdown of each step in the build pipeline.
1. Power Platform Tool Installer
This is always the first step. It ensures the agent running your pipeline has the required Power Platform CLI tools.
- task: microsoft-IsvExpTools.PowerPlatform-BuildTools.tool-installer.PowerPlatformToolInstaller@0
  displayName: 'Power Platform Tool Installer'
2. Power Platform Pack Solution
This task takes the unpacked source files from your repository (located at $(Build.SourcesDirectory)) and packs them into a single unmanaged solution .zip file.

- task: microsoft-IsvExpTools.PowerPlatform-BuildTools.pack-solution.PowerPlatformPackSolution@0
  displayName: 'Power Platform Pack Solution'
  inputs:
    SolutionSourceFolder: '$(Build.SourcesDirectory)/$(SolutionName)' # Path to your unpacked solution
    SolutionOutputFile: '$(Build.ArtifactStagingDirectory)/$(SolutionName).zip' # Output path for the packed zip
3. Power Platform Import Solution
Next, we import the newly packed (but still unmanaged) solution into our dedicated build environment. This acts as a crucial validation step. If the import fails, it means there's an issue with the solution's dependencies or structure as defined in source control, and the pipeline will stop.
- task: microsoft-IsvExpTools.PowerPlatform-BuildTools.import-solution.PowerPlatformImportSolution@0
  displayName: 'Power Platform Import Solution'
  inputs:
    authenticationType: PowerPlatformSPN
    PowerPlatformSPN: 'Your-Build-Env-Service-Connection'
    SolutionInputFile: '$(Build.ArtifactStagingDirectory)/$(SolutionName).zip'
    AsyncOperation: true
    MaxAsyncWaitTime: '60'
4. Power Platform Publish Customizations
After a successful import, all customizations in the build environment must be published.
- task: microsoft-IsvExpTools.PowerPlatform-BuildTools.publish-customizations.PowerPlatformPublishCustomizations@0
  displayName: 'Power Platform Publish Customizations'
  inputs:
    authenticationType: PowerPlatformSPN
    PowerPlatformSPN: 'Your-Build-Env-Service-Connection'
5. Power Platform Export Solution (as Managed)
This is the climactic step. We export the solution from the now-validated build environment. By setting Managed: true, we create the managed solution package that is safe for deployment to downstream environments.
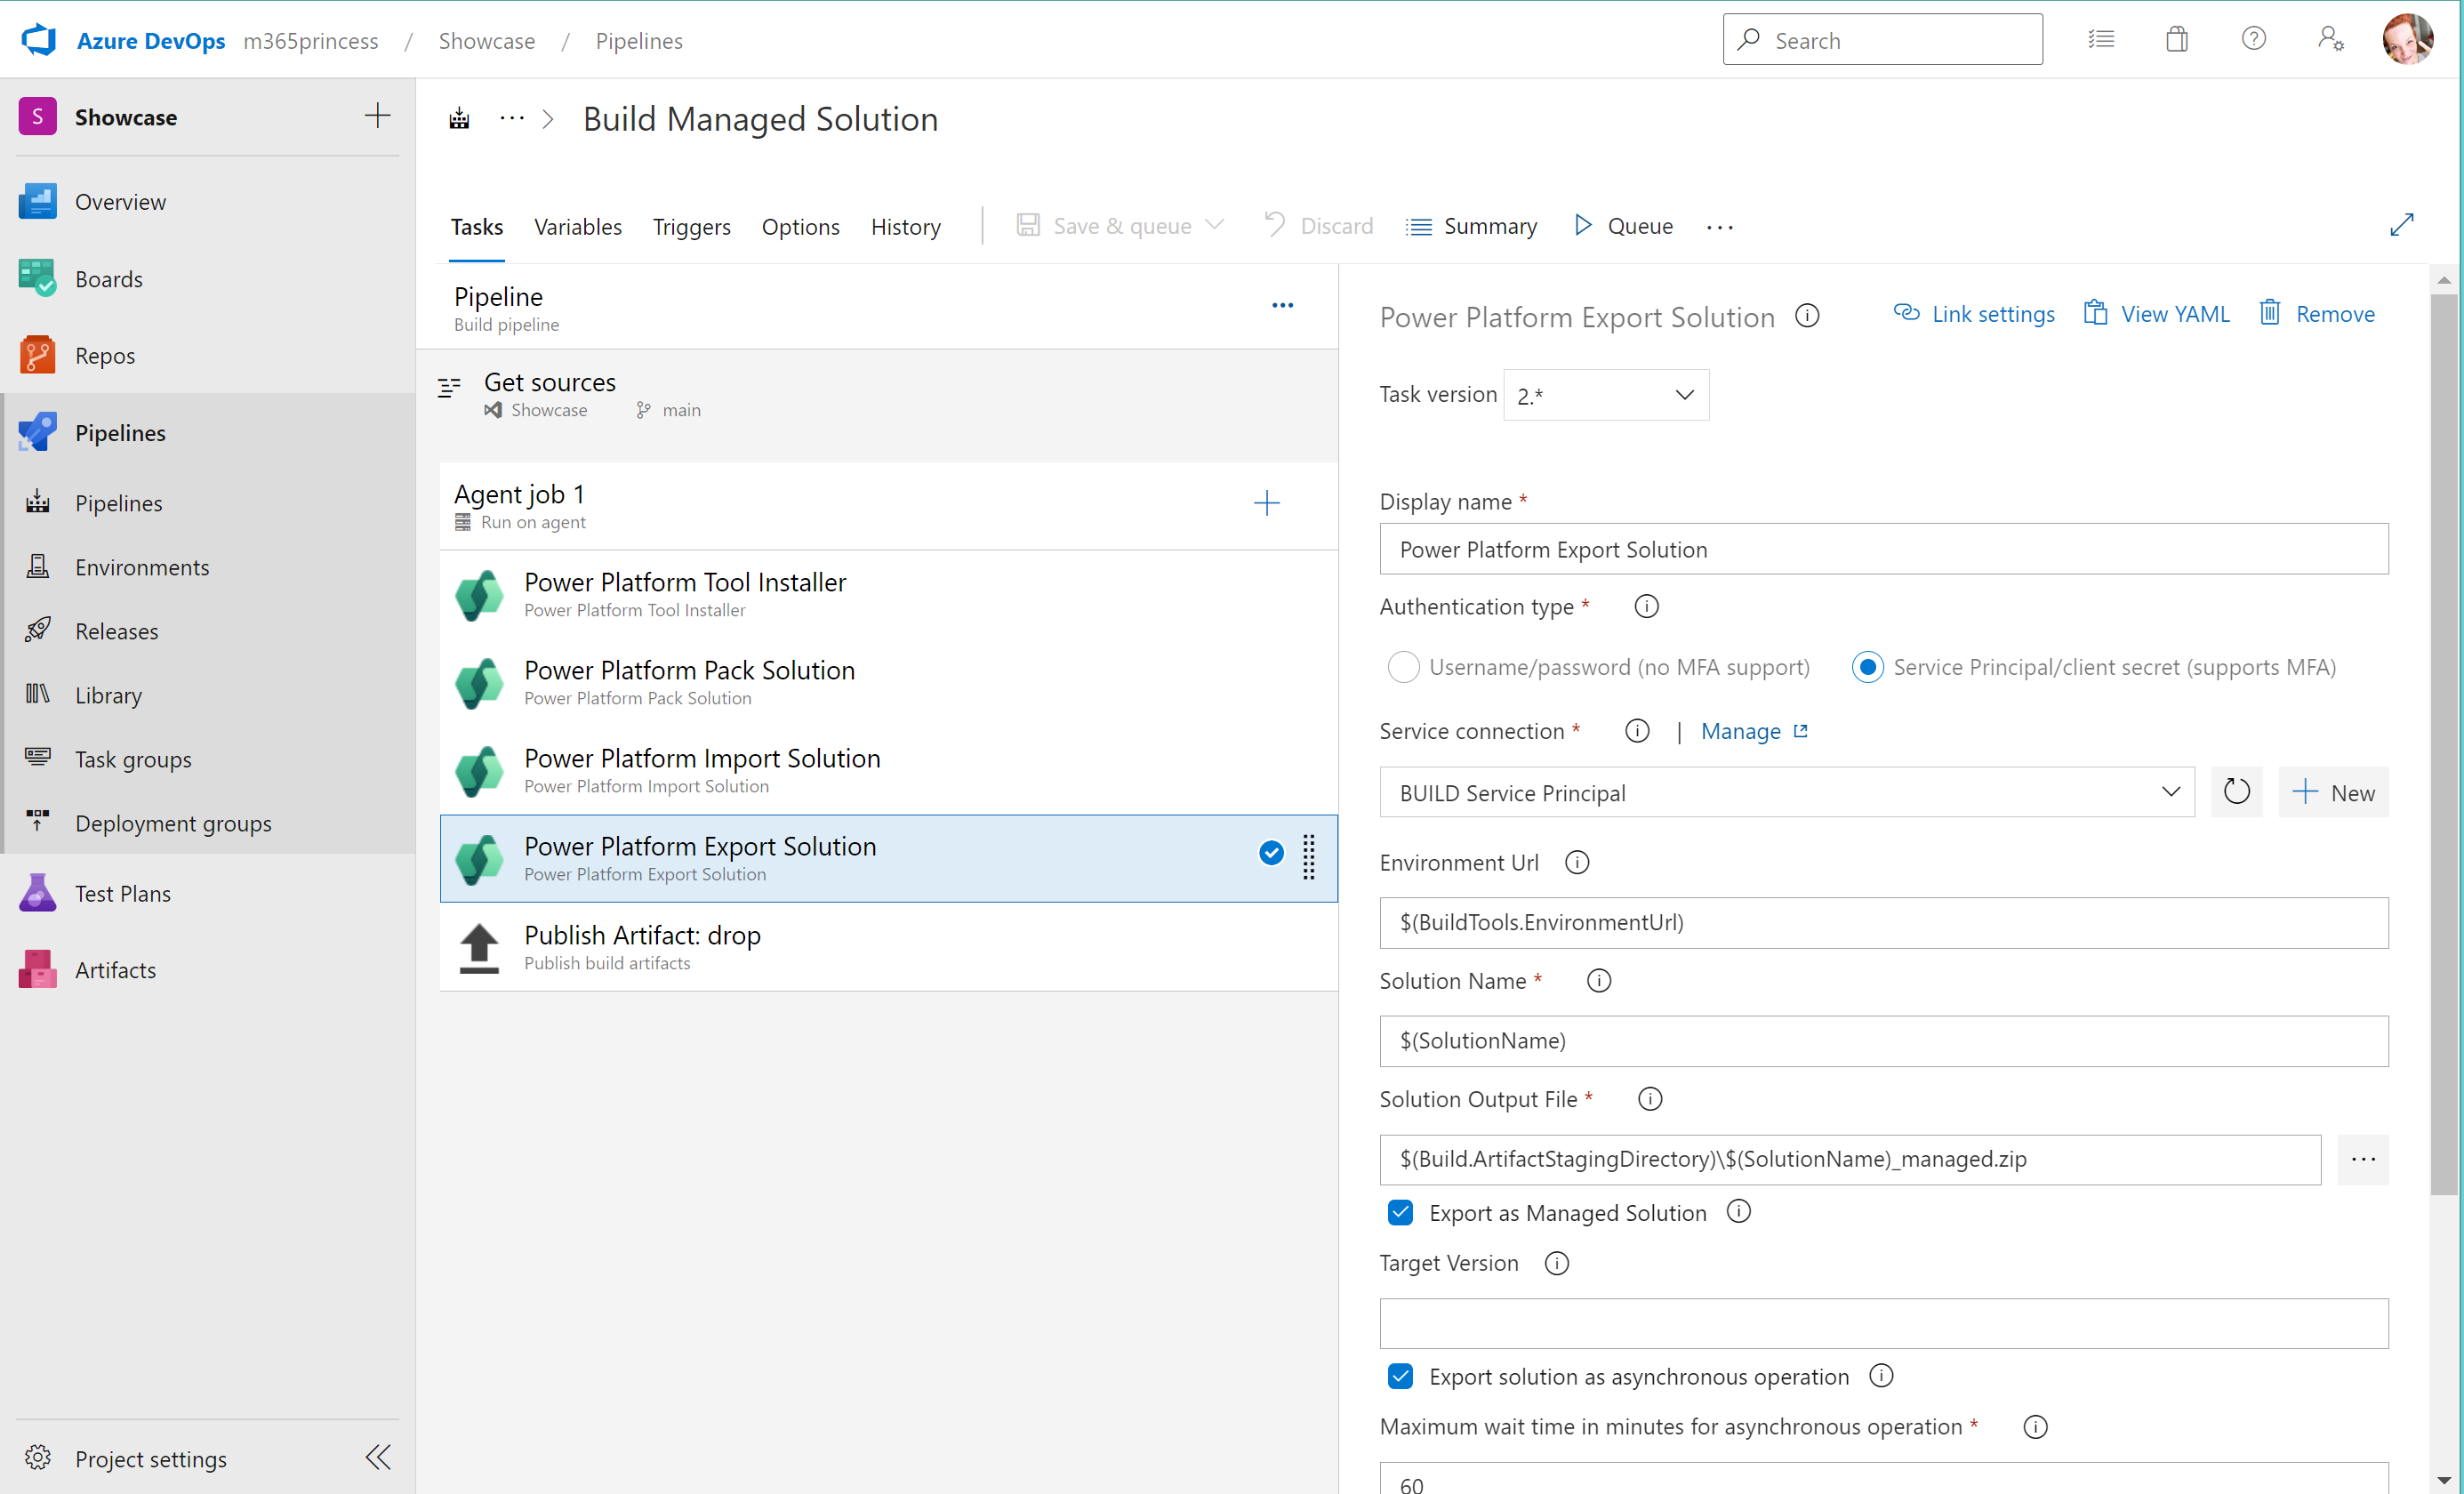
- task: microsoft-IsvExpTools.PowerPlatform-BuildTools.export-solution.PowerPlatformExportSolution@0
  displayName: 'Power Platform Export Solution as Managed'
  inputs:
    authenticationType: PowerPlatformSPN
    PowerPlatformSPN: 'Your-Build-Env-Service-Connection'
    SolutionName: '$(SolutionName)'
    SolutionOutputFile: '$(Build.ArtifactStagingDirectory)/$(SolutionName)_managed.zip'
    Managed: true # The key parameter to create a managed solution
6. Publish Build Artifacts
Finally, we publish the generated managed .zip file as a build artifact named drop. This makes the file available for download and, more importantly, for our release pipeline to consume.
- task: PublishBuildArtifacts@1
  displayName: 'Publish Artifact: drop'
  inputs:
    PathtoPublish: '$(Build.ArtifactStagingDirectory)'
    ArtifactName: 'drop'
    publishLocation: 'Container'
Test your understanding!
A junior developer on your team asks why the build pipeline imports the solution into a "build" environment only to export it again immediately. They argue it's an unnecessary step and the pipeline should just pack the source code from Git into a managed solution directly. How would you explain the importance of the import/export cycle through a dedicated build environment?
Show answer
You would explain that the import step serves as a critical validation or integration test. While the pack task can create a solution zip from source, it doesn't verify that the solution is actually valid within a Dataverse environment.
By importing the packed solution into a clean build environment, we confirm that:
- All necessary components were correctly checked into source control.
- There are no missing dependencies within the solution.
- The solution structure is valid and can be successfully provisioned in a Dataverse instance.
If this import fails, the pipeline fails early, preventing a broken artifact from being created. Exporting from this validated state ensures that the final managed artifact is a true, working representation of the solution. It decouples the development environment from the build process, ensuring that the artifact is built only from what's in source control.
Common Pitfalls and Troubleshooting
Building pipelines rarely works perfectly on the first run. The following video, while demonstrating a slightly different pipeline (export-to-git), is invaluable for showing the common troubleshooting process.
PL-400 Exam Prep: Extracting and Deploying Solutions using Azure DevOps
In this video, 'PL-400 Exam Prep: Extracting and Deploying Solutions', the presenter methodically creates a pipeline and debugs common errors. This is a realistic look at the development process.
First, watch from 02:30 to 03:26 to see how to grant the build service the necessary permissions on the repository—a very common point of failure. Then, jump to 11:44 to 13:40 to see how the presenter diagnoses and fixes failures related to incorrect branch names and typos in the YAML file. Note the iterative 'fix and re-run' approach.
Key troubleshooting tips to remember:
- Permissions: Ensure the
[Your Project Name] Build Service ([Your Org Name])user has "Contribute" permissions on your Git repository if your pipeline needs to commit changes. - YAML Indentation: YAML is highly sensitive to spaces and indentation. A misplaced space can cause tasks to fail or be skipped. Use a code editor with YAML support to catch these errors.
- Branch Names: Be precise. A common mistake is using
masterin your script when the repository's default branch ismain. - Service Connections: Double-check that the Service Principal has the System Administrator role in the target environments and that the connection details in Azure DevOps are correct.
Conclusion
Congratulations! You have now designed a complete Continuous Integration pipeline. By automating the creation of a managed solution, you have established a repeatable, reliable process for building your Power Platform applications.
Key Takeaways:
- A CI/build pipeline automates the process of turning source code into a deployable artifact.
- The standard pattern is to Pack from source, Import to a build environment for validation, and then Export as a managed solution.
- The
PowerPlatformBuildToolsextension for Azure DevOps provides all the necessary tasks (Pack,Import,Export, etc.). - Using YAML for "pipeline-as-code" is the modern standard, providing versioning and transparency.
- The final output of the build pipeline is a managed solution
.zipfile, published as a build artifact.
What's Next?
With a trustable, automated build artifact in hand, the next logical step is to deploy it. In our final lesson of this course, we will tackle that by learning how to create a release pipeline in Azure DevOps to automate the deployment of a managed solution to a target environment. This will complete our end-to-end CI/CD workflow.