Hello! Welcome to the final lesson in our "Professional ALM and DevOps" module, and the capstone of your PL-400 preparatory course.
In our previous lesson, we constructed a build pipeline (Continuous Integration) that automatically takes your solution's source code, validates it, and packs it into a versioned, managed solution artifact. This artifact is the standardized, deployable unit for your application.
Today, we complete the CI/CD cycle. Our learning outcome is to create a release pipeline in Azure DevOps to automate the deployment of a managed solution to a target environment. This is where we take the artifact produced by our build pipeline and deliver it to environments like Quality Assurance (QA) or Production, achieving true Continuous Deployment.
From Build Artifact to Live Environment
The distinction between build and release pipelines is fundamental to a robust DevOps strategy, a concept you're well-versed in from your work with Azure DevOps.
- A Build Pipeline (CI) is concerned with creating and validating a deployable artifact from source code. Its trigger is typically a commit to a branch.
- A Release Pipeline (CD) is concerned with deploying that validated artifact to one or more environments. Its trigger is often the successful completion of a build, followed by an approval.
A release pipeline in Azure DevOps is structured around stages, where each stage typically represents a target environment (e.g., QA, UAT, Production). This allows you to define a clear path for promotion, with specific approvals and quality gates at each step.
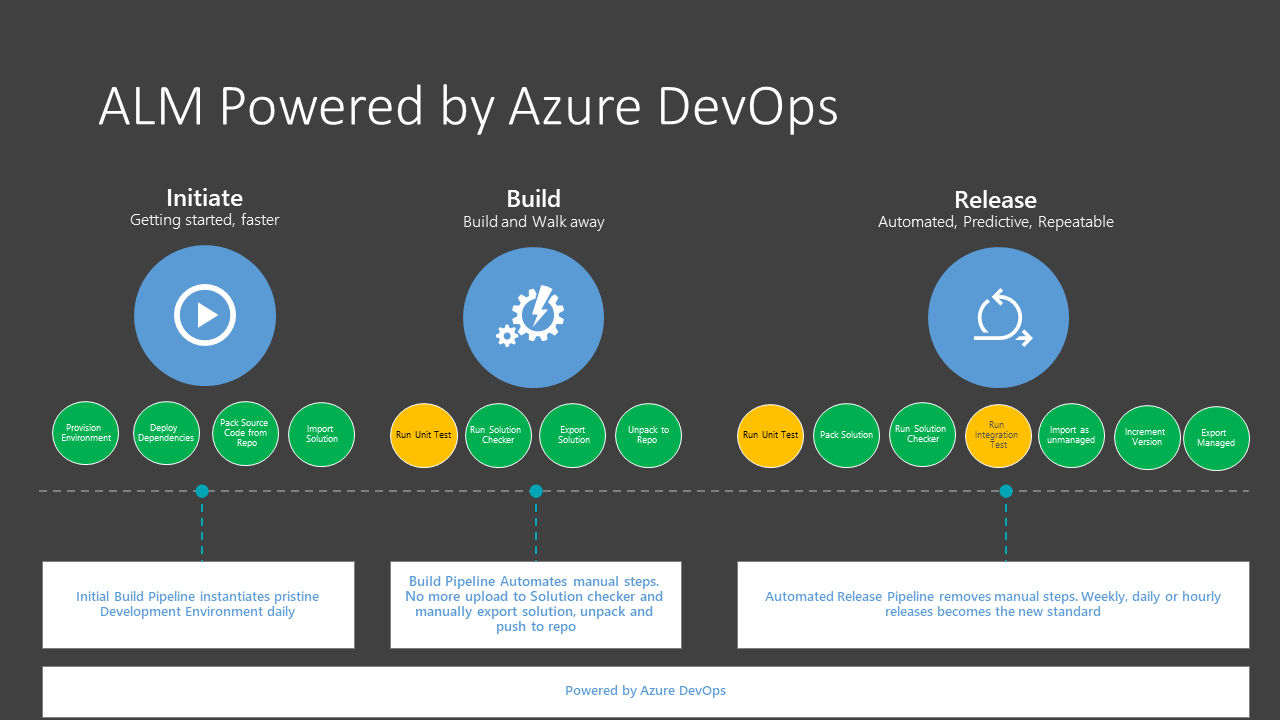
Creating the Release Pipeline: A Step-by-Step Guide
We will use the classic UI editor to create our release pipeline. While YAML is excellent for build definitions, the visual nature of the classic editor is often preferred for release pipelines as it clearly illustrates the flow between different environmental stages.
The process involves three main parts: linking the artifact, defining a stage, and configuring the deployment tasks.
Step 1: Initialize the Pipeline and Link the Artifact
First, we need to tell our new release pipeline where to find the deployable package.
- In your Azure DevOps project, navigate to Pipelines -> Releases.
- Click New pipeline. You can start with an Empty job template.
- In the Artifacts box, click Add.
- Select Build as the source type. Choose the build pipeline you created in the last lesson.
- The Source alias will default to
_Your-Build-Pipeline-Name. This alias is how you will reference the artifact's contents in your tasks.
This crucial first step ensures your release pipeline is directly connected to the output of your build process.
The following video demonstrates this initial setup.
Power Platform Deployment using Azure DevOps - Episode 04 | Create Release Pipeline
In this clip from 'Power Platform Deployment using Azure DevOps', the presenter initiates a new release pipeline and configures the artifact source. This visualizes the first step of our process.
Watch from 00:23 to 01:19 to see how to create a new release pipeline and select the build pipeline's output as the source artifact.
Step 2: Configure the Deployment Stage and Tasks
With the artifact linked, you can now define the deployment stage. Let's call our first stage "Deploy to QA". Within this stage, we'll add the necessary tasks from the Power Platform Build Tools extension.
Detail Step-By-Step - Power Platform ALM with Azure DevOps
The article 'Detail Step-By-Step - Power Platform ALM with Azure DevOps' provides a concise, step-by-step guide for creating a release pipeline using the classic editor. It perfectly aligns with our goal of deploying the artifact from our build pipeline.
Review the section titled 'Create Release Pipeline'. Focus on the screenshots and steps showing how to add and configure the 'Power Platform Import Solution' task. This is the core of our deployment process.
Based on the guide and best practices, your stage should contain the following tasks:
-
Power Platform Tool Installer: As always, this task must come first to prepare the pipeline agent.
-
Power Platform Import Solution: This is the core task of the release pipeline. Its configuration is critical:
- Authentication type:
PowerPlatformSPN - Power Platform Service Connection: Select the service connection for your target environment (e.g., your QA environment).
- Solution Input File: This is where you point to your artifact. The path will be
$(System.DefaultWorkingDirectory)/_Your-Build-Pipeline-Name/drop/YourSolutionName_managed.zip. - Import as managed: For any environment other than development, this box must be checked. This enforces the ALM principle of deploying managed solutions downstream.
- Asynchronous: Leave this checked. As noted in the "DevOps on Azure" video, asynchronous operations are the default and are more resilient.
- Authentication type:
Test your understanding!
In the previous lesson, our build pipeline also used a Power Platform Import Solution task. What is the key difference in configuration and purpose between the Import Solution task in the build pipeline versus the one in our new release pipeline?
Show answer
There are two key differences:
- Solution Type: The build pipeline imports an unmanaged solution into a temporary build environment purely for validation. The release pipeline imports a managed solution into a permanent target environment (like QA or Prod).
- Source File: The build pipeline's import task uses the solution file it just packed from source (
$(Build.ArtifactStagingDirectory)/YourSolutionName.zip). The release pipeline's import task uses the managed artifact produced by the entire build process (.../drop/YourSolutionName_managed.zip).
- Power Platform Publish Customizations (Optional but Recommended): After a successful import, it's good practice to add this task to ensure all solution components are activated in the target environment.
Handling Environment-Specific Configurations
A professional ALM process must handle differences between environments, such as connection strings or other variables. In Power Platform, this is managed with Connection References and Environment Variables.
Your release pipeline is responsible for applying the correct values for the target environment during deployment.
The workflow is as follows:
- Generate Settings File: You use the Power Platform CLI to generate a
deployment-settings.jsonfile from your solution (pac solution create-settings). This file contains placeholders for your connection references and environment variables. - Update Build Pipeline: Modify the build pipeline from the last lesson to include a "Copy Files" task and publish this
deployment-settings.jsonfile as part of thedropartifact. - Use Variable Groups: In Azure DevOps, create a Variable Group for each environment (e.g., "QA-Variables", "Prod-Variables"). Store the specific values for each environment here.
- Replace Tokens: In your release stage, add a "Replace Tokens" task (a popular extension from the Marketplace) before the
Import Solutiontask. Configure it to replace tokens in thedeployment-settings.jsonfile with values from your stage's linked variable group. - Use Settings File: In the
Power Platform Import Solutiontask, check the Use deployment settings file box and provide the path to the token-replaceddeployment-settings.jsonfile.
This pattern, also highlighted in the "Power Platform Release Automation with Azure DevOps" article, cleanly separates your solution definition from its environment-specific configuration.
Staging, Approvals, and Deployment Triggers
A simple pipeline deploys to one environment. A professional pipeline orchestrates deployments across multiple environments.
- Multi-Stage Releases: You can clone your "Deploy to QA" stage to create subsequent stages like "Deploy to UAT" and "Deploy to Production". Each stage would point to a different service connection and use a different variable group.
- Triggers: You can configure the first stage to trigger automatically upon the completion of a build. Subsequent stages can be configured to trigger upon the success of the previous stage.
- Pre-deployment Approvals: For sensitive environments like Production, you can enable pre-deployment approvals. This pauses the pipeline and sends a notification to designated approvers, who must manually approve the deployment before it proceeds. This provides a critical governance control.
Power Platform Deployment using Azure DevOps - Episode 04 | Create Release Pipeline
Now, let's watch a full, end-to-end demonstration. This video covers creating the pipeline, adding tasks, running the release, and verifying the deployment.
Watch from 01:19 to the end. Note how the presenter: Adds the necessary Power Platform tasks to the stage. Configures the 'Import Solution' task for the target environment. Creates a new release, triggers the deployment, and monitors the live logs. Finally, verifies that the solution has been successfully deployed as managed in the target Power Platform environment.
Conclusion
Congratulations on completing the final lesson! By building this release pipeline, you have established a complete, professional CI/CD workflow for Power Platform using Azure DevOps. You now have an automated, repeatable, and auditable process for moving your applications from source code to production.
Key Takeaways:
- Release pipelines in Azure DevOps are used to deploy build artifacts to a series of environments (stages).
- The core deployment task is
Power Platform Import Solution, configured to import a managed solution from the build artifact. - Environment-specific configurations are handled using deployment settings files and token replacement from variable groups.
- Multi-stage pipelines with triggers and pre-deployment approvals provide the control and governance needed for enterprise-level deployments.
This lesson concludes your journey through the advanced concepts of Power Platform development. From solution architecture and Dataverse logic, through advanced app-building, to professional ALM and DevOps, you have covered the critical skills needed for the PL-400 exam and for a successful career as a Power Platform developer. Good luck with your certification