Hello! Welcome to our next lesson on developing with Power Automate Cloud Flows.
In our last session, we focused on building resilient flows by implementing robust error handling with scopes and the Configure run after setting. You learned how to create Try-Catch-Finally blocks, a pattern that should feel familiar from your C# development experience. We established how to manage the "unhappy path" where actions fail.
Today, we shift our focus from sequential execution and error handling to performance and efficiency. This lesson addresses the learning outcome: Implement parallel branches and join operations for concurrent processing. We'll explore how to make your flows do more work in less time by running multiple tasks simultaneously. For a developer aiming for the PL-400 certification, understanding how to design for performance is critical.
1. The Need for Speed: Introducing Parallel Branches
By default, Power Automate actions run sequentially. Action B waits for Action A to finish, Action C waits for B, and so on. This is simple and predictable, but often inefficient. What if Action A and Action B are completely independent? For instance, when a new high-priority Case is created in Dataverse, you might need to:
- Send an email to the customer service manager.
- Post a message in a Microsoft Teams channel for the support team.
- Create a task in Planner for follow-up.
None of these tasks depend on the others. Waiting for the email to be sent before posting to Teams is unnecessary. This is where parallel branches come in. A parallel branch allows you to run two or more actions at the same time.
To get a practical, step-by-step look at how to create these branches, please review the following guide. While the example uses SharePoint, the user interface and core concepts for adding a parallel branch are identical for any connector, including Dataverse.
How to Use Parallel Branch in Power Automate?
This article from SPGuides provides a clear, visual walkthrough of adding parallel branches to a flow. It will serve as a great introduction to the mechanics of the feature.
Please read the sections 'What Is a Parallel Branch in Power Automate?' and 'Add a Parallel Branch to Power Automate'. Focus on how the visual designer allows you to add a new branch next to an existing action, enabling them to run concurrently.
As you saw, you can add up to 49 additional branches to a flow, for a total of 50 parallel paths. This "fire-and-forget" model is excellent for independent tasks where you don't need to wait for the results.
2. Synchronizing Work: The Join Pattern
What if you need to wait for all parallel tasks to complete before proceeding? This is a common requirement. Consider a scenario where a sales opportunity over $100,000 in Dataverse requires approval from both the regional Sales Director and the Head of Finance before it can be marked as "Approved". You want to send both approval requests simultaneously, but you can only update the opportunity's status after both have responded affirmatively.
This is known as the Join pattern. You start with parallel branches and then converge them back into a single path.
The key to implementing a join is the same Configure run after setting we used for error handling. For the action that joins the branches, you configure it to run only after all the preceding parallel actions have successfully completed.
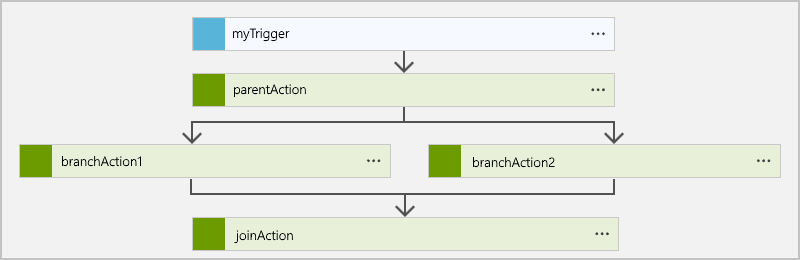
This pattern is especially powerful for parallel approvals. The following GIF from the SPGuides article shows this exact process of building a parallel approval and joining the results into a condition.

To see the full implementation, including the expressions used to check the outcomes of the approvals, please continue with the article you started earlier.
How to Use Parallel Branch in Power Automate?
Now, let's explore the join pattern in detail using the travel request example from the same SPGuides article.
Read the section 'Join Parallel Branch in Power Automate'. Pay close attention to how the 'Condition' action is configured after the two parallel approval actions. It effectively acts as the join point, and its logic depends on the outcomes from both branches.
3. A Different Kind of Parallelism: Concurrency Control
Parallel branches are ideal for executing a fixed number of different actions simultaneously. But what if you need to perform the same action on a large set of items?
Imagine your flow queries Dataverse and retrieves 500 contact records that need to be updated. The standard Apply to each loop will process them one by one. This can be very slow.
Power Automate provides a different mechanism for this: Concurrency Control on the Apply to each loop. By enabling this setting, you can configure the loop to process multiple items from the input array at the same time, up to a maximum of 50.
This is a critical performance optimization technique for any developer working with batch data. The following document explains this concept and its benefits.
Power Automate Cloud flows Best Practices
This best practices guide explains the difference between parallel execution (branches) and concurrency control within loops. It's essential for understanding how to optimize batch processing.
Please read the section 'Parallel Execution and Concurrency (within For each loop)'. Focus on: The distinction between parallel branches and concurrency control. How to enable concurrency and set the degree of parallelism on an 'Apply to each' loop. The performance comparison table showing the impact of concurrency.
Key Considerations for Concurrency:
- Idempotency: The operations inside your loop should be independent. Updating contact A should not depend on the result of updating contact B.
- Throttling: Processing items in parallel increases the number of API calls you make in a short period. Be mindful of the API limits of the services you are calling (e.g., Dataverse, SharePoint, or external APIs) to avoid being throttled.
- Optimal Degree: A higher degree of parallelism isn't always faster due to overhead. Start with a moderate number (e.g., 10-20) and test to find the sweet spot for your specific scenario.
Test your understanding!
You are designing an automation for a new product launch. When a "Launch" button is clicked in a Power App, the flow must perform several tasks.
-
Scenario A: The flow needs to update the product's status to "Live" in Dataverse, send an announcement email to all employees, and post a notification to the public-facing Twitter account. Which parallel processing method would you use here?
-
Scenario B: Part of the launch process involves finding all 2,000 active resellers in Dataverse and creating an individual "Launch Pack" task for each of them in their respective Account records. Which parallel processing method is best suited for this?
-
Scenario C: You've implemented the parallel approval pattern from section 2. How do you ensure your flow waits for both approvals to complete before sending a "Launch Approved" confirmation email?
Show answer
-
Parallel branches are the correct choice. These are three distinct, independent actions that can all be triggered at the same time.
-
Concurrency control on an
Apply to eachloop is the best fit. You have a single action (create a task) that needs to be performed on a large array of items (the resellers). -
You would use the
Configure run aftersetting on the confirmation email action. You would set it to run only after both of the parallel "Start and wait for an approval" actions have a status ofis successful.
Conclusion
In this lesson, you've moved beyond simple sequential logic to build more efficient and performant automations. Understanding when and how to use concurrent processing is a hallmark of an advanced Power Platform developer.
Key Takeaways:
- Parallel Branches are used to execute a known number of different actions simultaneously, which is ideal for independent tasks.
- The Join Pattern allows you to synchronize the results of parallel branches by using the
Configure run aftersetting to wait for all branches to complete. - Concurrency Control on an
Apply to eachloop is used to process items from an array in parallel, drastically improving performance for batch operations. - Choosing the right parallel technique depends on whether you're running different actions concurrently (branches) or the same action on many items (concurrency).
What's Next
We've now covered control flow, error handling, and parallel execution. The next step in building sophisticated solutions is to make your logic reusable. In the next lesson, we will cover how to create and call child flows to build modular and reusable automation logic. This will allow you to encapsulate complex patterns, like the parallel approval we discussed today, into a single, reusable component.