Hello! Welcome to the next lesson in our journey through Power Automate Cloud Flows.
In the previous lesson, we focused on building the "happy path" for our automations by implementing control flow logic like conditions, switches, and loops. Your background in C# development made those concepts feel familiar. Now, we'll address the equally important "unhappy path"—what happens when things go wrong.
This lesson directly targets the learning outcome: Configure robust error handling using scopes, 'configure run after' settings, and try-catch patterns. Just as you would use a try-catch-finally block in C# to handle exceptions gracefully, Power Automate provides mechanisms to build resilient, production-ready flows that can anticipate, report, and react to failures.
1. The Foundation: Configure run after
The most fundamental error handling mechanism in Power Automate is the Configure run after setting. Every action in a flow concludes with a status: is successful, has failed, is skipped, or has timed out. The run after setting allows you to define which of these statuses from a preceding action should trigger the next one.
By default, an action runs only if the previous one was successful. To create an error handling branch, you change this.
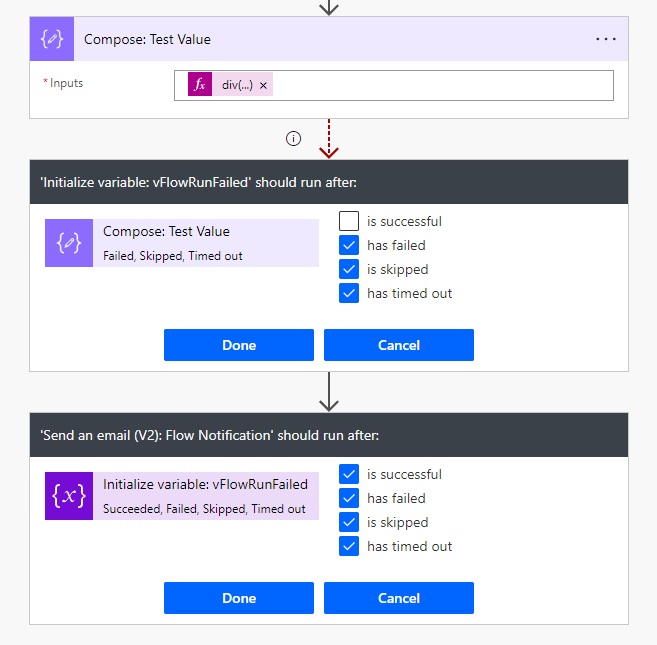
To see this basic concept in action, let's watch a short video. It will show how to intentionally create a failure and then use Configure run after to catch it and send a notification.
Error Handling in Power Automate flows | Try Catch Scope Action
This first video segment by Reza Dorrani will demonstrate the fundamental 'configure run after' setting. You'll see how to create a simple failure and then catch it to send a basic notification.
Watch the first part of the video (00:00 - 06:36). Focus on these key points: How the 'Send an email' action is configured to run only after the 'Compose' action has failed. The use of the actions() expression to retrieve the specific error message from the failed action. The use of the workflow() expression to construct a direct link to the failed flow run for easier debugging.
As you saw, you can get rich diagnostic information. The two key expressions are:
actions('Action_Name')?['error']?['message']: Retrieves the error message from a specific failed action.workflow(): Returns an object with metadata about the current flow run, which you can use to build a direct URL to the run history.
2. The Standard: The Try-Catch-Finally Pattern with Scopes
Applying Configure run after to every single action in a complex flow is not scalable. A much cleaner approach, analogous to the try-catch blocks you use in code, is to use Scope actions.
- Try Scope: A scope block where you place all the primary actions of your business logic.
- Catch Scope: A separate scope block that is configured to run only if the Try scope
has failedorhas timed out. This is where all your error handling and notification logic will live. - Finally Scope: An optional scope block that runs regardless of the outcome of the Try block (on success, failure, skip, or timeout). This is useful for cleanup tasks, like closing a connection or updating a status field.

Inside the Catch block, you need to identify which action inside the Try block failed. For this, you use the result() expression.
result('Try_Scope_Name')
This expression returns an array containing the outcome of every top-level action within the specified scope. You can then use a Filter array action to find the object where the status is 'Failed'.
Let's see this more robust pattern in practice.
Error Handling in Power Automate flows | Try Catch Scope Action
Now let's scale this up. This next segment shows how to use 'Scope' actions to build a proper 'Try-Catch' block, which is the standard pattern for handling errors across multiple actions.
Watch from 06:36 to 11:52. Pay close attention to: How the 'Try' and 'Catch' scopes are created and configured. The use of the result('Try') expression to get the outcomes of the actions within the scope. The use of 'Filter array' to isolate the failed actions. How a detailed HTML table is constructed with the action name, status, and error message for a clear notification.
3. Ensuring Correct Flow Status with Terminate
A critical point to understand is that if your Catch block runs successfully, the entire flow run will be marked as "Succeeded" in the run history. This is misleading because a business process failure did occur.
To fix this, the last step in your Catch block should always be a Terminate action. This action allows you to explicitly stop the flow and set its final status to Failed. You can also provide a custom error code and message.
Power Automate Standards: Error-Handling
This article from Matthew Devaney provides a concise overview of the Try-Catch-Finally pattern and highlights this critical step of terminating the flow correctly.
Please read the sections 'Try, Catch, Finally Pattern', 'Group Multiple Actions Inside Of A Scope Action', and 'Terminate The Flow With A Status Of Success Or Failure'. This will solidify the full structure and explain why the 'Terminate' action is so important for accurate run history.
4. Special Case: Handling Errors Inside Apply to each Loops
The result() pattern has a limitation: it does not work for actions nested inside an Apply to each loop. If one iteration fails, the entire loop action fails, but result() won't tell you which item caused the failure.
The correct pattern for this scenario is to collect errors manually:
- Initialize an array variable (e.g.,
varErrors) before the loop. - Inside the
Apply to eachloop, configure arun afterbranch on the action that might fail (e.g., a DataverseAdd a new rowaction). - In this failure branch, use Append to array variable to add an object containing the error message (
actions('Action_Name')?['error']?['message']) and identifying information about the item that failed. - After the loop completes, use a Condition to check if the error array is empty using the expression
length(variables('varErrors')). - If the array contains errors, send a notification with the collected details and use a
Terminateaction to fail the flow.
This specific technique is demonstrated clearly in the following video segment.
Error Handling in Power Automate flows | Try Catch Scope Action
Handling errors inside loops requires a different approach. This segment demonstrates the standard pattern for capturing errors on a per-item basis within a loop.
Watch from 13:31 to 17:08. Observe how an array variable is used to collect errors from individual loop iterations. This is a crucial technique for any batch processing scenario.
Test your understanding!
You are building a flow that processes a batch of invoices from an external system. The main logic is inside a "Try" scope.
-
An action 'Call Invoice API' in your "Try" scope fails. How would you get the specific error message, like "404 Not Found", to include in a Teams notification sent from your "Catch" scope?
-
Your "Catch" scope successfully sends a notification to a Teams channel about the failure. What is the default final status of the flow run, and what action should you add to ensure the run history accurately reflects a failure?
-
The flow uses an 'Apply to each' loop to create multiple records in Dataverse. You suspect some records might fail due to duplicate data. You've set up an array variable called
varFailedRecordsbefore the loop. Inside the loop, what action and configuration would you use to capture the details of each failed record creation?
Show answer
-
You would first use a
Filter arrayaction on the output ofresult('Try')to find the action where thestatusis 'Failed'. Then, in your notification action, you would use an expression on that filtered result likeitem()?['error']?['message']to get the message. -
The default final status would be Succeeded. You must add a Terminate action at the end of the "Catch" scope and set its status to Failed.
-
Inside the 'Apply to each' loop, on your 'Add a new row' action, you would add a parallel branch or a subsequent action. You would then click the ellipses (
...) on that new action, selectConfigure run after, and set it to run only if the 'Add a new row' actionhas failed. The action itself would beAppend to array variable, where you would add the error details and the failing invoice data to yourvarFailedRecordsvariable.
Conclusion
In this lesson, you've learned how to transform a simple flow into a robust, enterprise-grade automation by implementing structured error handling. This is a non-negotiable skill for any Power Platform developer.
Key Takeaways:
Configure run afteris the fundamental building block for creating conditional paths based on an action's success, failure, timeout, or skipped status.- The Try-Catch-Finally pattern, implemented with Scope actions, is the standard for cleanly organizing your logic and handling exceptions for a group of actions.
- Use the
result()andFilter arrayactions within aCatchblock to identify the specific cause of a failure. - Always use the
Terminateaction with aFailedstatus at the end of yourCatchblock to ensure the flow's run history is accurate. - For
Apply to eachloops, use an array variable to manually collect errors from individual iterations, as the standardresult()pattern won't work.
What's Next
We have now covered both sequential logic and error handling. The next logical step is to explore how to run parts of your flow at the same time for efficiency. In our next lesson, we will cover how to implement parallel branches and join operations for concurrent processing.