Introduction
In our last lesson, we explored how our perception of loudness is logarithmic, meaning we perceive equal ratios of sound energy as equal steps in volume. This is why, to manage the enormous range between the quietest audible sound and the loudest tolerable one, audio professionals rely on the decibel (dB) scale. Today, we will conduct a deep dive into this fundamental unit of measurement.
This lesson fulfills the learning outcome of describing the decibel scale and its application in measuring both acoustic sound pressure and electrical signal levels. You will learn not only what a decibel is but also why it is structured the way it is. We will demystify the various "flavors" of the decibel, such as dBSPL, dBu, and dBFS, which you will encounter constantly on hardware equipment and in your Digital Audio Workstation (DAW). Mastering this topic is non-negotiable for any aspiring audio engineer, as it forms the basis for setting correct recording levels, mixing, and understanding equipment specifications.
Why We Need the Decibel: Taming an Immense Range
The primary reason for the decibel's existence is the sheer dynamic range of human hearing. The difference in sound pressure between a nearly silent room and a painful sound like a jet engine is a factor of millions. Using a linear scale like Pascals (the unit of pressure) would be incredibly unwieldy, involving numbers with many zeros.
The decibel scale solves this by using logarithms to compress this vast range into manageable numbers, typically from 0 to about 140. The following video provides an excellent conceptual breakdown of why this logarithmic approach is so necessary and how the decibel unit was developed.
Why decibels in acoustics - Acoustics Basics
This video from HEAD acoustics International, "Why decibels in acoustics," explains the motivation behind the dB scale. Please watch it in three parts. First, watch the section that illustrates the problem with using a linear scale for the vast range of sound pressures we can hear. Next, see how logarithms offer a clever solution. This section explains how taking the logarithm compresses the range and introduces the "Bel," named after Alexander Graham Bell, and the "deci-Bel" (dB). Pay close attention to the explanation from logarithms to decibels. Finally, the video explains a crucial but often confusing point: why we sometimes see the formula multiplied by 10 and other times by 20. Watch the segment on power vs. pressure to understand this distinction.
Focus on the core idea: the decibel is a tool to make gigantic ratios understandable.
From this video, there are two foundational properties of the decibel to commit to memory:
- A decibel is always a ratio: It compares one value to a reference value. A statement like "the signal is 60 dB" is meaningless on its own. It must be "60 dB louder than X" or "60 dB relative to reference Y."
- The scale is logarithmic: This aligns both with our perception of loudness and the mathematics of handling enormous value ranges.
The Flavors of the Decibel: Understanding the Suffix
Because the decibel is a ratio, the reference point is critical. The suffix after "dB" tells you exactly what that reference is. We will now explore the most common types you will use in audio engineering. The following article from iZotope is a great guide.
Inside the Decibel and Why It Matters
This article provides clear definitions of the different dB types. To start, read the section that unpacks the decibel's two fundamental properties.
In the article, find the heading "Unpacking the decibel." Read the two subsections that follow: The logarithmic scale and the ratio.
Now let's examine the specific references for each application.
dBSPL: Measuring Sound in the Air
When we measure the loudness of a sound in an acoustic space—a room, a concert hall, the outdoors—we use dBSPL, which stands for Decibels Sound Pressure Level.
- Application: Measuring acoustic sound. How loud is that speaker? How noisy is this room?
- Reference: The reference point, 0 dBSPL, is 20 micropascals (µPa) of pressure, which is internationally recognized as the quietest sound a healthy human ear can detect.
So, when a sound level meter reads "85 dBSPL," it means the sound pressure is 85 decibels above the threshold of human hearing.
dBu & dBV: Measuring Analog Electrical Signals
Inside analog audio equipment like mixing consoles, preamps, and compressors, the audio signal exists as a fluctuating voltage. We use dBu and dBV to measure this signal level.
- Application: Measuring voltage in analog audio gear.
- Reference for dBu: 0 dBu = 0.775 volts. This is the standard for professional audio equipment. A common "nominal" or optimal operating level for pro gear is +4 dBu.
- Reference for dBV: 0 dBV = 1 volt. This is typically used for consumer and semi-professional equipment, which often operates at a nominal level of -10 dBV.
Understanding this distinction is crucial for correctly connecting different pieces of gear. A mismatch between pro and consumer level equipment can lead to either a very weak, noisy signal or a distorted, clipped one.
dBFS: Measuring Digital Signals
Inside your DAW or any digital audio device, the signal is represented by a series of numbers. Here, we use dBFS, or Decibels Full Scale.
- Application: Measuring signal level in a digital system.
- Reference: The reference point is "Full Scale," which is the maximum possible numerical value that the digital system can represent. Therefore, 0 dBFS is the absolute ceiling. All other levels are expressed as negative numbers (e.g., -6 dBFS, -18 dBFS).
Any signal that attempts to go above 0 dBFS will be harshly clipped, resulting in severe distortion. This is a hard limit, unlike analog systems which may distort more gradually.
The article from Sonarworks provides a concise summary of these reference points.
The Decibel: How a Tiny Unit Measures the Universe of ...
This article provides a very clear list of the common dB reference points.
Please read the short section that begins just after the introduction. Focus on the list that defines the common anchor points and their notations.
Visualizing the Decibel Scales
Seeing how these different scales relate to one another is key to understanding their practical use. The following chart, the "dB Ruler," is a powerful tool for visualizing these relationships.
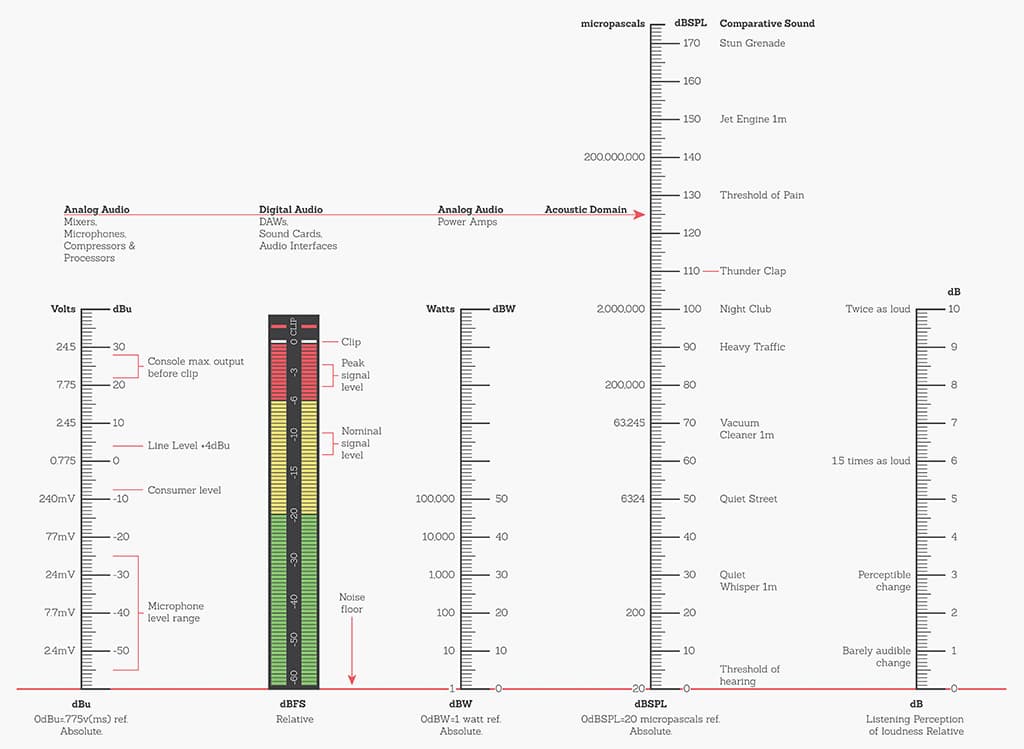
Take a moment to study the chart. Notice the columns for Analog Audio (dBu), Digital Audio (dBFS), and the Acoustic Domain (dBSPL). On the far right, you see real-world sound examples. See how a "Quiet Whisper" around 30 dBSPL corresponds to very low signal levels, while "Heavy Traffic" at 90 dBSPL pushes the meters into their nominal operating range.
Headroom and Calibration: dBu vs. dBFS
A critical concept in recording is the relationship between the analog levels coming from your gear and the digital levels inside your DAW. We do not want our average signal level to be anywhere near the digital ceiling of 0 dBFS, as this leaves no room for unexpected peaks. This "room to spare" is called headroom.
To ensure adequate headroom, studios calibrate their systems. A common standard is to align the analog nominal level of +4 dBu with a digital level of -18 dBFS or -20 dBFS.

This alignment means that when your analog gear's meters are averaging around their sweet spot (+4 dBu), your DAW's meters will be averaging around -18 dBFS. This leaves 18 decibels of headroom before the signal hits the digital ceiling and clips. This is a fundamental principle of gain staging, a topic we will explore in depth in the next module.
Practical Rules of Thumb
To make decibels more intuitive, here are three common rules used by engineers:
-
The 3 dB Rule: A change of +3 dB represents a doubling of power. A change of -3 dB is a halving of power. This applies primarily to power amplifiers. For example, a 200-watt amplifier is +3 dB more powerful than a 100-watt amplifier.
-
The 6 dB Rule: A change of +6 dB represents a doubling of voltage or sound pressure. A change of -6 dB is a halving of voltage/pressure. This is the rule that applies to signal levels in your mixer and DAW. If you turn a fader up by 6 dB, you have doubled the signal's voltage.
-
The 10 dB Rule: A change of +10 dB is perceived by our ears as being roughly twice as loud. A change of -10 dB sounds about half as loud. This is a psychoacoustic approximation, but it's a very useful one for making mixing decisions.
Conclusion
This lesson demystified the decibel, one of the most important and ubiquitous concepts in audio. By understanding its logarithmic and relational nature, you are now equipped to interpret specifications and meters correctly.
Here are the key takeaways:
- The decibel (dB) is a logarithmic ratio, not an absolute unit. It's used to manage the vast dynamic range of sound.
- A dB value is only meaningful when its reference point is known, which is indicated by a suffix.
- dBSPL measures acoustic sound pressure in the air, referenced to the threshold of human hearing.
- dBu and dBV measure signal voltage in analog equipment, with dBu being the professional standard.
- dBFS measures signal level in digital systems, where 0 dBFS is the absolute maximum level before clipping.
- Proper calibration between analog (dBu) and digital (dBFS) systems is essential for maintaining headroom and preventing distortion.
Now that we have a solid grasp on how we measure the amplitude of sound waves, our next lesson will turn our attention back to frequency. We will explore the full frequency spectrum of human hearing and how this spectrum is divided, laying the groundwork for one of the most powerful tools in audio engineering: equalization (EQ).