Hello! Welcome to the final lesson in our "Optimal Entry Framework" module.
In our previous lessons, you've learned how to identify high-probability trade setups by finding the confluence of key ICT concepts. We've seen how a Fair Value Gap (FVG) or an Order Block (OB) located within an Optimal Trade Entry (OTE) zone can significantly increase our confidence in a trade's direction.
Today, we move from analysis to execution. Our goal is to define precise entry, stop-loss, and take-profit levels for an OTE setup. This is where the theoretical framework becomes a concrete, actionable trade plan. Mastering this step is critical for effective risk management and is the foundational logic you'll eventually translate into code for your trading bots.
From Zone to Precision: The Three Pillars of a Trade Plan
While the OTE provides a high-probability zone, a professional trader needs specific price levels to execute and manage a trade. We can break this down into three pillars:
- The Entry: The exact price at which you enter the market.
- The Stop-Loss (SL): The price at which you exit the trade for a small, predefined loss if the idea is proven wrong.
- The Take-Profit (TP): The price (or prices) at which you exit the trade to realize a profit.
These three elements are derived directly from the same Fibonacci structure you've already learned to draw.
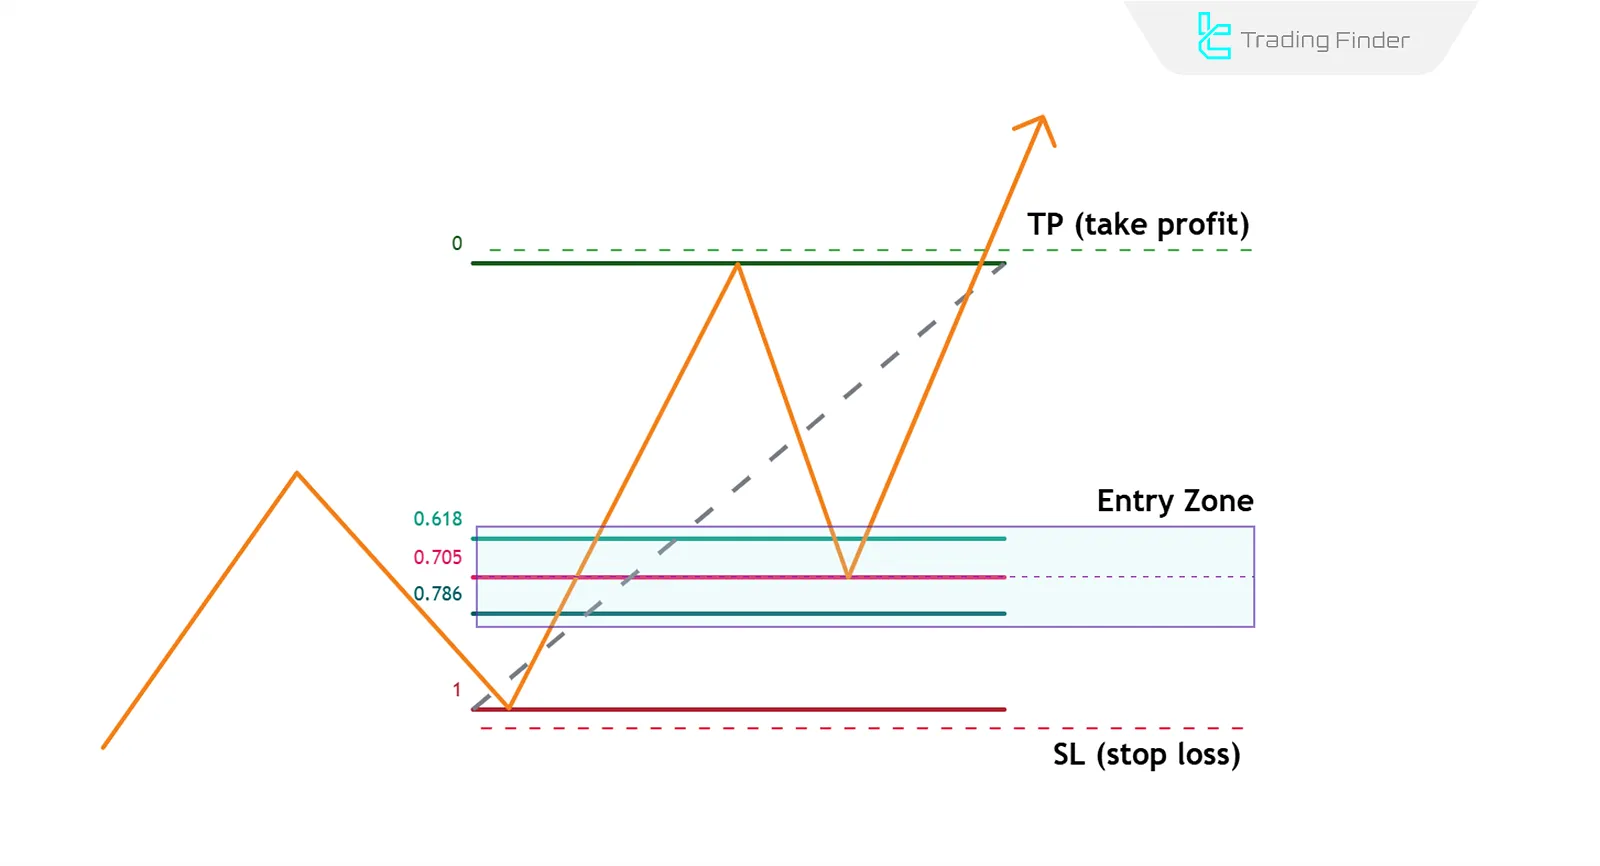
Let's break down how to define each of these pillars with precision.
Pillar 1: Defining Your Entry Point
The OTE zone between the 62% and 79% Fibonacci levels is an area of opportunity. To place a trade, you must select a specific level within it. Here are a few systematic approaches:
- The 62% Level: This is the shallowest OTE level. Entering here gives you the highest probability of your limit order being filled, as price doesn't need to retrace as deeply. The trade-off is a slightly lower risk-to-reward ratio.
- The 70.5% Level (The "Equilibrium" of OTE): Often considered the "true" OTE or the sweet spot. It offers a great balance between getting your order filled and achieving a strong risk-to-reward ratio.
- The 79% Level: This is the deepest retracement level. It offers the best possible risk-to-reward ratio but comes with a higher risk that price may reverse before reaching your entry, causing you to miss the trade entirely.
So, which should you choose? There's no single "best" answer; it depends on your trading style and the specific setup. A good starting point is the 70.5% level.
To see this explained, let's watch a clip that details the entry, stop, and targets.
ICT's Optimal Trade Entry (OTE) Explained
The video 'ICT's Optimal Trade Entry (OTE) Explained' by Smart Risk provides a clear, step-by-step model for trade execution. This section will walk you through setting the entry, stop-loss, and take-profit levels.
Watch the segment from 06:39 to 08:45. Pay close attention to how the presenter specifies the 70.5% level as the precise entry and defines the standard stop-loss and take-profit targets.
As the video highlights, a systematic approach often uses a limit order placed at one of these key levels.
Pillar 2: Setting a Logical Stop-Loss
Your stop-loss is your safety net. It should be placed at a price level that logically invalidates your trade idea.
For an OTE setup, the logic is very clear:
- For a Buy (Long) Trade: The stop-loss should be placed a few pips or ticks below the swing low of the dealing range (the 100% Fibonacci level).
- For a Sell (Short) Trade: The stop-loss should be placed a few pips or ticks above the swing high of the dealing range (the 100% Fibonacci level).
Why? The entire OTE premise is based on price retracing within a confirmed impulsive move (the dealing range). If price breaks beyond the starting point of that move, the market structure has shifted, and the original reason for the trade is no longer valid. Placing your stop here protects you from a fundamental change in market direction.
This standard placement is a consistent rule across most ICT teachings. However, as you become more advanced, you may identify opportunities for more aggressive stops. For example, the article "Optimal-Trade-Entry-in-ICT.pdf" briefly mentions placing a stop loss above a breaker block for a better risk-to-reward ratio. While this can improve returns, it also increases the risk of being stopped out by volatility before the main move occurs. For now, mastering the standard placement is your primary goal.
Pillar 3: Defining Your Take-Profit Targets
Once you're in a winning trade, you need a plan to take profits. OTE setups provide a logical framework for this using both the dealing range itself and Fibonacci extensions.
Primary Target (TP1): The 0% Level
Your first and most conservative target should always be the other end of the dealing range (the 0% Fibonacci level).
- In a buy setup, this is the recent swing high.
- In a sell setup, this is the recent swing low.
Price is naturally drawn to these levels as they represent significant liquidity pools. It's a high-probability area to take partial or full profits.
Secondary Targets (TP2 & TP3): Fibonacci Extensions
For trades that have stronger momentum, you can target levels beyond the initial dealing range using Fibonacci extension levels. The standard ICT targets are:
- -0.27 (or -27%) Level
- -0.618 (or -62%) Level
These levels project logical areas where the trend extension might pause or reverse. Many traders scale out of their position, taking some profit at TP1, more at TP2, and leaving a final portion to run towards TP3.
The "What Is the OTE Strategy?" article provides a concise summary and a useful comparison table that reinforces these trade management rules.
What Is the OTE Strategy? Optimal Entry & Key Fibonacci ...
This article provides a section dedicated to trade management and a helpful table comparing OTE to classic Fibonacci strategies. We will focus on these parts to solidify the rules for stop-loss and take-profit.
First, read the section 'Managing the Trade in OTE Setup', focusing on the 'Stop Loss Placement' and 'Take Profit Targets' subsections. Then, review the comparison table under the heading 'Comparison of Entry and Exit in the OTE Strategy vs. Classic Fibonacci'. Note how it explicitly defines the SL and TP rules for the OTE strategy.
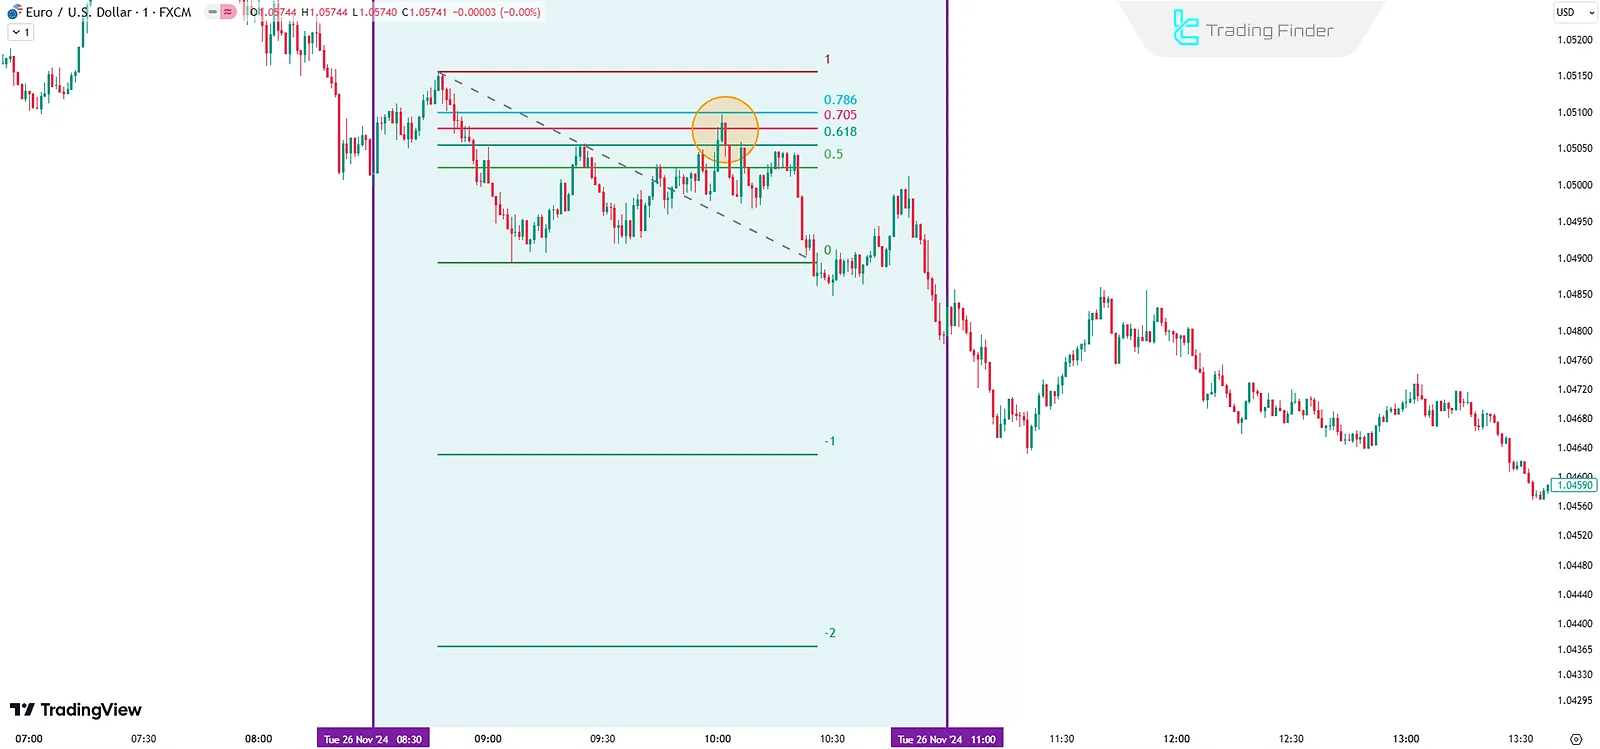
Putting It All Together: A Bearish OTE Example
Let's walk through setting up a short trade from start to finish.
Scenario: EUR/USD is in a downtrend. A recent impulsive move created a swing high at 1.08500 and a swing low at 1.07300.
- Identify the Dealing Range: The range is 120 pips (1.08500 - 1.07300).
- Draw the Fibonacci Tool: From the swing high (1) to the swing low (0).
- Define the Entry: We'll use the 70.5% level.
- Calculation: 1.07300 + (0.705 * 0.01200) = 1.07300 + 0.00846 = 1.08146.
- We place a Sell Limit order at 1.08146.
- Define the Stop-Loss: A few pips above the swing high.
- Let's add 4 pips: 1.08500 + 0.00040 = 1.08540.
- Our Stop-Loss is at 1.08540.
- Define Take-Profit Levels:
- TP1 (0% Level): The swing low at 1.07300.
- TP2 (-27% Level): 1.07300 - (0.27 * 0.01200) = 1.07300 - 0.00324 = 1.06976.
- TP3 (-62% Level): 1.07300 - (0.62 * 0.01200) = 1.07300 - 0.00744 = 1.06556.
Test your understanding!
You are analyzing a bullish market on a stock. A recent impulsive move up created a swing low at $150 and a swing high at $170.
Calculate the precise price levels for a complete trade plan using the 70.5% OTE level.
- Entry Price:
- Stop-Loss Price (place it $0.10 below the swing low):
- Take-Profit 1 (TP1) Price:
- Take-Profit 2 (TP2) Price (at the -27% extension):
Show answer
The dealing range is $20 ($170 - $150).
- Entry Price (70.5%): The retracement is calculated down from the high.
- $170 - (0.705 * $20) = $170 - $14.10 = $155.90.
- (Alternatively, calculate up from the low: $150 + ((1-0.705) * $20) = $150 + (0.295 * $20) = $150 + $5.90 = $155.90)
- Stop-Loss Price:
- $150 (Swing Low) - $0.10 = $149.90.
- Take-Profit 1 (0% Level):
- The swing high at $170.
- Take-Profit 2 (-27% Level):
- $170 + (0.27 * $20) = $170 + $5.40 = $175.40.
Conclusion
This lesson concludes our deep dive into the Optimal Entry Framework. You now possess a complete model, moving from high-level market structure analysis to defining a precise, manageable trade plan. This systematic, rule-based approach is not just for discretionary trading; it forms the very blueprint you will need for algorithmic trading.
Key Takeaways:
- A trade plan has three pillars: A precise Entry, a logical Stop-Loss, and clear Take-Profit targets.
- Entry: Can be set at specific Fib levels within the OTE zone, with 70.5% offering a good balance.
- Stop-Loss: Is placed just beyond the start of the impulsive move (the 100% level) to invalidate the trade idea if the structure breaks.
- Take-Profit: Targets are set at the end of the impulsive move (the 0% level) and at standard Fibonacci extensions like -27% and -62%.
Preview for the Next Lesson:
We are now at an exciting turning point in your learning journey. Having established a robust manual trading model, we will pivot to acquiring the skills needed to automate it. Our next module, "Python Fundamentals for Algorithmic Trading," will start from the very beginning. You will set up your development environment and learn the basic building blocks of programming: variables, data types, and operations. This is the first step toward your goal of building trading bots.