Hello! Welcome back to our module on "Price Imbalances."
In the last lesson, you learned how to identify a Fair Value Gap (FVG) as a three-candle pattern representing a market inefficiency. You now know that these gaps—also called BISI for bullish and SIBI for bearish—are the footprints of rapid institutional moves.
Today, we'll build directly on that knowledge. It's not enough to just see these gaps; you need to know how to use them. This lesson will focus on exactly that: using FVGs as high-probability areas for trade entries and targets. We'll explore how and why price interacts with these zones, and you'll learn a framework for building a trade setup around them. Mastering this is a crucial step toward developing the systematic trading models you aim to eventually automate.
1. The FVG as a Magnet for Price
As we discussed, the market algorithmically seeks efficiency. An FVG is an inefficiency that the price is often drawn back to, like a magnet, in order to "rebalance" or "reprice" that area. This tendency creates two primary ways we can use an FVG in our trading:
- As an Entry Zone: When price makes an aggressive move, leaving an FVG behind, it will often retrace back into the gap. This provides an opportunity to enter a trade in the direction of the original aggressive move.
- As a Profit Target: An old, unfilled FVG on a higher timeframe can act as a destination for price. If you are in a trade, and price is moving towards such an FVG, that gap becomes a logical area to take profits.

To see this dynamic of price returning to fill a gap, let's watch a segment from one of the core ICT mentorship videos.
ICT Mentorship Core Content - Month 04 - ICT Fair Value Gaps FVG
In this classic video, 'ICT Mentorship Core Content - Month 04,' Michael Huddleston demonstrates how price is drawn to an FVG after taking out liquidity. This will help you visualize the 'magnet' effect.
Watch the section from 06:24 to 08:33. Notice how price first runs below an old low (a liquidity sweep or 'turtle soup'), and then reverses to trade back up and fill the FVG. This is a classic ICT model.
2. A Framework for Trading FVGs
Now that you've seen the principle in action, let's formalize it into a trading strategy. A complete trade requires an entry, a stop-loss, and a take-profit.
Fair Value Gap: Explanations, Types, Indicator, Trading ...
The article 'Fair Value Gap Strategy' provides a very clear and structured approach to trading FVGs. We will focus on the section that lays out the complete trade plan.
Read the section titled 'How to Trade Fair Value Gaps'. Pay close attention to the subsections on 'Entry Conditions', 'Stop-Loss Placement Rules', and 'Take-Profit Targets'. This provides the essential blueprint for an FVG setup.
Let's summarize and refine the key points from that reading:
-
Entry:
- Bullish FVG (BISI): After a bullish FVG forms, wait for the price to retrace into the gap. An entry can be placed as soon as price touches the top of the FVG.
- Bearish FVG (SIBI): After a bearish FVG forms, wait for the price to retrace into the gap. An entry can be placed as soon as price touches the bottom of the FVG.
-
Stop-Loss:
- For a long entry in a bullish FVG, the stop-loss should be placed just below the FVG or, more conservatively, below the low of the candle that created the FVG (the middle, impulsive candle).
- For a short entry in a bearish FVG, the stop-loss should be placed just above the FVG or, more conservatively, above the high of the candle that created the FVG.
-
Take-Profit:
- The primary target is often the nearest significant liquidity pool. For a long trade, this would be an old high (Buy-side Liquidity). For a short trade, this would be an old low (Sell-side Liquidity).
- Alternatively, an opposing FVG on a higher timeframe can also serve as a logical target.
This exact model—a liquidity sweep followed by an FVG entry—is the foundation of the Silver Bullet strategy you're interested in. The article ICT Silver Bullet Strategy Explained confirms this. In that strategy, a trader waits for liquidity to be taken during a specific time window, then looks for the resulting FVG to use as an entry to target the opposing liquidity.
Test your understanding!
Look at the chart below. A bearish FVG (SIBI) has formed after a strong downward move. Price then retraces back up to the gap.
- Where would you consider entering a short trade?
- Where would you place a logical stop-loss?
- What is a potential take-profit target visible on the chart?
Show answer
- Entry: A short entry could be taken as soon as the price trades into the FVG zone (the bottom of the highlighted box).
- Stop-Loss: A logical stop-loss would be placed just above the high of the FVG box, or more conservatively, above the high of the large red candle that created the gap.
- Take-Profit: The most logical target on this chart is the old swing low, which represents a pool of Sell-side Liquidity (SSL).
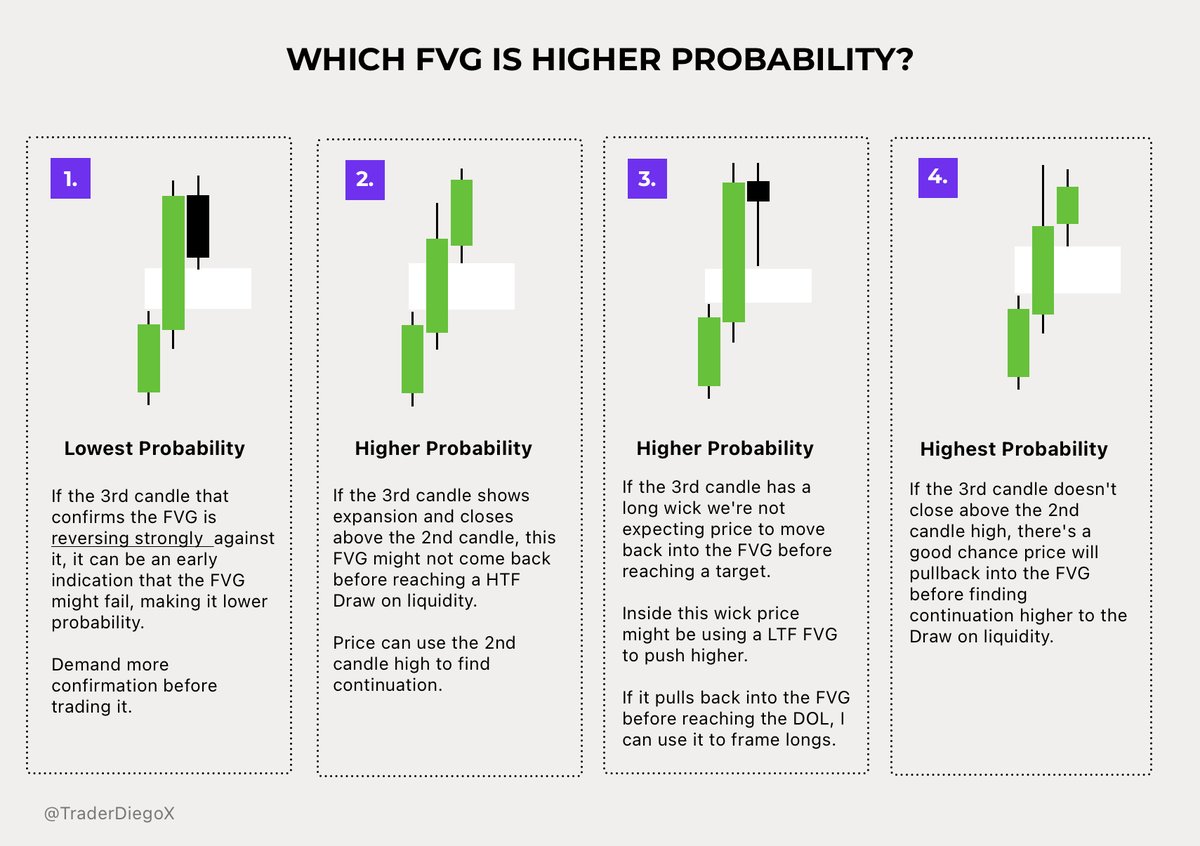
3. Identifying High-Probability FVG Setups
Not all FVGs are created equal. To fulfill the learning outcome, we need to focus on what makes them "high-probability." Relying on an FVG alone is not enough; we need confluence—multiple confirming factors that align to support the trade idea.
The following video provides an excellent checklist of six factors that increase the validity and probability of an FVG setup.
I Found A Secret To Fair Value Gaps
The video 'I Found A Secret To Fair Value Gaps' by TradingLab is a fantastic resource that breaks down six key criteria for identifying strong, high-probability FVGs. We will go through these one by one.
Watch the video from 01:29 to 06:22 to learn the six criteria. Then, watch the live trade example from 06:22 to 07:56 to see how they are all combined in practice.
Let's summarize the six criteria for a high-probability FVG from the video:
- The FVG must be unmitigated: The gap should be fresh and not have been tested or filled by price since its formation.
- Confirming candle closure: When price retraces to the FVG, the candle should ideally close within the gap or be rejected from it, closing back in the direction of the trade. A candle closing straight through the FVG invalidates it.
- Confluence with Support/Resistance: An FVG that lines up with a traditional support or resistance level is much stronger.
- Priority based on location: When multiple FVGs exist, the highest one in a bearish move and the lowest one in a bullish move have the highest priority.
- Location in Premium/Discount: This is a core ICT concept we'll cover in detail later. For now, the simple rule is: for buy setups, you want to trade FVGs in the lower half (discount) of a price leg. For sell setups, you want to trade FVGs in the upper half (premium). The Gann Box tool shown in the video is just a visual way to find the 50% level.
- A preceding Break of Structure (BOS): An FVG is most powerful when it's created by the same impulsive move that breaks a prior swing high (for buys) or swing low (for sells). This confirms the momentum is strong and likely to continue.
Combining these factors—especially a liquidity sweep followed by a break of structure that creates an unmitigated FVG—gives you a very high-probability trading model.
Conclusion
In this lesson, you have moved from simply identifying FVGs to understanding how to use them as cornerstones of a trading setup. You now have a framework for entering, setting a stop-loss, and targeting profits based on these powerful institutional footprints.
Key Takeaways:
- FVGs can be used as high-probability entry zones when price retraces into them or as logical profit targets if they are unfilled on a higher timeframe.
- A basic FVG trade setup involves entering when price touches the gap, placing a stop-loss just beyond it, and targeting a nearby liquidity pool.
- The probability of an FVG setup increases significantly with confluence. The most powerful setups often involve a liquidity sweep, a break of structure, and the creation of a fresh (unmitigated) FVG.
Preview for the Next Lesson:
We've discussed entering a trade when price retraces to an FVG. But sometimes price will respect the FVG and reverse, while other times it will trade right through it. How can we tell the difference? Our next lesson, "Differentiate between FVGs that are likely to be filled versus respected," will delve into the nuances that help you anticipate which outcome is more likely, further refining your ability to select the best trading opportunities.