Hello! Welcome to the third lesson in our "Foundations for Automated Deployment" module.
In our last lesson, we compared different Git branching strategies and concluded that a simple approach like GitHub Flow is an excellent starting point for projects aiming for Continuous Delivery. The core principle of GitHub Flow is that your main branch is always in a deployable state.
But this raises a question: if you deploy multiple times, how do you track which specific version of the code is running in production? A commit hash like f4a8c3e is precise but not very descriptive. This is where Git tags come in. Today, you will learn how to use Git tags to assign meaningful version numbers to your application releases, enabling clear tracking and providing a simple mechanism for rollbacks.
What is a Git Tag?
In Git, a branch is a pointer to a commit that moves forward as you add new commits. A tag, by contrast, is a pointer that is fixed to a specific commit. Think of it as a permanent bookmark or a label marking a significant point in your project's history, most commonly a release.
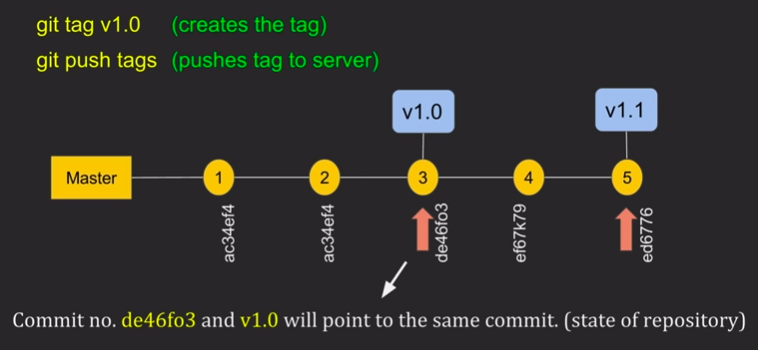
There are two main types of tags. Let's get a clear definition of each.
How to Create, List, and Manage Tags in Git
Please read the following sections from the Codecademy article 'How to Create, List, and Manage Tags in Git' to understand what tags are and the difference between the two types.
Read the sections 'What is a Git tag?', 'How to create lightweight Git tags', and 'How to create annotated Git tags'. Focus on understanding why annotated tags are preferred for official releases.
As the article explained, while lightweight tags are simple pointers, annotated tags are full objects in Git that store extra metadata, including the tagger's name, email, date, and a message. For this reason, annotated tags are the standard for marking application releases.
A Naming Convention for Your Tags: Semantic Versioning
To make tags useful, you need a consistent naming convention. The industry standard for software versioning is Semantic Versioning (SemVer). You've likely encountered this in your work with composer.json for PHP packages and package.json for JavaScript libraries.
SemVer uses a MAJOR.MINOR.PATCH format:
- MAJOR version increases for incompatible API changes.
- MINOR version increases for adding functionality in a backward-compatible manner.
- PATCH version increases for backward-compatible bug fixes.
Adopting SemVer for your application's release tags brings clarity and predictability to your release history. The following video provides an excellent explanation of this concept.
Strategies for Github Tagging and Release Management
Watch this segment from the video 'Strategies for Github Tagging and Release Management' to understand how Semantic Versioning works in practice.
Watch from 10:28 to 13:39. The presenter explains the MAJOR.MINOR.PATCH structure and provides examples of when to increment each number.
Creating, Pushing, and Publishing a Release
Now, let's put theory into practice. The typical workflow for creating a release involves three steps:
- Creating an annotated tag locally on your machine.
- Pushing that tag to your remote repository (e.g., GitHub).
- Creating a "Release" on GitHub, which is a user-friendly wrapper around your Git tag that includes release notes.
The next part of the video you just watched walks through this entire process from the command line to the GitHub UI.
Strategies for Github Tagging and Release Management
This segment demonstrates the complete workflow for creating and publishing a versioned release.
Watch from 13:39 to 18:40. Pay close attention to the commands used: git tag -a ..., git push origin --tags, and the steps taken in the GitHub UI to 'Draft a new release'.
To summarize the key commands for managing tags:
- Create an annotated tag:
git tag -a v1.0.0 -m "Release version 1.0.0" - List all tags:
git tag - Push a single tag:
git push origin v1.0.0 - Push all local tags:
git push origin --tags - Delete a local tag:
git tag -d v1.0.0 - Delete a remote tag:
git push origin --delete v1.0.0
Test your understanding!
You have just merged a small, backward-compatible bug fix into your main branch. The current version of your Laravel application is v2.4.1. What would be the appropriate SemVer tag for this new release, and what Git command would you use to create an annotated tag for it?
Show answer
The new version should be v2.4.2, because this is a backward-compatible bug fix, which calls for a PATCH version increment.
The command to create the annotated tag would be:git tag -a v2.4.2 -m "Release version 2.4.2"
Using Tags for Inspection and Rollbacks
One of the most powerful features of tagging is the ability to easily access a specific state of your codebase. This is essential for debugging issues in a past release or for performing a rollback if a deployment goes wrong.
Inspecting an Old Version
You can check out the code exactly as it was for a specific release. This is useful for reproducing bugs reported in older versions.
Strategies for Github Tagging and Release Management
This final clip from the video shows how to use git checkout to switch your working directory to the state of a specific tag.
Watch from 18:40 to 20:05. Notice how checking out a tag puts you in a 'detached HEAD' state.
As the video shows, checking out a tag puts you in a "detached HEAD" state. This means you're not on a branch. It's great for inspection, but if you need to make changes (like a hotfix), you should create a new branch from the tag:git checkout -b hotfix-v1.2.0 v1.2.0
Rolling Back to a Previous Version
If a deployment fails, tags provide a clear, stable reference point to roll back to. While a real-world rollback in an automated pipeline involves more steps (like redeploying a previous Docker image), the Git command at its core is straightforward.
To learn about this, please review the relevant section of the Codecademy article.
How to Create, List, and Manage Tags in Git
This section explains two ways to revert your codebase to a previous tag.
Read the section 'How to revert to a previous Git tag'. Pay close attention to the git reset --hard command and its implications. This command is destructive and rewrites history, so it must be used with care.
Using git reset --hard <tag_name> is a powerful but dangerous command. On a developer's machine, it can cause loss of work. However, in an automated deployment script running on a server, it can be an effective way to quickly revert the server's code to a last known good state before re-running the build process.
Test your understanding!
Your current production deployment is v3.1.0, but it has a critical bug. The last stable version was v3.0.5. You need to create a new branch called emergency-fix based on the stable version's code to start working on a patch. What Git command would you use?
Show answer
You would use the git checkout -b command to create a new branch from the specified tag:
git checkout -b emergency-fix v3.0.5
This creates the emergency-fix branch using the exact code from the v3.0.5 release, providing a clean slate for you to work on the patch.
Conclusion
In this lesson, we've established the critical role of Git tags in a professional deployment workflow. They provide the human-readable signposts needed to navigate your project's history effectively.
Here are the key takeaways:
- Git tags are fixed pointers to specific commits, ideal for marking releases.
- Annotated tags are the standard for releases as they store important metadata.
- Semantic Versioning (
MAJOR.MINOR.PATCH) provides a clear and consistent naming strategy for your release tags. - The workflow involves creating a tag, pushing it to the remote, and creating a GitHub Release for documentation.
- Tags are essential for tracking versions, inspecting historical code, and enabling rollbacks in case of deployment failures.
With a solid branching strategy and a disciplined tagging policy, you now have two key pillars of an automated workflow. However, with the main branch being so important, how do we prevent accidental pushes or unauthorized merges?
In our next lesson, we will address this by learning how to implement branch protection rules in your Git repository to safeguard your production code.