Hello! In our last lesson, you mastered the crucial skill of editing system configuration files from the terminal using nano and vim, and learned the secure way to do so with sudoedit.
As we previewed, we're now going to put that skill to immediate use. Editing files is about changing the state of your system, but what if you want to make things happen automatically, without you being there? This is where task scheduling comes in, a cornerstone of system administration and a powerful tool in a hacker's arsenal.
This lesson directly addresses the learning outcome: Schedule automated tasks using cron and interpret crontab entries. We will explore how Linux systems run commands on a repeating schedule, a process managed by the cron daemon. You'll learn how to create, view, and manage these scheduled tasks for your own user and for the system itself.
For an ethical hacker, understanding cron is twofold: it's a fundamental sysadmin skill for automating maintenance (like log rotation or backups), but it's also a primary technique for achieving persistence on a compromised system—for example, by scheduling a malicious script to run periodically.
1. What is Cron? The System's Timekeeper
Before we start scheduling, let's clarify the terminology. You'll hear the terms cron, crontab, and cron job used frequently. They are related but distinct.
- Cron Daemon (
crond): A daemon is a background process that runs without direct user interaction. Thecrondaemon wakes up every minute, checks for scheduled tasks, and executes them if their time has come. On modern systems like Arch, this service is often calledcronie. You can check its status withsystemctl status cronie.service. - Crontab: This stands for "cron table." It is a special text file that contains the list of scheduled tasks. Each user on the system can have their own crontab, and there's also a system-wide one.
- Cron Job: This is a single entry in a crontab file—one scheduled task.
Understanding Crontab in Linux With Examples
To get a clear picture of how these concepts fit together, let's read a quick introduction from the article 'Understanding Crontab in Linux With Examples'.
Please read the section 'Quick introduction to key cron concepts'. Focus on the table that defines the Daemon, Table, and Job, and the explanation of each. This will provide a solid theoretical foundation.
2. Managing Your Crontab
Interacting with your crontab is done through the crontab command. You almost never edit the crontab file directly.
The two essential options are:
crontab -l: Lists the contents of your current user's crontab.crontab -e: Edits your current user's crontab. This will open the file in your default terminal editor (likelynanoorvim), directly applying the skills from our last lesson.
Let's watch a video that introduces these commands and the fundamental structure of a cron job.
Linux Crash Course - Scheduling Tasks with Cron
The video 'Linux Crash Course - Scheduling Tasks with Cron' by Learn Linux TV provides a great introduction to the basics. It shows how to list and edit your crontab and breaks down the syntax.
Watch from 00:43 to 06:11. Pay close attention to: The difference between crontab -l and crontab -e. The breakdown of the five time fields and what each one represents (minute, hour, etc.). How the asterisk (*) is used as a wildcard for 'every'.
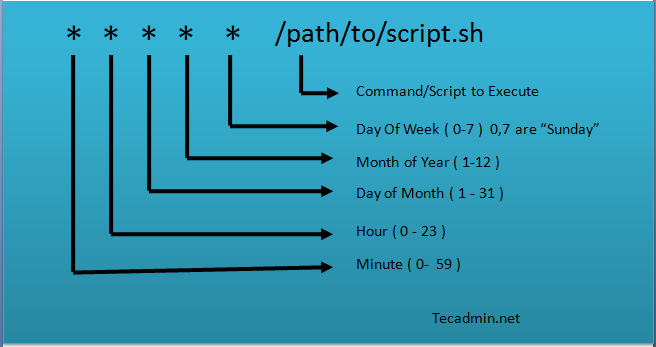
Crontab Syntax Breakdown
As the video explained, every cron job has two parts: the schedule and the command. The schedule is defined by five fields, followed by the command to be executed.
3. Hands-on: Your First Cron Job
Time to put this into practice. Let's create a simple job that runs every minute.
- Open your terminal and edit your crontab:
crontab -e - Your editor (
nanoorvim) will open. Add the following line at the bottom of the file:
This job uses wildcards for all time fields, meaning it will run every minute of every hour of every day. It executes the* * * * * date >> ~/cron_output.logdatecommand and appends (>>) the output to a file namedcron_output.login your home directory. - Save the file and exit the editor.
- In
nano:Ctrl+O,Enter,Ctrl+X. - In
vim:Esc, then:wq,Enter.
- In
- You should see a message like
crontab: installing new crontab. - Verify the job is installed:
crontab -l - Wait for the clock to tick over to the next minute, then check your log file:
Wait another minute and run thecat ~/cron_output.logcatcommand again. You should see a new line with the latest timestamp. To watch the file update in real-time, you can usetail -f ~/cron_output.log. PressCtrl+Cto stop watching.
4. Advanced Scheduling Syntax
Using only * and numbers is just the beginning. cron provides special characters to create more complex schedules.
This is best explained with clear examples. This next video covers the most common operators you'll need.
Linux/Mac Tutorial: Cron Jobs - How to Schedule Commands with crontab
Corey Schafer's tutorial 'Cron Jobs - How to Schedule Commands with crontab' excels at explaining the more advanced syntax for creating specific schedules.
Please watch from 07:27 to 13:28. This covers four key concepts: Comma (,): For specifying multiple values (e.g., 1,15 for the 1st and 15th). (07:27 - 09:25) Slash (/): For step values or intervals (e.g., */10 for every 10 minutes). (09:25 - 11:02) Dash (-): For defining a range (e.g., 9-17 for 9 AM to 5 PM). (11:02 - 12:11) Combined Example: A practical example that ties these operators together. (12:11 - 13:28)
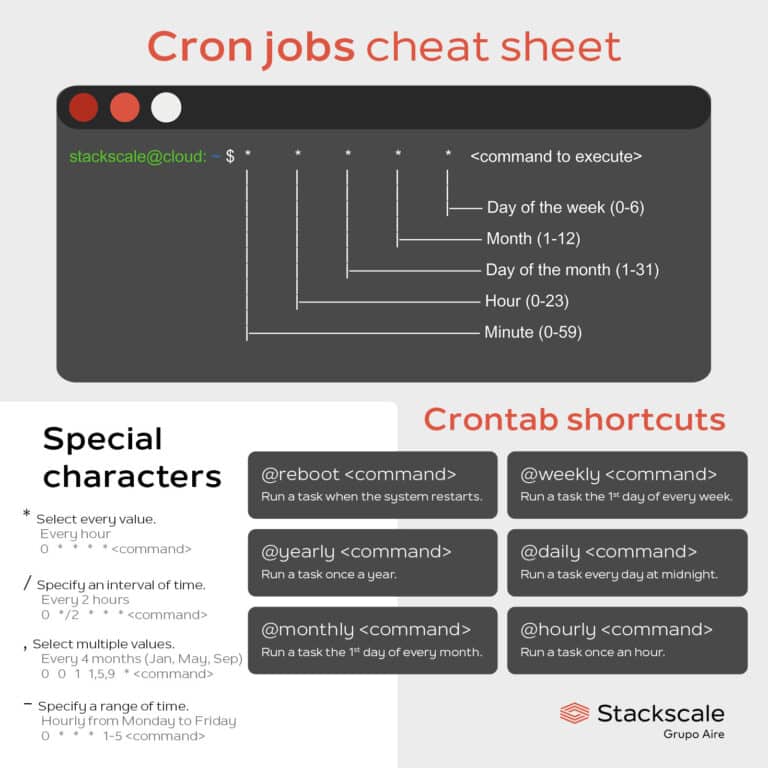
This cheat sheet is an excellent reference to have on hand for summarizing these rules and some handy shortcuts.
Practice Interpreting a Cron Job
Let's test your understanding. Look at the following crontab entry. What does it do?
*/15 9-17 * * 1-5 /usr/local/bin/check_updates.sh
Click to reveal the answer
This job runs the script /usr/local/bin/check_updates.sh:
*/15: Every 15 minutes...9-17: ...between the hours of 9 AM and 5 PM (17:00)...*: ...on every day of the month...*: ...in every month...1-5: ...from Monday (1) to Friday (5).
In plain English: "Run the update check script every 15 minutes during business hours on weekdays."
5. Best Practices and Other Users
When you start using cron for real system tasks, there are a few professional practices you need to follow.
Running Jobs as Root or Other Users
Many administrative tasks need to be run as root. You can edit the root user's crontab using sudo.
sudo crontab -e: Edits therootuser's crontab.sudo crontab -u <username> -e: Edits a specific user's crontab (for example, a service user likewww-datafor a web server).
The video from Learn Linux TV demonstrates this clearly.
Linux Crash Course - Scheduling Tasks with Cron
Let's return to the Learn Linux TV video, which has excellent demonstrations of managing other users' crontabs and a critical best practice.
Watch from 07:57 to 16:53. Focus on these two key points: Editing other users' crontabs: Notice how sudo crontab -u root -e is used to manage jobs for the root user. This is how you'll schedule system-wide administrative tasks. (07:57 - 15:24) Using absolute paths: The presenter emphasizes that you must use the full path to your scripts and commands (e.g., /usr/bin/apt instead of just apt). This is because cron runs with a very limited PATH environment variable and won't know where to find commands otherwise. This is one of the most common reasons cron jobs fail. (15:24 - 16:53)
Handling Output
By default, cron will try to email any output from your command to the user who owns the job. Since a mail server isn't usually configured on a desktop or personal server, this can get messy. It's better to explicitly handle the output.
- Log to a file: As we did in our first example, redirect the output. To capture both standard output and errors, use:
* * * * * mycommand >> /path/to/my.log 2>&1 - Silence the output: If you don't care about the output and just want the command to run silently, redirect it to
/dev/null:
* * * * * mycommand > /dev/null 2>&1
Removing Cron Jobs
To remove your cron jobs, you have two options:
- Run
crontab -eand delete the lines for the jobs you want to remove. - Run
crontab -r. Be very careful with this command. It will instantly remove your entire crontab without asking for confirmation.
Before you finish, please clean up the test job you created:
- Run
crontab -e. - Delete the line
* * * * * date >> ~/cron_output.log. - Save and exit.
- You can also delete the log file:
rm ~/cron_output.log.
Conclusion
You have now learned how to automate tasks on your Linux system, a skill that is central to both system administration and ethical hacking.
Key Takeaways:
cronis the background daemon that executes scheduled tasks.- You manage your list of tasks (your
crontab) usingcrontab -e(edit) andcrontab -l(list). - The
crontabsyntax has five time/date fields followed by the command to run. - Special characters (
*,,,-,/) allow for flexible and complex scheduling. - For system administration and persistence, you'll often edit the
rootcrontab usingsudo crontab -e. - Crucial Best Practice: Always use absolute paths for commands and scripts in your crontab entries.
Next Lesson Preview:
You've spent the last few modules building a strong foundation in how a single Linux system works—managing files, users, processes, and now, time. In the next module, "Foundations of Network Communication," we will shift our focus from the single machine to how multiple machines talk to each other. We will start with the theoretical bedrock of all networking: the OSI model.