Hello! Welcome back to our series on building your foundational Linux skills.
In the last lesson, we learned how to become observers on our system. You now know what processes and PIDs are, and you can use ps, top, and htop to list all the running programs and find their unique Process IDs. This is like learning how to identify all the pieces on a chessboard.
Today, we're moving from observing to interacting. We're going to learn how to control those pieces. This lesson directly addresses your goal of understanding how systems work at a deeper level, which is critical for both defending and attacking a machine. Knowing how to terminate a rogue process, a hung application, or an unauthorized script is a fundamental power for any system administrator or ethical hacker.
Our learning outcome is to send signals to processes using kill and killall, explaining common signals like SIGTERM and SIGKILL.
1. Beyond "Killing": Understanding Signals
First, let's clear up a common misconception. The kill command doesn't just "kill" things. Its real purpose is to send a signal to a process. A signal is a message from the kernel that instructs a process to perform an action. While terminating is a common action, it's not the only one.
To get a quick overview of this concept, watch the first part of the following video.
How to use the kill command in Linux (Linux Crash Course Series)
The video "How to use the kill command in Linux" from Learn Linux TV starts by explaining that kill is for sending signals, not just for termination. This is the perfect introduction to our topic.
Watch from 00:28 to 01:25. The key takeaway is that sending a signal causes a process to do something, like reload a configuration file or, more commonly, to terminate.
Think of a signal as a software interrupt. The Linux kernel provides dozens of different signals, but for now, we will focus on the two most important ones for process termination:
SIGTERM(Signal 15)SIGKILL(Signal 9)
2. The kill Command: A Tale of Two Signals
The most direct way to interact with a process is using the kill command with the process's PID, which you learned to find in our last lesson. The key is which signal you send.
SIGTERM (15): The Polite Request
When you use kill without specifying a signal, it sends SIGTERM by default.
kill <PID> is the same as kill -15 <PID>
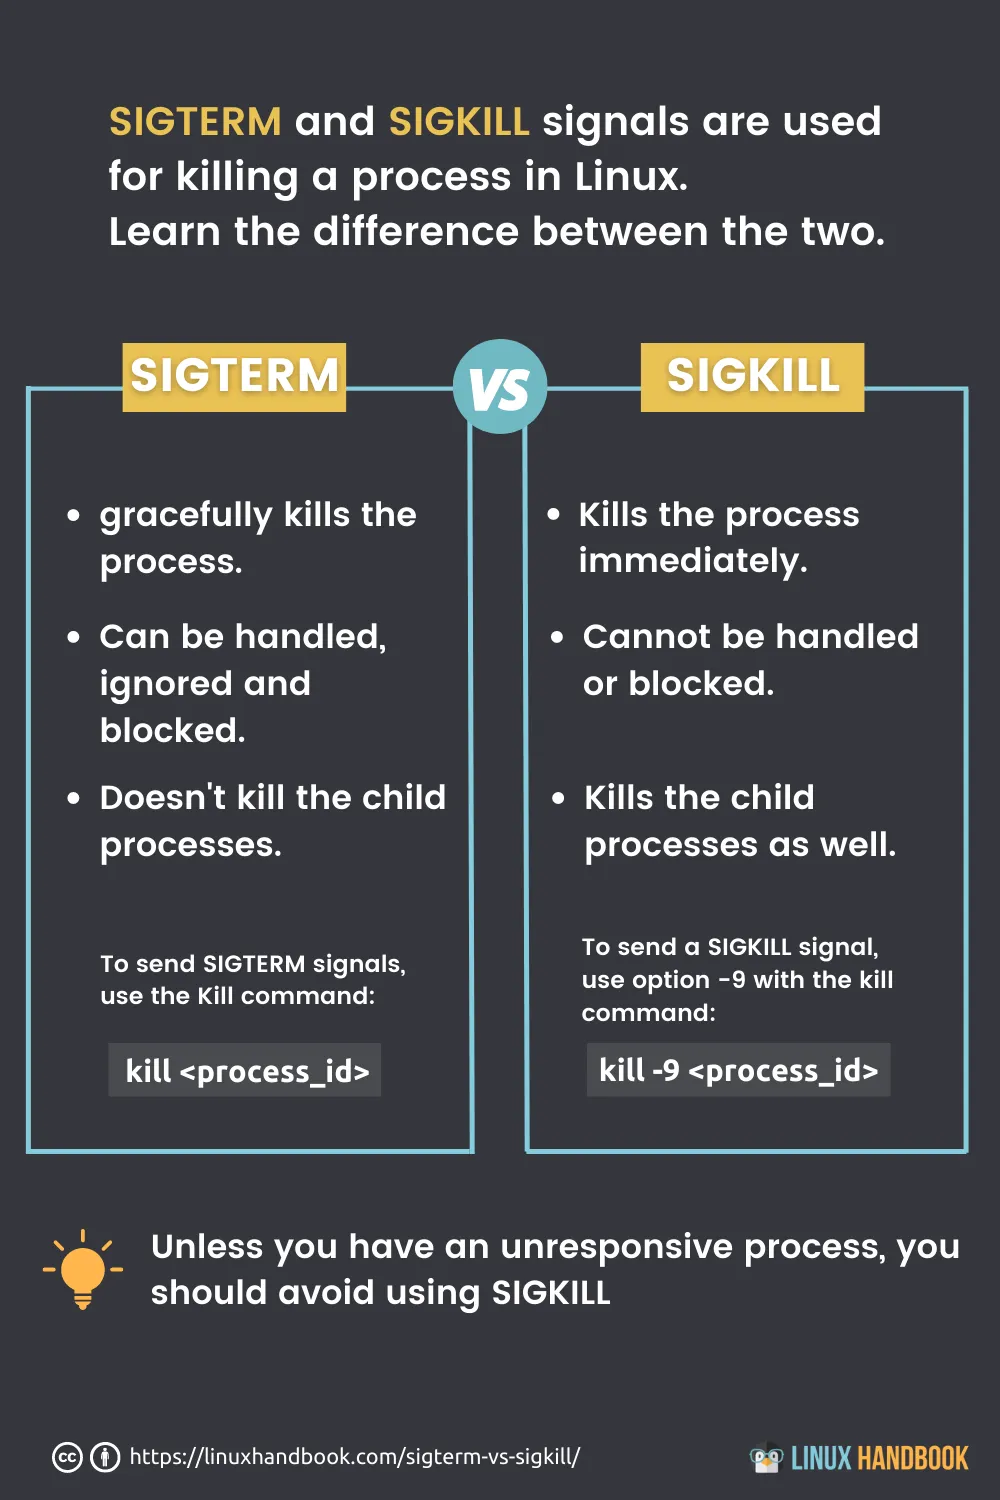
SIGTERM politely asks the process to terminate. This is the graceful way to close an application. It gives the process a chance to perform cleanup operations: save its state, close open files, and release resources before shutting down. You should always try this first.
SIGKILL (9): The Forceful Order
Sometimes, a process is unresponsive and will ignore a SIGTERM signal. In these cases, you need a more forceful approach.
kill -9 <PID>
SIGKILL doesn't ask; it commands. This signal cannot be ignored or blocked by the process. The kernel steps in and terminates the process immediately. This is effective but can be risky, as the process gets no chance to clean up after itself. This could lead to corrupted files or other system inconsistencies. Use SIGKILL as a last resort.
The following article section and image provide an excellent summary of this crucial difference.
How to Use the kill Command in Linux
The article "How to Use the kill Command in Linux" from Linuxize has a concise section explaining the difference between these two key signals.
Read the section titled "SIGTERM vs SIGKILL". It clearly outlines the best practice: try SIGTERM first, and only use SIGKILL if the process doesn't stop.
3. Hands-On Lab: Terminating Processes
Let's put this into practice. Open your terminal.
-
Start a process. We'll use the
sleepcommand, which does nothing but wait for a specified number of seconds. We'll run it in the background using the&symbol so we get our terminal prompt back immediately. (We'll cover background jobs in detail in the next lesson).sleep 300 & -
Find its PID. Use
pgrep, a handy command for finding PIDs by name.pgrep sleepThe terminal will output a number. This is the PID of your
sleepprocess. Let's say it's12345. -
Send
SIGTERM. Terminate it gracefully using the defaultkillcommand.kill 12345You should see a message like "Terminated".
-
Forcefully kill a process. Let's do it again, but this time with
SIGKILL.sleep 300 & pgrep sleepTake the new PID (it will be different this time) and use
kill -9.kill -9 <new_PID>This time, the message will likely be "Killed". Both
killandkill -9stopped the process, but they did so in fundamentally different ways.
4. killall and pkill: Terminating by Name
Looking up a PID every time can be tedious, especially if a single application (like a web browser) has many processes. For this, we have more convenient tools: killall and pkill.
These commands work just like kill, but they target processes by their name instead of their PID.
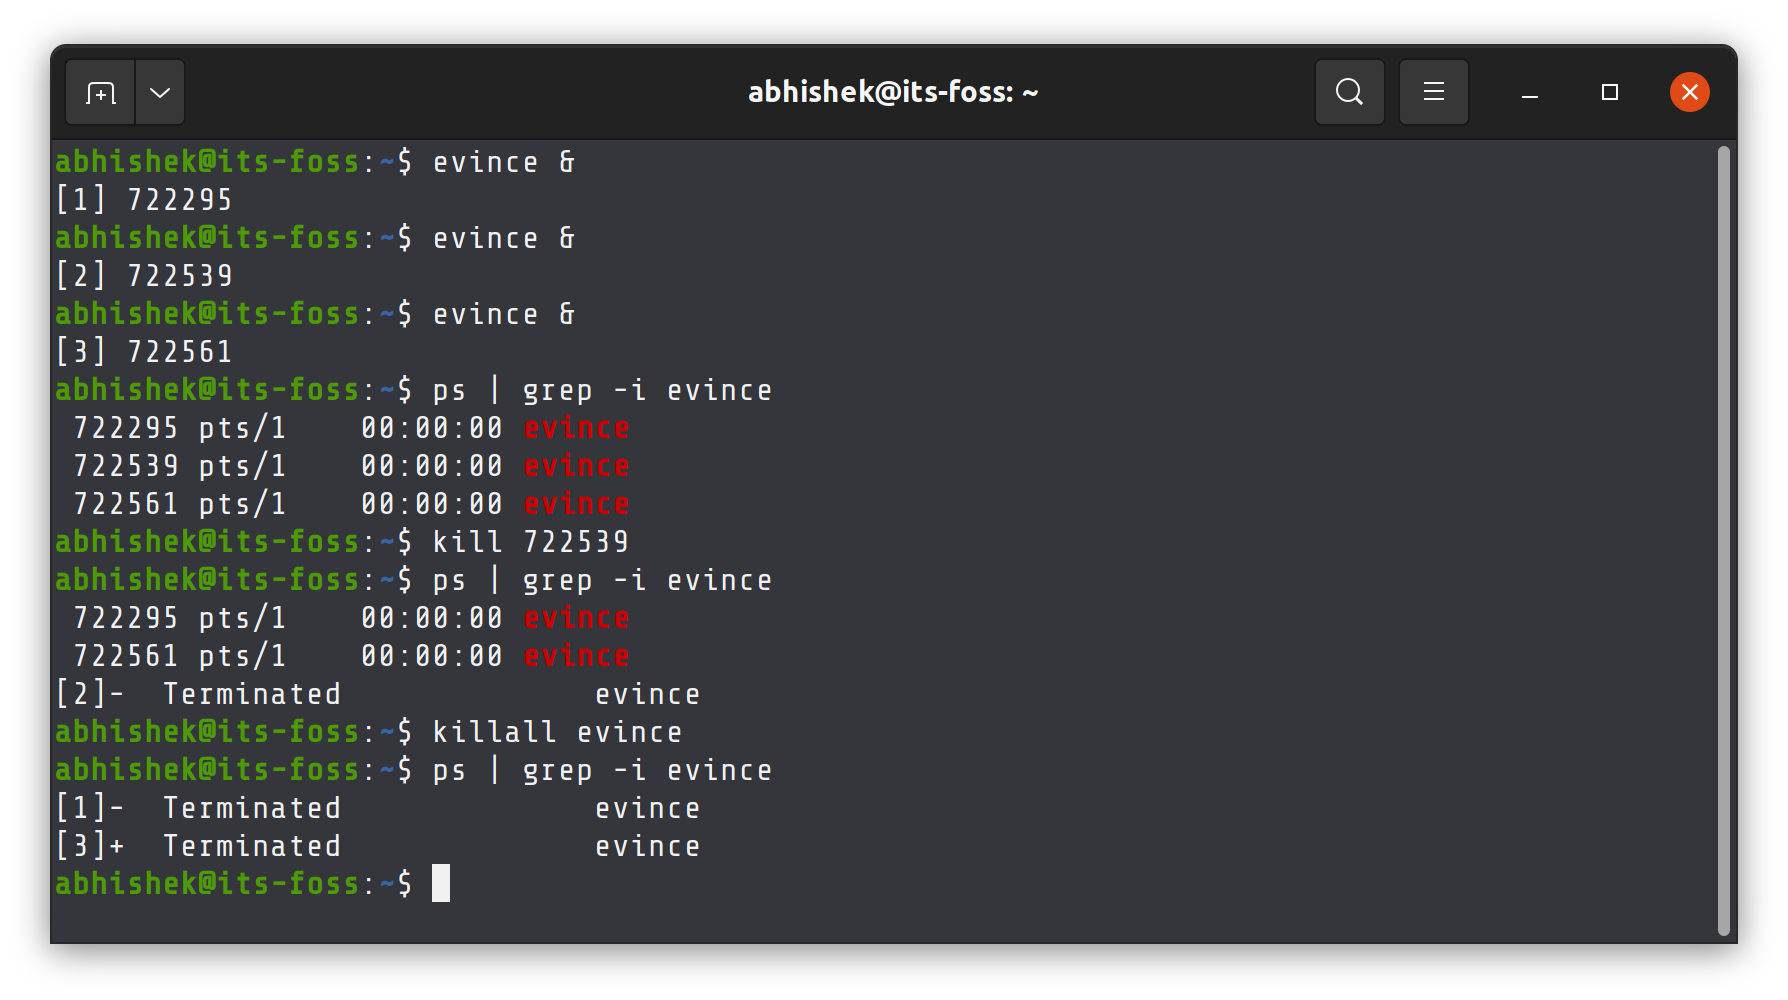
You can also specify signals with killall and pkill, just as you do with kill.
killall firefox: SendsSIGTERMto all processes namedfirefox.killall -9 nginx: SendsSIGKILLto all processes namednginx.pkill -SIGKILL chrome: An alternative syntax to achieve the same result.
The killall command is a convenient tool, and understanding its options can make your process management workflow more efficient.
Guide to Linux killall Command
The Baeldung article "Guide to Linux killall Command" offers a great comparison between kill and killall and explains how to use signals with killall.
Read section 2, "Comparing kill With killall", focusing on the syntax and usability differences. Then, quickly read section 3.1, "Choosing the Right Signal", to see how the -s flag is used to send specific signals like SIGKILL.
5. A World of Signals
As mentioned, SIGTERM and SIGKILL are just two of many signals. You can see a full list on your system by running:
kill -l
You'll see many others, including:
SIGHUP(1): Often used to tell a service to hang up and reload its configuration file without restarting.SIGINT(2): The interrupt signal. This is what's sent to a foreground process when you pressCtrl+C.SIGSTOP(19): A signal that pauses a process without terminating it. It can be resumed later.
You don't need to memorize these now, but it's good to know that kill is a versatile signaling utility, not just a termination tool.
Conclusion
You now have the power to not only see but also control the processes running on your Linux system. This is a crucial skill. Whether you're stopping a service to reconfigure it, killing a frozen application, or terminating a suspicious process during a security incident, the commands you learned today are essential.
Key Takeaways:
- The
killcommand sends signals to processes. SIGTERM(signal 15) is the default signal. It's a graceful request for a process to terminate. You should always try this first.SIGKILL(signal 9) is a forceful order that terminates a process immediately. Use it as a last resort for unresponsive processes.- The
killallandpkillcommands provide a convenient way to send signals to processes by name instead of by PID.
Next Lesson Preview:
We've seen how Ctrl+C sends a SIGINT signal to terminate a foreground process. But what if you want to pause a process instead of killing it, or run a long-running command without it tying up your terminal? In the next lesson, we will explore job control. You'll learn how to manage foreground and background jobs using &, Ctrl+Z, jobs, fg, and bg, giving you complete mastery over your shell session.