Hello! Welcome to the second module of our course, "Linux User and Process Administration."
In the last lesson, we explored special permissions and saw just how central user and group ownership are to Linux security. We even got a little hands-on practice by creating a group with groupadd and adding a user to it with usermod.
Today, we'll build directly on that foundation. This lesson is all about mastering the creation and management of the identities themselves: user accounts and groups. For your goal of becoming a skilled ethical hacker, these are non-negotiable, fundamental skills. Whether you're setting up a target system in your lab, creating a user account for persistence on a compromised machine, or analyzing existing user configurations for weaknesses, you will use these commands constantly.
Our learning outcome is to create and manage user accounts and groups using useradd, usermod, and groupadd. We will cover the theory behind why accounts are structured this way and then dive into the practical commands to control them.
Part 1: Why We Need Users and Groups
In Linux, every single process that runs is owned by a user and a group. This is the bedrock of the permission system. Before we create them, let's clarify what they are.
Mastering User Management and Permission in Linux
This article provides a concise overview of the different types of users and the roles of groups in Linux. It will give you the foundational 'why' before we get to the 'how'.
Read the first section, "Understanding Users and Groups." Focus on the distinction between regular users and system users, and the concepts of primary and supplementary groups.
As you just read, users are categorized, but for now, we're focused on the regular users you create for people to log in. Each user has:
- A User ID (UID): A unique number identifying the user.
- A Primary Group: The default group for a user. When a user creates a new file, it is owned by their user and their primary group.
- Supplementary Groups: Additional groups a user can be a member of to gain extra permissions.
The quickest way to see this information for your own user or any other is with the id command.
# Check your own identity
id


# Check the identity of the root user
id root
The output shows your UID, your primary group (GID), and all the groups you belong to.
Part 2: Creating and Deleting User Accounts
The primary command-line tool for creating users is useradd. It's a low-level utility that gives you fine-grained control.
A quick but important note: many online tutorials, especially those based on Debian or Ubuntu systems, use a command called adduser. This is a friendlier, interactive script. On your Arch Linux system, adduser is typically a symbolic link to useradd, so it behaves like useradd. It's good to be aware of this difference when you see other resources.
The KodeKloud video below gives an excellent overview of what happens behind the scenes when you use useradd.
Managing Users and Groups in Linux | Linux Tutorial | KodeKloud
This video from KodeKloud clearly explains the useradd command and the system changes that occur when you create a new user.
Watch from the beginning to 03:51. Pay close attention to the list of actions the system performs when a user is created, such as creating a group and a home directory.
Core Commands: useradd and passwd
As the video explained, useradd by itself is quite basic. To create a functional user, you'll typically use a few options.
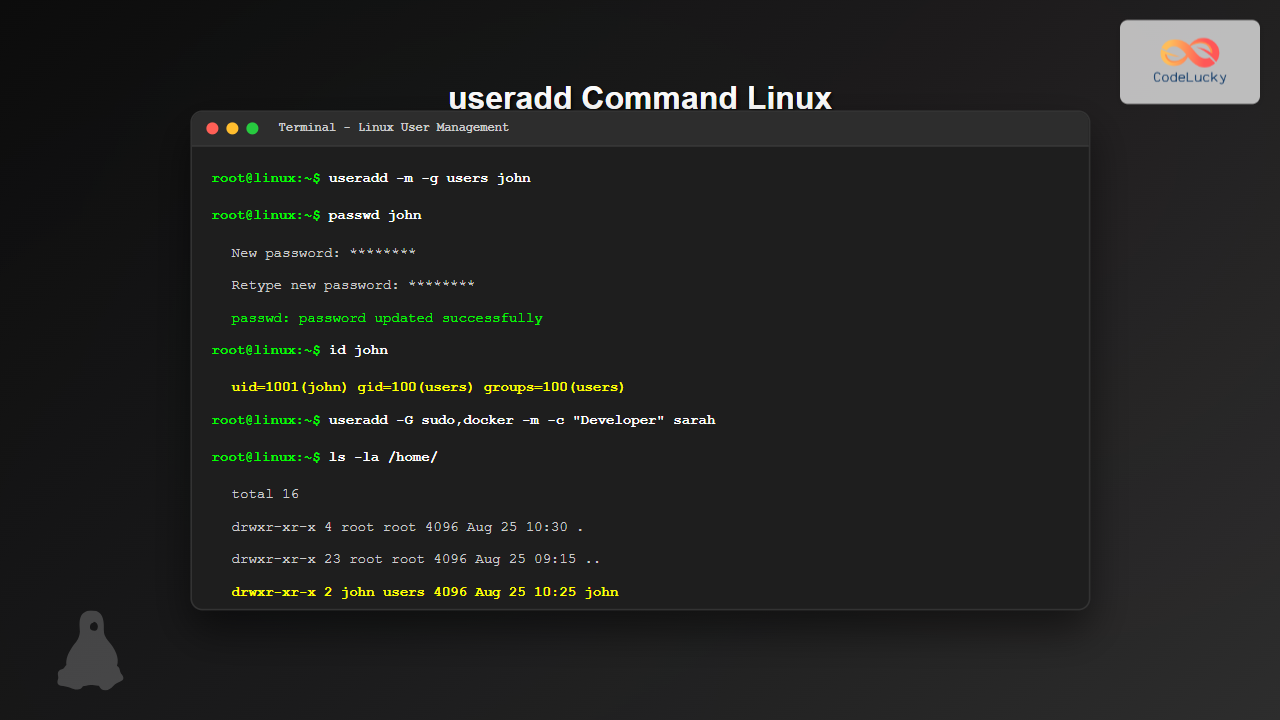
Here are the most important options for useradd:
-m: Create the user's home directory (e.g.,/home/username). Without this, the user has nowhere to store their files!-s <shell>: Specifies the user's default login shell. Usually/bin/bash.-c "<comment>": Adds a descriptive comment, often the user's full name.-G <groups>: A comma-separated list of supplementary groups to add the user to.
After creating a user, their account is locked. You must set a password for them using the passwd command.
Hands-on Lab: Create Your First User
Let's practice this on your Arch system.
-
Create a new user named
target01. We'll give them a home directory and a bash shell.sudo useradd -m -s /bin/bash -c "Vulnerable Target User" target01 -
Verify the user's creation. Check for their entry in the user database and their home directory.
id target01
ls -l /home
You should see
target01has a UID and a primary GID, and a home directory owned bytarget01. -
Set a password for the new user. You will be prompted to enter and confirm a new password.
sudo passwd target01 -
Test the user. Switch to the new user account using
su(Switch User).su - target01 # You will be prompted for the password you just set. # The '-' is important; it simulates a full login and moves you to the user's home directory. # Verify who you are now whoami pwd # Exit back to your own user session exit -
Delete the user. The
userdelcommand removes a user. The-rflag is crucial as it also removes the user's home directory and mail spool.sudo userdel -r target01 # Verify the deletion id target01 ls -l /homeYou should get an error that the user doesn't exist, and their home directory should be gone.
Part 3: Modifying User Accounts with usermod
Once a user is created, you can change almost any of their attributes with the usermod command. This is an incredibly powerful tool for system administration.
This video from NetworkChuck demonstrates a few common modifications.
sudo = POWER!! (managing users in Linux) // Linux for Hackers // EP4
Let's watch a practical demonstration of modifying a user's shell and login name using usermod.
Watch from 10:15 to 11:37. Notice the syntax for changing the shell (-s) and the login name (-l).
Here are some of the most useful usermod operations:
- Change Login Name:
usermod -l <new_name> <old_name> - Change Home Directory:
usermod -d <new_home> -m <username>(The-mmoves the content from the old home to the new one). - Lock an Account:
usermod -L <username>(Disables login via password). - Unlock an Account:
usermod -U <username> - Add to Supplementary Groups:
usermod -aG <group_name> <username>(We'll dive into this next).
Hands-on Lab: Modify an Account
Let's create a user again and modify their properties.
- Re-create your user.
sudo useradd -m target01 sudo passwd target01 - Change their login name from
target01todecoy_user.sudo usermod -l decoy_user target01 # Verify the change. The first command should fail, the second should succeed. id target01 id decoy_user - Lock the account.
sudo usermod -L decoy_user - Try to switch to the locked account. The login attempt should fail.
su - decoy_user # Expected output: su: Authentication failure - Unlock the account and try again. This time it should succeed.
sudo usermod -U decoy_user su - decoy_user # ... log in, then exit exit - Clean up by deleting the user.
sudo userdel -r decoy_user
Part 4: Managing Groups and Memberships
Groups are the connective tissue of permissions. You rarely assign permissions to individual users; instead, you grant permissions to a group and then add users to that group.
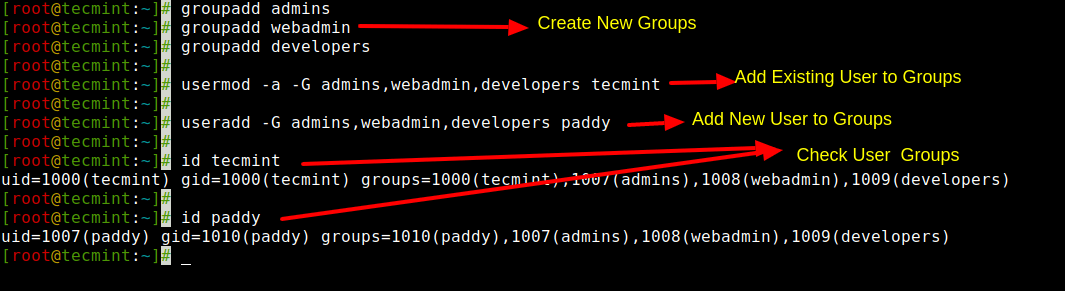
Core Commands: groupadd, groupdel, usermod
-
Create a Group: The
groupaddcommand is straightforward.sudo groupadd pentest -
Add a User to a Group: This is one of the most common tasks and a frequent source of errors. You use
usermodwith the-aGflags.-G: Specifies the supplementary group(s).-a: Append. This is critical. It adds the user to the new group without removing them from their existing groups.
Let's watch a short video that covers creating groups and adding users.
sudo = POWER!! (managing users in Linux) // Linux for Hackers // EP4
This clip demonstrates creating a group and, most importantly, the correct way to add a user to it using usermod -aG.
Watch from 23:40 to 24:55. Focus on the distinction between -g (primary group) and -aG (append to supplementary group).
The article from `tecmint` also has a very clear warning about this. If you use `usermod -G` without `-a`, you will overwrite all of the user's existing supplementary group memberships! This can have serious unintended consequences.
3. Delete a Group: The groupdel command removes a group.bash sudo groupdel pentest
Note: You cannot delete a group if it is the primary group for any user. You must first change that user's primary group to something else.
Hands-on Lab: Putting It All Together
- Create a user and a group.
sudo groupadd developers sudo useradd -m -s /bin/bash app_user - Check the user's initial groups.
id app_user # Notice the primary group is 'app_user'. - Add the user to the
developersgroup.sudo usermod -aG developers app_user - Verify the new group membership.
id app_user # You should now see 'developers' in the list of groups. - (Optional) Change the primary group.
sudo usermod -g developers app_user id app_user # Now the gid is 'developers'. - Clean up.
sudo userdel -r app_user
sudo groupdel developers
Conclusion
You have now mastered the fundamental commands for Linux identity management. While simple, they are incredibly powerful and form the basis for securing or attacking a multi-user system.
Key Takeaways:
useraddcreates new users. Always use-mto create their home directory. Set a password withpasswdafterward.usermodmodifies existing users. You can change the login name (-l), lock/unlock (-L/-U), and manage group memberships.groupaddandgroupdelmanage groups.- To add a user to a supplementary group, always use
usermod -aG <group> <user>. The-a(append) flag is essential to avoid removing the user from other groups.
Next Lesson Preview:
We've been using these commands to manipulate users and groups, but where is all this information stored? In our next lesson, we will pull back the curtain and examine the three critical files that underpin the entire user management system: /etc/passwd, /etc/shadow, and /etc/group. Understanding their structure is key to both defending a system and identifying potential weaknesses.