Hello! Welcome to the third lesson in our "Building a Hacking Lab" module.
In the last lesson, we covered the theoretical architecture of a virtual hacking lab. You learned about its three core components—the hypervisor, the attacker VM, and the target VM—and why virtualization features like network isolation and snapshots are essential for safe and effective practice.
Today, we move from theory to practice. Our learning outcome is to install virtualization software and configure a private virtual network for the lab. This is the foundational, hands-on work that will create the "space" for your attacker and target machines. Since you use Arch Linux, we'll follow the installation process specific to your environment.
1. Installing Your Hypervisor: VirtualBox
We will use Oracle VirtualBox as our hypervisor. It is free, open-source, powerful, and well-supported on Linux, making it an excellent choice for our lab.
A Critical Prerequisite: Enabling Hardware Virtualization
Before installing any software, you must ensure that hardware virtualization is enabled in your computer's BIOS or UEFI settings. This feature, known as Intel VT-x for Intel CPUs or AMD-V for AMD CPUs, is what allows a hypervisor to run 64-bit guest operating systems efficiently. It is often disabled by default.
The following video explains how to access your BIOS/UEFI and enable this setting. The process is OS-independent, so the instructions are applicable to any machine.
you need to learn Virtual Machines RIGHT NOW!! (Kali Linux VM, Ubuntu, Windows)
This clip from NetworkChuck's video on VMs clearly demonstrates how to find and enable the hardware virtualization setting in a typical BIOS/UEFI menu.
Watch from 07:55 to 09:27. Focus on identifying the key setting (Intel VT-x, AMD-V, or similar virtualization technology) and enabling it. The specific key to press during boot (e.g., F2, F12, Del) and the menu layout will vary depending on your motherboard manufacturer.
Once you've enabled virtualization and booted back into Arch Linux, you're ready to install VirtualBox.
Installation on Arch Linux
As an Arch user, you'll use pacman to install VirtualBox. You need two main packages:
virtualbox: The main application.virtualbox-host-modules-arch: The kernel modules that allow VirtualBox to function. This package is specific to the standard Arch Linux kernel.
Open a terminal and run the following command:
sudo pacman -Syu virtualbox virtualbox-host-modules-arch
After the installation, you need to load the VirtualBox kernel module. You can do this by running:
sudo modprobe vboxdrv
This module needs to be loaded every time the system boots. The virtualbox-host-modules-arch package includes a system file that handles this automatically, so a reboot after installation will also ensure it's loaded.
Installing the VirtualBox Extension Pack
For full functionality, such as support for USB 2.0/3.0 devices, you should also install the VirtualBox Extension Pack.
you need to learn Virtual Machines RIGHT NOW!! (Kali Linux VM, Ubuntu, Windows)
This brief clip explains what the Extension Pack is and why it's needed.
Watch from 11:25 to 11:51. This shows the general process of downloading and installing the pack. We will use a more convenient method for Arch.
While you can download the pack manually from the Oracle website, the easiest way on Arch is to use an AUR helper (like yay or paru) to install it from the Arch User Repository.
# Using 'yay' as an example
yay -S virtualbox-ext-pack-oracle
This will automatically fetch the correct version and install it for you. After these steps, VirtualBox is fully installed and ready on your system.
2. Understanding Virtual Network Modes for Isolation
Our primary goal when setting up the lab network is isolation. We need our attacker and target VMs to talk to each other, but we must prevent them from accessing your home network or the internet. This creates a safe sandbox.
VirtualBox offers several network modes, each with different properties. Let's look at the most common ones to understand which is best for our purpose.
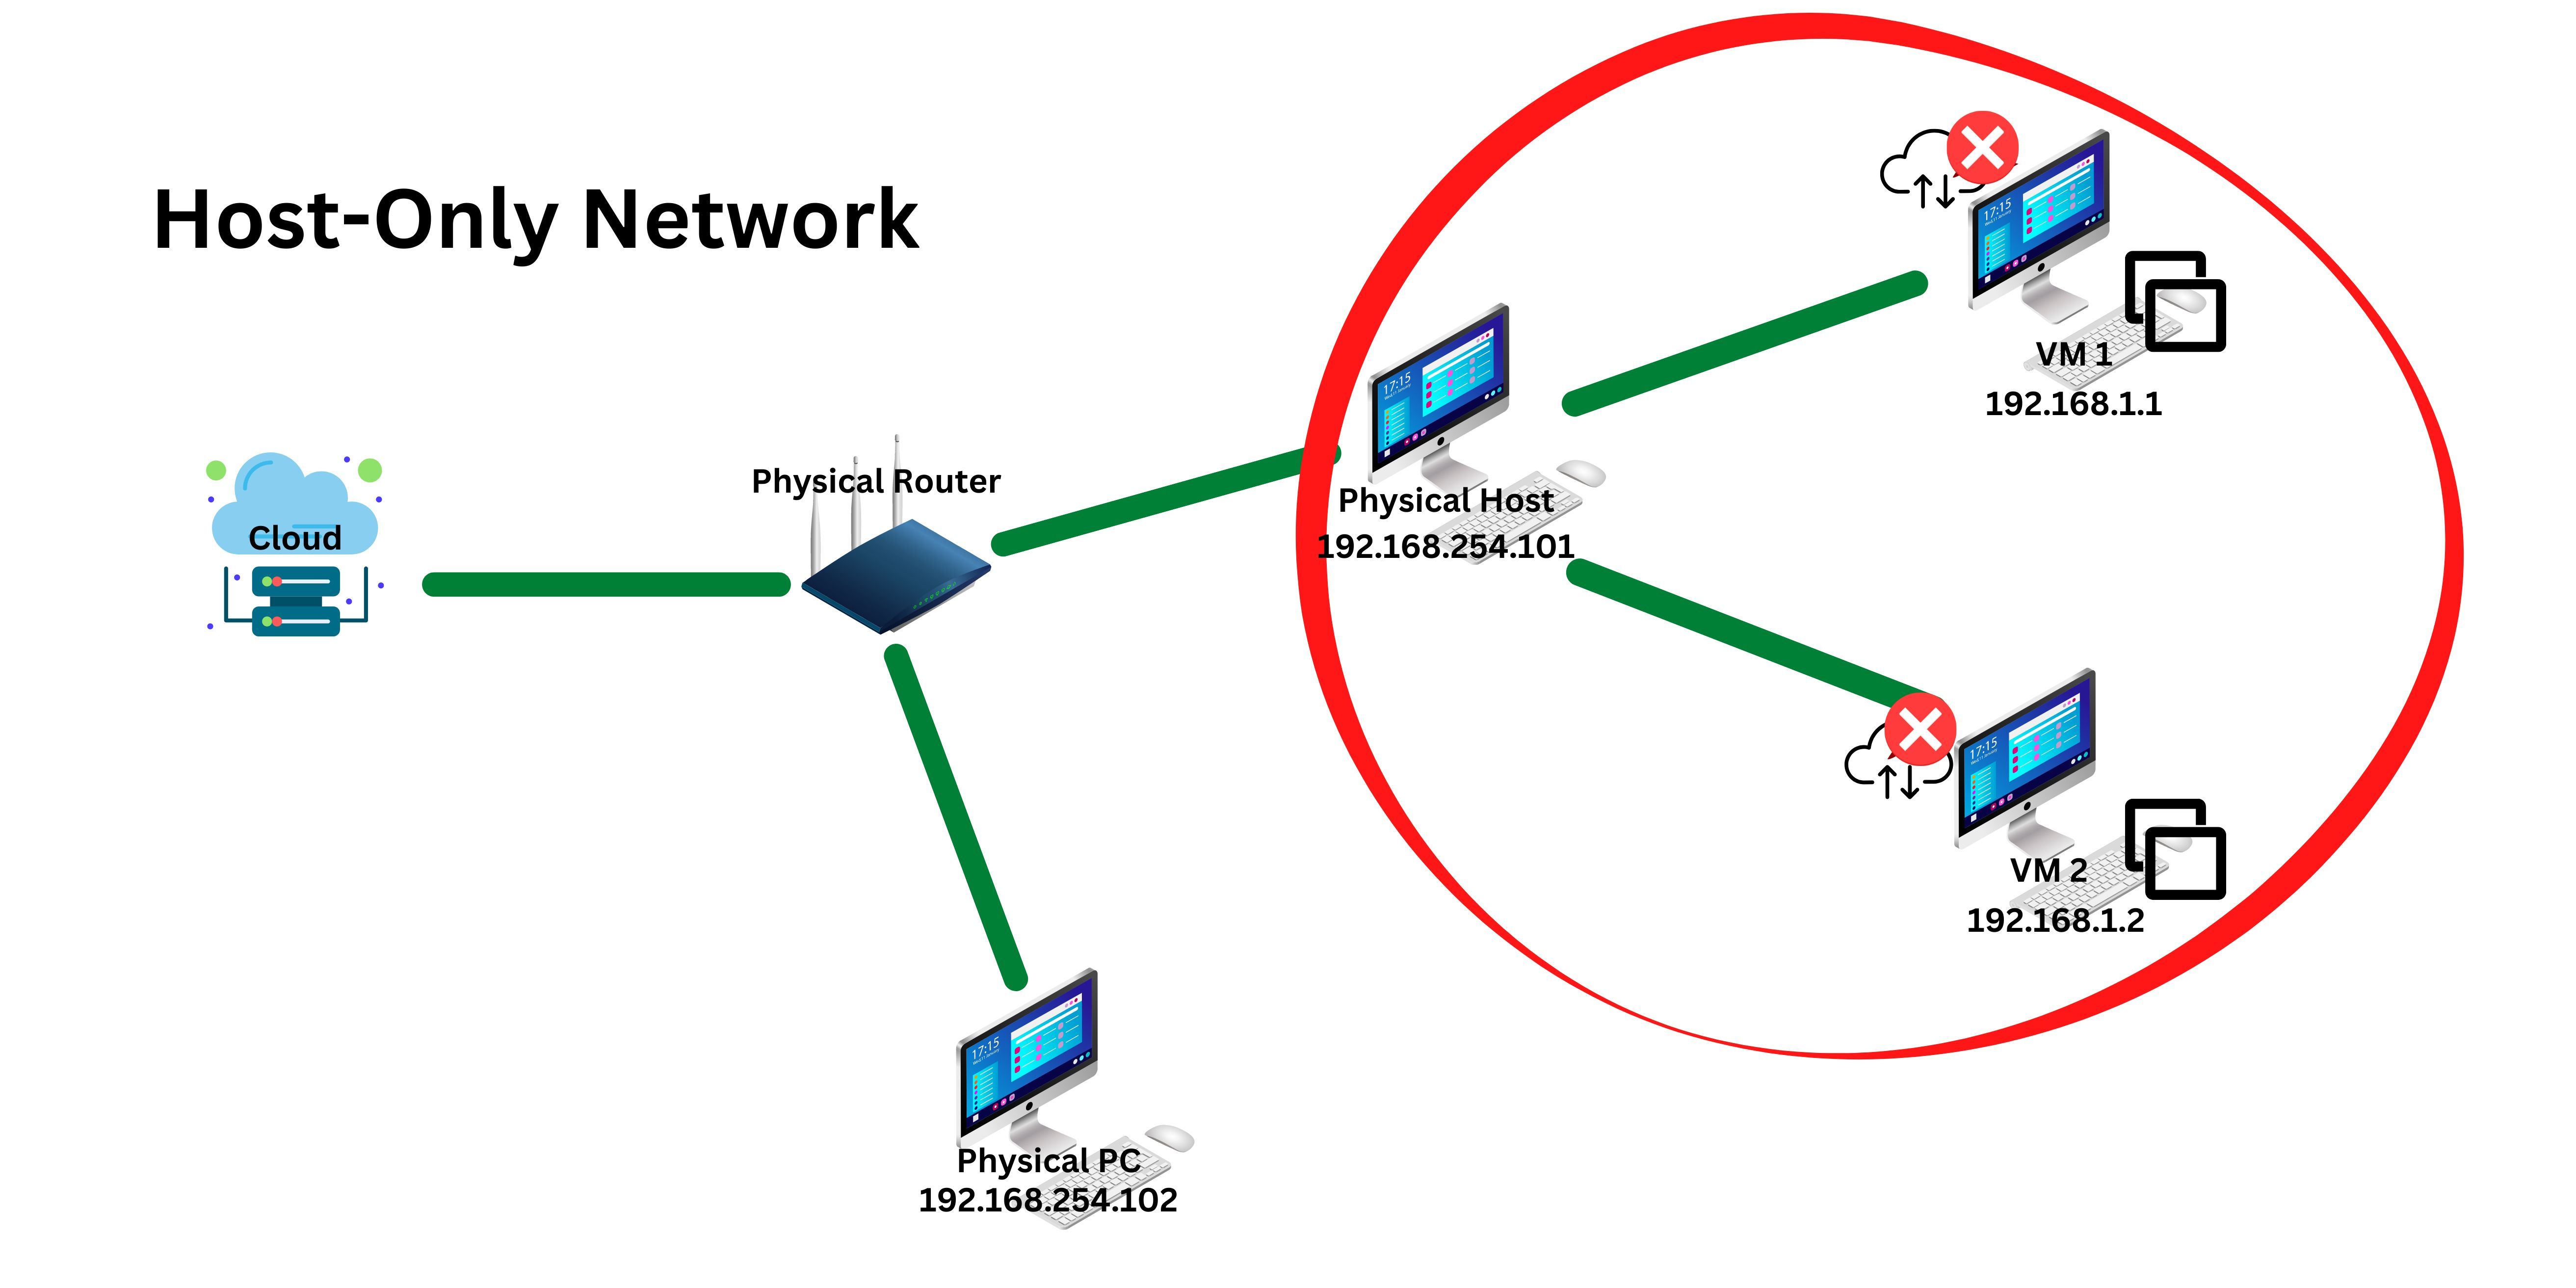
The video below provides an excellent, detailed explanation of the four main networking modes. Pay close attention to the capabilities and limitations of each one.
How VirtualBox 7.0 networking works - NAT, NAT Network, Internal Network, Bridged Adapter
The video 'How VirtualBox 7.0 networking works' by LS111 Cyber Security Education provides clear diagrams and analogies to explain the different network modes. This is crucial for making the right choice for our lab.
Watch the explanations for NAT (00:46-03:48), NAT Network (03:48-05:34), Internal Network (05:34-07:11), and Bridged Adapter (07:11-08:39). Focus on how each mode handles communication between VMs and with the outside world.
To summarize the video's key points, here is a helpful comparison table:

Based on these options, the two best modes for a secure lab are:
- Internal Network: Creates a completely isolated network. Only VMs attached to this network can communicate with each other. They cannot communicate with your host machine or the internet. This is the most secure option.
- Host-only Adapter: Creates a private network between the VMs and your host machine. The VMs can talk to each other and to your host, but they cannot reach the internet. This is slightly less isolated but can be convenient if you need to transfer files from your host to a VM.
For our lab, we will use a Host-only network. It provides the necessary isolation from the internet while offering the convenience of host-to-VM communication.
3. Creating Your Private Lab Network
Now for the final practical step: creating the host-only network in VirtualBox. We will create a new network that we can then assign to our attacker and target VMs in the next lesson.
The following reading provides a simple, direct walkthrough of this process.
How to Build Your Own Private Hacking Lab with VirtualBox
This guide from freeCodeCamp clearly explains how to create and configure the host-only network we need for our lab. Follow these steps within VirtualBox.
Read the section titled 'Update Networking Settings'. Follow the instructions to navigate to the 'Host-only Networks' tool, create a new network, and give it a memorable name like HackingLabNet. The default IP settings are fine. You can stop once the network is created; we will attach VMs to it later.
After completing these steps, you have successfully created the private network that will serve as the backbone of your hacking lab.
Conclusion
Congratulations on completing the foundational setup of your lab! This lesson was all about practical application, bridging the gap between knowing what a lab is and knowing how to build its core infrastructure.
Key Takeaways:
- Hardware virtualization (VT-x/AMD-V) must be enabled in your BIOS/UEFI for VirtualBox to work properly.
- On Arch Linux, VirtualBox is installed using
pacman(virtualbox,virtualbox-host-modules-arch) and the AUR (virtualbox-ext-pack-oracle). - VirtualBox offers several network modes, with Host-only Network and Internal Network being the best choices for an isolated, secure hacking lab.
- You have now created a Host-only network inside VirtualBox, which is ready to host your attacker and target machines.
Next Lesson Preview:
In our next lesson, we will continue the hands-on setup. You will learn how to download and import a Kali Linux VM (our attacker machine) and a vulnerable target VM (Metasploitable2). We will then connect both of these machines to the HackingLabNet you just created, bringing your lab to life.