Hello! Welcome to your next lesson on building a hacking lab and initial reconnaissance.
In our last lesson, you got your hands dirty with manual passive reconnaissance, using whois to query domain registration data and Google Dorking to find information hidden in plain sight. These are fundamental skills, but they can be slow and time-consuming.
Today, we level up by automating these processes. You'll learn how to use tools like theHarvester and Recon-ng to collect email addresses and subdomains for a target. These tools are staples in a penetration tester's toolkit because they rapidly query dozens of public sources, aggregate the results, and provide a comprehensive starting point for the next phases of an attack. This lesson will bridge the gap between manual information gathering and the automated, large-scale reconnaissance used by professionals.
1. TheHarvester: The OSINT Multi-Tool
theHarvester is a classic open-source intelligence (OSINT) tool. Its job is to gather emails, subdomains, hosts, employee names, open ports, and banners from various public sources like search engines and public databases (e.g., certificate transparency logs). Think of it as an automated script that runs dozens of Google Dorks and other queries for you, all at once.
How to Gather Sensitive Data with theHarvester in Kali Linux?
To start, let's get a clear definition of what theHarvester does and the kind of information it's designed to find. This short clip from the video 'How to Gather Sensitive Data with theHarvester' by Tech Sky explains it well.
Watch from 00:39 to 01:08 to understand the purpose of theHarvester.
Understanding theHarvester's Commands
Since you're comfortable with command-line tools, the best way to understand theHarvester is to look at its help menu. It's pre-installed on Kali Linux, so you can bring this up in your terminal with theHarvester -h.
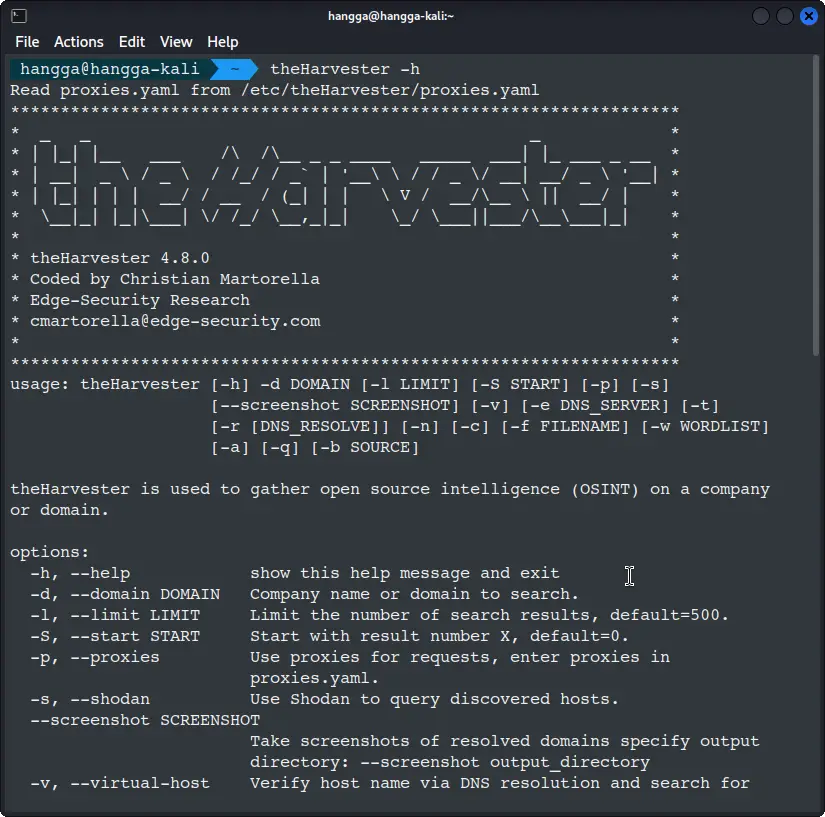
The most important flags for a basic scan are:
-d: The target domain (e.g.,tesla.com).-b: The data source to use. You can specify one (e.g.,bing) or multiple sources (bing,google,crtsh). Usingallwill query every available source.-l: Limits the number of search results from sources like search engines.-f: Saves the output to an HTML and/or XML file for your records.
How to Gather Sensitive Data with theHarvester in Kali Linux?
Let's continue with the Tech Sky video to see these flags in action and understand how to run a basic scan.
Watch from 01:08 to 03:45. Pay close attention to: The explanation of the core flags -d, -b, -l, and -f. The discussion about API keys. You'll notice many sources fail without them; this is normal. We'll see a more robust way to handle this with Recon-ng later. How to run a more focused search using sources that don't require API keys, like bing, duckduckgo, and crtsh.
Hands-on Lab 1: Running Your First Harvest
Time to put this into practice in your Kali VM. We'll use a public bug bounty target for this exercise, like tesla.com, to ensure our activities are directed at an organization that permits reconnaissance.
-
Open your terminal.
-
Run a broad scan. Let's start by telling
theHarvesterto query all its sources fortesla.comand limit the results to 200.theHarvester -d tesla.com -l 200 -b allYou will see many sources being queried. Some will yield results, while others will report missing API keys. This is expected. The goal here is to see the breadth of sources the tool can check.
-
Run a focused scan and save the results. Now, let's run a more targeted scan using sources that are known to be effective without API keys and save the output.
theHarvester -d tesla.com -l 500 -b bing,crtsh,duckduckgo,dnsdumpster -f tesla-harvestbing,duckduckgo: General search engines.crtsh: Searches certificate transparency logs, an excellent source for finding subdomains.dnsdumpster: A popular service that maps out a domain's DNS records.-f tesla-harvest: This will createtesla-harvest.htmlandtesla-harvest.xmlin your current directory. Open the HTML file in a browser to see a nicely formatted report of the subdomains and emails found.
Examine the output. You have just automated a significant amount of the manual work from the previous lesson, discovering dozens or even hundreds of potential hosts in minutes.
2. Recon-ng: The Reconnaissance Framework
If theHarvester is a multi-tool, Recon-ng is a full workshop. It's a powerful, modular framework written in Python with an interactive shell that will feel familiar after working with Linux. Its key advantage is its structure:
- Workspaces: You create separate workspaces for each target, keeping your findings organized.
- Modular Design: It uses individual modules for specific tasks (e.g., a module for querying Bing, another for WHOIS, another for brute-forcing subdomains).
- Database Backend: All data collected by modules is automatically saved into a structured database within the workspace. This allows you to easily query, manage, and build upon your findings.
recon-ng.md - a guide on GitHub
To understand the core concepts of Recon-ng, let's read a quick overview from this helpful GitHub guide.
Read the sections 'Key Features of Recon-ng' and 'Core Commands in Recon-ng'. This will introduce you to the tool's design and the essential commands for navigating its interface, like workspaces, marketplace, modules, options, and show.
Hands-on Lab 2: A Structured Recon Workflow
The best way to learn Recon-ng is to use it. This lab will walk you through a standard workflow: setting up a workspace, finding and installing modules, and running them to gather data.
Recon-ng V5 - Marketplace & Installing Recon Modules (whois, subdomain enumeration)
The following video from HackerSploit provides an excellent, step-by-step demonstration of the entire Recon-ng workflow. We will follow along with this video for our lab.
We'll be breaking this video into parts as we work through the lab steps. You don't need to watch it all at once.
Step 1: Setup and Module Installation
First, we'll start recon-ng, create a workspace for our target, and install the modules we need from the marketplace.
Recon-ng V5 - Marketplace & Installing Recon Modules (whois, subdomain enumeration)
Watch this first clip to see how to search for and install modules from the marketplace.
Watch from 01:02 to 02:08.
Now, perform these actions in your terminal:
- Start the tool:
recon-ng - Create and load a new workspace:
workspaces create tesla_recon - Search the marketplace for modules related to domains:
marketplace search domain - Install the following modules. Remember to use the full path as shown in the marketplace search results:
marketplace install recon/domains-contacts/whois_pocsmarketplace install recon/domains-hosts/google_site_webmarketplace install recon/domains-hosts/bing_domain_webmarketplace install recon/domains-hosts/brute_hosts
Step 2: Harvesting Contacts with the whois_pocs Module
This module automates the WHOIS lookups we did manually in the last lesson to find Points of Contact (POCs).
Recon-ng V5 - Marketplace & Installing Recon Modules (whois, subdomain enumeration)
This clip demonstrates loading a module, viewing its options, setting the target, and running it.
Watch from 02:24 to 06:39.
Follow along in your terminal:
- Load the module:
modules load recon/domains-contacts/whois_pocs - View information and options for this module:
info - Set the target domain:
options set SOURCE tesla.com - Run the module:
run - After it finishes, view the results:
show contacts
The module automatically queries WHOIS records and neatly populates the contacts table in your database with any email addresses it finds.
Step 3: Enumerating Subdomains with Search Engines
Next, we'll use modules that automate Google and Bing dorking to find subdomains.
Recon-ng V5 - Marketplace & Installing Recon Modules (whois, subdomain enumeration)
This clip shows how to use the bing_domain_web and google_site_web modules for subdomain discovery.
Watch from 06:39 to 11:45.
Now it's your turn:
- Return to the main prompt:
back - Load the Google module:
modules load recon/domains-hosts/google_site_web - Set the target (it might be pre-filled from the last module, but it's good practice to check with
info):options set SOURCE tesla.com - Run it:
run - View the results. Notice how new entries are added to the
hoststable:show hosts - Repeat the process for the Bing module (
recon/domains-hosts/bing_domain_web). You will see that different sources often yield different results, which is why using multiple modules is so important.
Step 4: Brute-Forcing Subdomains with brute_hosts
Our final module takes a more active approach. It uses a wordlist of common subdomain names (like www, mail, dev, api) and attempts to resolve each one to see if it exists.
Recon-ng V5 - Marketplace & Installing Recon Modules (whois, subdomain enumeration)
Finally, watch this clip to understand how the brute_hosts module works.
Watch from 11:45 to 15:05.
Let's run it:
- Return to the main prompt:
back - Load the brute-force module:
modules load recon/domains-hosts/brute_hosts - Check the options with
info. TheSOURCEshould still betesla.com. Notice it uses a default wordlist. - Run it:
run - Check the
hoststable again withshow hosts. You will likely see even more subdomains discovered by this module.
You have now completed a structured reconnaissance workflow, gathering data from multiple sources and consolidating it all into a single, queryable database.
Conclusion
Congratulations! You've successfully automated your passive reconnaissance process using two industry-standard tools. You've moved beyond single manual queries to efficient, large-scale data gathering.
Key Takeaways:
theHarvesteris a fantastic tool for a quick, initial sweep. It's simple to use and queries many sources at once, making it ideal for getting a broad overview of a target.Recon-ngis a professional-grade framework for deep, methodical reconnaissance. Its workspace and database structure allow you to organize and build upon your findings over time, which is crucial for complex penetration tests.- The goal of these tools is to build a list of potential targets—subdomains, IP addresses, and people. This list forms the foundation for the next, more active phases of a security assessment.
Next Lesson Preview:
So far, our reconnaissance has been entirely passive (with the slight exception of the DNS brute-forcing). We've gathered a list of potential hostnames, but we don't know if they are actually online and responsive. In the next lesson, we will begin the Scanning phase. You will learn to perform host discovery on a network using Nmap ping scans, a fundamental technique for turning your list of potential targets into a list of confirmed, live systems.