Hello! Welcome to your first lesson on network scanning.
In our previous lesson, you used powerful reconnaissance tools like theHarvester and Recon-ng to build a list of potential targets—subdomains and hostnames associated with an organization. However, a name in a list doesn't guarantee a live system. The next logical step, and the first phase of active scanning, is to determine which of these targets are actually online and responsive. This process is called host discovery.
Today, you will learn how to perform host discovery on a network using Nmap ping scans. We will introduce Nmap (Network Mapper), the single most important tool for network exploration, and focus on its ability to quickly and efficiently identify live hosts. This moves you from passively gathering information to actively probing a network, a critical transition in any penetration test.
1. What is Nmap and Host Discovery?
Before we run our first command, let's establish what we're doing and why. In any ethical hacking engagement, after you've identified potential targets (reconnaissance), you need to confirm they exist and are reachable on the network (scanning).
Nmap is the industry-standard tool for this. It's a free and open-source utility for network discovery and security auditing. System administrators use it to inventory network devices, and penetration testers use it to find live hosts, open ports, running services, and operating systems.
Host discovery, also known as a "ping scan," is Nmap's function for identifying which IP addresses on a network belong to active devices.
Nmap Host Discovery – What is it and How do you use it?
To start, let's read a short introduction to what host discovery is and its purpose. This article from Cyberscope provides a clear and concise definition.
Read the 'Introduction' and 'What is Nmap Host Discover?' sections. Focus on understanding why host discovery is the foundational first step before doing more in-depth scanning.
As you read, the key takeaway is that host discovery lets us filter a large list of potential targets down to a smaller, confirmed list of live systems. This makes subsequent, more intensive scans much more efficient.
2. The Ping Scan: nmap -sn
The primary command for host discovery is nmap -sn. Let's break it down:
nmap: The program itself.-sn: This is the option for a "ping scan." It tells Nmap: "Discover which hosts are online, but do not perform a port scan."
This is an important distinction. A full port scan can be time-consuming and noisy (i.e., easily detected). A ping scan is much faster and lighter, as its only goal is to get a "yes" or "no" answer to the question, "Is anyone at this IP address?"
You can provide targets to Nmap in several ways, which should feel familiar from your work with other command-line tools:
- Single IP:
nmap -sn 192.168.1.1 - Hostname:
nmap -sn scanme.nmap.org - Subnet (CIDR notation):
nmap -sn 192.168.1.0/24(scans all 256 addresses from 192.168.1.0 to 192.168.1.255) - IP Range:
nmap -sn 192.168.1.1-50
The output is a simple list of hosts that responded.
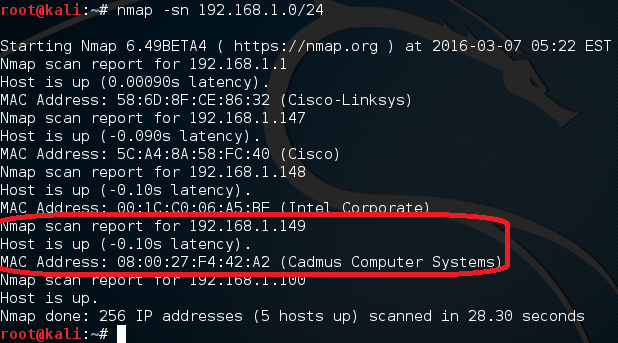
3. Hands-On Lab: Discovering Hosts in Your Lab
Theory is great, but let's apply this in your virtual lab. Make sure your Kali Linux and Metasploitable2 VMs are running on the same virtual network.
-
Find your network range:
- On your Kali VM, open a terminal and run
ip a. - Look for your primary network interface (e.g.,
eth0). Find theinetaddress, which will look something like192.168.56.101/24. - The
/24tells you the subnet is192.168.56.0/24. Your network may be different.
- On your Kali VM, open a terminal and run
-
Perform a ping sweep:
- Run the
nmap -sncommand against the entire subnet you just identified. Remember to usesudofor some scan types to work correctly. sudo nmap -sn 192.168.56.0/24(replace with your actual subnet).
- Run the
You should see a list of active hosts. This will include your Kali machine, your Metasploitable2 target, and possibly the virtual network's gateway. You have now successfully mapped the live devices in your lab environment!
Nmap - Host Discovery With Ping Sweep
The following video from HackerSploit provides a great walkthrough of performing a ping sweep. It will help solidify what you just did in the lab.
Watch the section from 03:26 to 05:46. The demonstrator uses nmap -sn to scan both a single host and an entire network range, just as you did. Pay attention to the information Nmap returns for each live host.
4. How "Ping Scans" Really Work
Here's a crucial detail for any aspiring hacker: an Nmap "ping scan" doesn't just use the standard ping command (which sends ICMP echo requests). Relying only on ICMP is a bad strategy because many systems and firewalls are configured to ignore it.
Nmap is much smarter. When you run nmap -sn as root, it sends a combination of probes to maximize the chance of getting a response:
- ARP Ping (
-PR): On a local network (like your lab), Nmap sends ARP requests. This is the most reliable method for local host discovery because ARP is a fundamental protocol for Ethernet communication and is almost never blocked internally. - ICMP Echo Request (
-PE): The standard "ping." - TCP SYN Ping (
-PS): It sends a TCP packet with the SYN flag set to a specific port (by default, port 443). If the host responds with a SYN/ACK or a RST packet, Nmap knows it's online. - TCP ACK Ping (
-PA): It sends a TCP packet with the ACK flag set (by default, to port 80). An online host should respond with a RST packet.
The key idea is that even if a firewall blocks one type of probe (like ICMP), another might get through.
Nmap Host Discovery – What is it and How do you use it?
This article from Cyberscope provides a more detailed breakdown of the different probe types Nmap can use for host discovery. This is the 'why' behind the command.
Read the section 'How does Nmap Perform Host Discovery?'. You don't need to memorize every flag, but focus on understanding the variety of methods Nmap uses: ICMP, TCP SYN, TCP ACK, and ARP.
5. When Hosts Don't Respond: The -Pn Flag
What happens when a target is online but is behind a strict firewall that blocks all of your host discovery probes? Nmap will incorrectly report that the host is down.
For these situations, we have the -Pn flag. This powerful option tells Nmap: "Don't even try to discover the host. Assume it's online and proceed directly to the next steps (like port scanning)."
The syntax is simple: nmap -Pn <target>
You use -Pn when you have strong reason to believe a host is online, even if it's not responding to pings. This forces Nmap to skip the discovery phase entirely. While it ensures you don't miss a firewalled target, it can also waste a lot of time scanning IP addresses that are genuinely offline.
Nmap - Host Discovery With Ping Sweep
Let's return to the HackerSploit video to see a clear explanation of why and when you would use the -Pn flag.
Watch from 05:46 to 08:20. The video explains how firewalls can block ICMP requests and then introduces -Pn as the way to bypass host discovery and scan the target anyway.
Conclusion
You have just taken your first step into active network scanning. You've moved from a list of potential targets to a confirmed list of live targets, a fundamental pivot in any security assessment.
Key Takeaways:
- Host Discovery is the process of identifying live devices on a network, and it's the first step in active scanning.
nmap -snis the primary command for performing a "ping scan," which discovers live hosts without doing a full port scan. It's fast and efficient.- Nmap's host discovery is robust, using ARP, ICMP, and TCP probes to maximize the chance of finding a live host, even if some probes are blocked.
- The
-Pnflag is essential for situations where a firewall blocks all discovery probes. It tells Nmap to skip discovery and assume the host is online.
Next Lesson Preview:
Now that you have a list of confirmed live hosts, the next question is: "What are they running?" In the next lesson, we will dive into the core of network scanning: performing TCP port scans using Nmap. You'll learn how to use SYN scans (-sS) and Connect scans (-sT) to discover open ports and identify the services listening on them, which is where you will begin to find potential vulnerabilities.