Hello! Welcome back to your course on ethical hacking.
In the last lesson, you learned how to perform host discovery using nmap -sn to identify which targets on a network are live and reachable. You've essentially created a map of active devices. The next logical question in any penetration test is, "What are these devices doing?"
This lesson will teach you how to answer that question by exploring the core of network scanning: performing TCP port scans with Nmap. You'll learn to use the two most fundamental TCP scan types—the Connect scan (-sT) and the SYN scan (-sS)—to discover which "doors" (ports) are open on a target system and identify the services running behind them. This is how you begin to find potential entry points.
1. Ports and Their States
Before we scan, we need to understand what we're looking for. On a computer, a port is a numbered endpoint used by applications to handle specific types of network traffic. For example, web servers typically listen on TCP port 80 for HTTP traffic.
When you scan a host, Nmap determines the state of each port. While there are six states Nmap recognizes, for now, we'll focus on the three most important ones for a penetration tester:
- Open: An application is actively accepting connections on this port. This is your primary target.
- Closed: The port is accessible, but there is no application listening on it. It's like knocking on a door and being told no one is home.
- Filtered: Nmap cannot determine if the port is open or closed because a firewall or network filtering device is blocking the probes. These ports may require more advanced techniques to investigate.
To understand how Nmap determines these states, we need to quickly look at the signals used in TCP communication.
Nmap Basic Port Scans | TryHackMe (THM)
This article from a TryHackMe write-up on Medium offers a clear explanation of port states and the underlying TCP flags that Nmap uses to differentiate between them. Understanding this theory is crucial for interpreting scan results correctly.
First, read the beginning of the article, starting from 'After learning about the “Host” Scan...' down to 'Which port state is the most interesting to discover as a pentester?'. This will introduce you to the six port states. Then, continue reading the next part about the TCP header, focusing on the descriptions of the SYN, ACK, and RST flags. These three flags are the building blocks of the scans we're about to perform.
2. The TCP Connect Scan (-sT): The Full Handshake
The most basic TCP scan is the Connect scan. It uses the operating system's standard network functions to attempt a full connection with each port on the target. This process is identical to the TCP three-way handshake you may be familiar with:
- Nmap sends a
SYN(synchronize) packet to the target port. - If the port is open, the target responds with a
SYN/ACK(synchronize/acknowledge) packet. - Nmap completes the handshake by sending an
ACK(acknowledge) packet, establishing a full connection. It then immediately tears the connection down with aRST(reset) packet.
If the port is closed, the target will respond directly with a RST packet, and no connection is made.

The command for a Connect scan is:nmap -sT <target_IP>
Pros and Cons:
- Pro: It doesn't require special privileges. Any user on a system can run it.
- Con: It's "noisy." Because it establishes a full connection, the service on the other end (e.g., a web server) will almost certainly log the connection attempt. This makes it very easy to detect. It's also slower than other methods.
Nmap - TCP Connect & Stealth (SYN) Scanning
Let's watch a clear demonstration of the TCP Connect scan in action. This video from HackerSploit will walk you through the concept and the command.
Watch the segment from 00:24 to 02:52. The presenter explains how the Connect scan works, its advantages (accuracy) and disadvantages (slow, detectable), and demonstrates the -sT command.
3. The TCP SYN Scan (-sS): The "Stealth" Scan
The SYN scan is the default scan type in Nmap when run with root privileges, and for good reason. It's faster and stealthier than a Connect scan. It's often called a "half-open" scan because it never completes the three-way handshake.
- Nmap sends a
SYNpacket, just like before. - If the port is open, the target responds with a
SYN/ACK. - Instead of sending an
ACKto complete the connection, Nmap sends aRSTpacket, tearing down the connection before it's fully established.
Since no full connection was made, many older or simpler logging systems would never record the interaction, making the scan "stealthy."
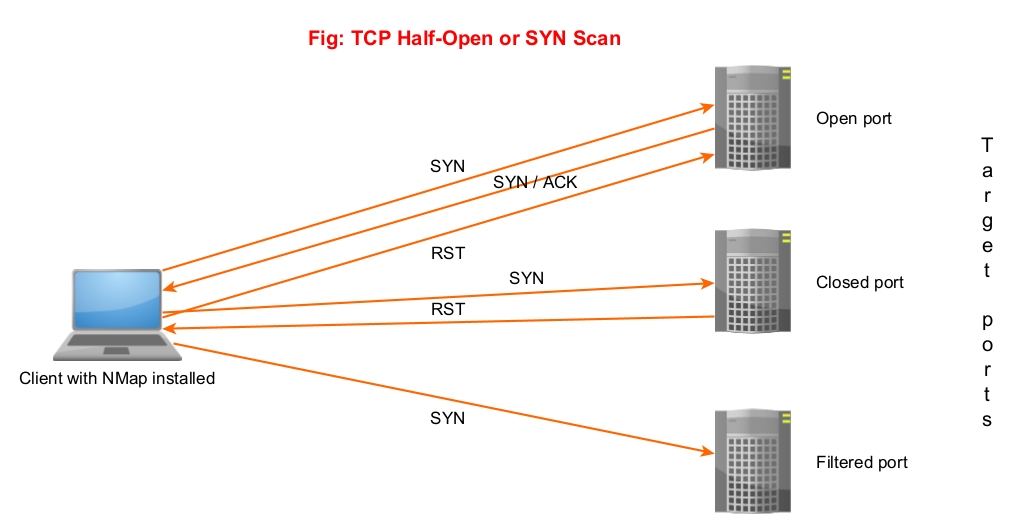
Because this scan requires crafting raw packets (a SYN packet followed by a RST), it needs elevated privileges.
The command for a SYN scan is:sudo nmap -sS <target_IP>
Pros and Cons:
- Pro: Much faster and stealthier than a Connect scan. It's the go-to scan for most situations.
- Con: Requires root privileges (use
sudo). Modern firewalls and Intrusion Detection Systems (IDS) are very good at detecting SYN scans, so it's not truly invisible.
Nmap Cheat Sheet: Top 10 Scan Techiques
The fact that Nmap uses different default scans depending on your user privileges is a key piece of practical knowledge. This cheat sheet from Netlas.io explains it concisely.
Read the short 'Default Scan' section. Note how Nmap defaults to -sT for a regular user but switches to -sS when run as root.
Now, let's see the SYN scan demonstrated.
Nmap - TCP Connect & Stealth (SYN) Scanning
Continuing with the HackerSploit video, the next section covers the SYN scan and contrasts it with the Connect scan you just learned about.
Watch from 02:52 to 05:29. Pay close attention to the explanation of the 'half-open' mechanism and why it is faster and more difficult to detect than a full connect scan.
4. Seeing the Difference: Packet-Level Analysis
To truly understand the difference between -sT and -sS, nothing beats seeing the packets on the wire. The next part of the video uses Wireshark, a network packet analyzer, to show you exactly what Nmap is sending and receiving.
You don't need to be a Wireshark expert to follow along. Just focus on the Info column, which describes the packets being exchanged (e.g., SYN, SYN, ACK, RST).
Nmap - TCP Connect & Stealth (SYN) Scanning
This is where the theory becomes reality. By watching the packet captures, you will see the three-way handshake of the Connect scan and the half-open exchange of the SYN scan, cementing your understanding of how they work.
Watch the two segments from 06:30 to 09:20 (Connect scan) and 09:20 to 10:24 (SYN scan). Compare the sequence of packets in each scan. For the -sT scan, look for the SYN -> SYN/ACK -> ACK sequence. For the -sS scan, notice how it's SYN -> SYN/ACK -> RST.
5. Hands-On Lab: Scanning Metasploitable2
It's time to put this into practice in your virtual lab.
- Start your lab: Make sure your Kali Linux and Metasploitable2 VMs are running and on the same virtual network.
- Find your target: Use the skills from the last lesson to find the IP address of your Metasploitable2 machine. A quick
sudo nmap -sn <your_network_range>should do the trick (e.g.,192.168.56.0/24). - Run a Connect Scan (
-sT):- Open a terminal on your Kali VM.
- Execute the command:
nmap -sT <metasploitable_IP> - Observe the output. Nmap will list every open port it finds, along with the state (
open) and the service it believes is running (e.g.,ftp,ssh,http). Note how long the scan takes.
- Run a SYN Scan (
-sS):- Now, run the scan again using the SYN method:
sudo nmap -sS <metasploitable_IP> - The results should be nearly identical, but compare the
Scan completed in...time at the end. The SYN scan is almost always significantly faster.
- Now, run the scan again using the SYN method:
- Targeting Specific Ports:
- By default, Nmap scans the 1000 most common ports. To be more efficient or to look for something specific, you can use the
-pflag. - Try these variations:
sudo nmap -sS -p 21,22,80 <metasploitable_IP>(scans three specific ports)sudo nmap -sS -p 1-100 <metasploitable_IP>(scans a range of ports)sudo nmap -sS -F <metasploitable_IP>(scans the top 100 ports,-Fis for "Fast")
- By default, Nmap scans the 1000 most common ports. To be more efficient or to look for something specific, you can use the
Take some time to examine the output. You are now looking at the attack surface of the target machine—a list of running services that could potentially be vulnerable.
Conclusion
You have now mastered the two most essential TCP port scanning techniques in Nmap. You not only know how to run the scans but also why they work at the packet level and when to choose one over the other.
Key Takeaways:
- Port scanning's goal is to discover open ports and the services listening on them.
- The TCP Connect Scan (
-sT) is reliable and doesn't need root, but it's slow and easily detected because it completes the full three-way handshake. - The TCP SYN Scan (
-sS) is the preferred method. It's fast and stealthier because it uses a "half-open" technique, but it requires root privileges. - The output
PORT | STATE | SERVICEgives you a direct map of the target's running services, which is the foundation for the next phase of enumeration and vulnerability discovery.
Next Lesson Preview:
So far, we've focused exclusively on TCP, the connection-oriented protocol. But there's another major transport protocol: UDP. In the next lesson, you will learn the difference between TCP and UDP scanning and how to perform a UDP port scan with Nmap. Scanning for UDP services presents its own unique set of challenges and is a critical skill for a thorough network assessment.