Hello! Let's dive into the next lesson in our module on Linux Storage and Filesystem Management.
In the previous lesson, we learned how to use df and du to see how much space is used on our mounted filesystems. This is like checking how full the rooms in a house are. Now, we're going to look at the blueprint of the house itself—the underlying physical and virtual disks where these filesystems are built.
Understanding the disk layout is a fundamental skill. For a system administrator, it's essential for managing storage. For a penetration tester, it's a critical part of the initial enumeration phase after gaining access to a machine. Knowing the disk and partition layout can reveal separate data volumes, backup drives, or other interesting targets.
Today, you will learn to list and identify block devices and partitions using lsblk and fdisk -l. These commands give you the "lay of the land" of a system's storage hardware.
1. What Are Block Devices?
In Linux, the "everything is a file" philosophy extends to hardware. Your hard drives, SSDs, and USB sticks are represented as special files located in the /dev directory. These are called block devices because the system reads from and writes to them in fixed-size blocks of data.
Common examples include:
/dev/sda: Often the first SATA, SCSI, or USB drive./dev/sdb: The second such drive./dev/nvme0n1: The first NVMe SSD.
We don't typically interact with these device files directly. Instead, we use specialized tools to manage them, and today we'll learn the two most important ones for listing what's available.
2. The Modern View: lsblk
The lsblk (list block devices) command is the go-to tool for a quick and readable overview of your storage devices. Its output is clean and organized in a tree structure, making it easy to see which partitions belong to which disks.
Let's start by watching a video that introduces lsblk and explains its output.
Linux Crash Course - Everything You Need to Know for Formatting and Mounting Disks
The video "Linux Crash Course - Everything You Need to Know for Formatting and Mounting Disks" by Learn Linux TV provides a great introduction to block devices and the lsblk command.
Watch from 03:38 to 07:06. Focus on: How lsblk lists all block devices. The device naming conventions for different drive types (sdb, nvme). What the numbered suffixes mean (e.g., sdb1 is the first partition on the sdb disk).
As the video explained, the base name like sdb refers to the entire physical disk, while the numbered name like sdb1 refers to a specific partition on that disk.
Now, let's examine a typical lsblk output more closely.
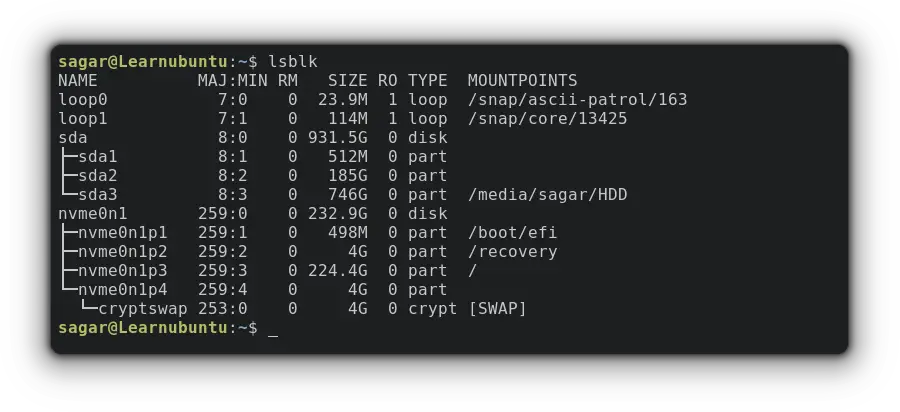
Hands-On Practice with lsblk
Open your terminal and try these commands:
-
Basic Listing: Run
lsblkby itself.lsblkIdentify your main system drive. If you're in a VM, it might be named
vdaorsda. If you're on a machine with an NVMe SSD, you'll see something likenvme0n1. -
Add Filesystem Info: The
-fflag adds information about the filesystem, including its type (FSTYPE), unique identifier (UUID), and label. This is extremely useful for seeing what's on each partition.lsblk -fNotice how this connects what we see here (the block device) with what we saw in the last lesson with
df -T(the filesystem type). You can now see which device holds yourext4orbtrfsroot filesystem.
3. The Classic View: fdisk -l
While lsblk is great for a quick look, the fdisk command is a classic, powerful tool for partition management. We will focus only on its ability to list partitions using the -l flag. fdisk often provides more low-level detail than lsblk, and because it can modify the disk, it requires root privileges.
Linux Crash Course - Everything You Need to Know for Formatting and Mounting Disks
Let's return to the Learn Linux TV video for a quick demonstration of the fdisk -l command.
Watch the short segment from 07:06 to 07:41. Note the use of sudo and the different format of the output compared to lsblk.
The output of fdisk -l is more verbose. To understand it better, let's look at an example and break it down.
Fdisk Command in Linux (Create Disk Partitions)
The article "Fdisk Command in Linux" from linuxize.com provides a great explanation of the fdisk -l output.
Read the section titled "List Partitions". Focus on the example output and the explanation of the different device names (/dev/nvme0n1, /dev/sda) and partition names (/dev/nvme0n1p1).
Key information you get from fdisk -l that isn't immediately obvious in lsblk includes:
- Disklabel type: This tells you the partition scheme, which is typically
gpt(GUID Partition Table, modern) ordos(also known as MBR, Master Boot Record, older). This is crucial information in some advanced scenarios. - Sector information: Shows the start and end sectors for each partition.
Hands-On Practice with fdisk
Time to try it yourself.
-
List all partitions:
sudo fdisk -lCompare the output to what you saw with
lsblk. You're seeing the same devices, just presented differently. -
Query a specific disk: You can also run it on a single device to reduce the output.
# Replace /dev/sda with the name of a disk on your system
sudo fdisk -l /dev/sda
4. Practical Application: Enumeration
Now, let's put this into the context of your goal. You've just gained a foothold on a target system. What do you do? You enumerate. Running lsblk -f and sudo fdisk -l are among the first commands you should execute. They help you answer key questions:
- How many disks are attached? Are there any that look non-standard?
- Are there any unmounted partitions (
lsblkoutput with an emptyMOUNTPOINTScolumn)? These are prime targets for investigation as they might contain hidden data or backups. - What filesystem types are in use? This informs what tools you might need to interact with them.
- What partition scheme is used (
gptordos)? This gives you clues about the age and configuration of the system.
Here's a final practical tip that is invaluable for both system administration and penetration testing.
Linux Crash Course - Everything You Need to Know for Formatting and Mounting Disks
The same Learn Linux TV video has a fantastic practical tip for identifying a newly connected device. This is useful when you're working with USB drives or adding virtual disks in a lab environment.
Watch from 09:17 to 10:05. The technique is simple: run lsblk, connect the device, and run lsblk again to see what new device name appeared.
This "before and after" technique is simple, effective, and eliminates guesswork when you need to operate on a specific removable disk.
Conclusion
You have now learned how to map out the foundational storage layer of a Linux system. While lsblk and fdisk -l show similar information, they present it differently and serve slightly different purposes.
Key Takeaways:
- Storage devices are represented as block devices in the
/devdirectory. lsblkis the modern tool for a quick, tree-view overview of disks and partitions. The-fflag adds valuable filesystem context.sudo fdisk -lis the classic tool that provides a detailed, verbose list, including low-level information like the partition table type (GPT/MBR).- Device Naming: Get familiar with
sdXfor SATA/USB drives andnvmeXnYfor NVMe drives. A number at the end (e.g.,sda1) indicates a partition. - These commands are essential for initial system enumeration in a security context to understand the system's layout and find potential areas of interest.
Next Lesson Preview:
We've seen how to list existing partitions. But what exactly is a partition, and why do we need them? In the next lesson, we will dive into basic disk partitioning concepts to understand how a raw disk is divided up to become usable.