Hello! Welcome back.
In our last lesson, we built a solid theoretical foundation for SSH, exploring how it uses encryption, data integrity checks, and a two-way authentication model to provide secure remote access. We discussed the "what" and the "why."
Today, we transition from theory to practice. This lesson focuses on the learning outcome: Connect to a remote machine using SSH with password authentication. We will take the concepts of host and user authentication and see them in action as you use the ssh command for the first time. This is a fundamental skill for any system administrator or ethical hacker.
1. The Anatomy of the ssh Command
Let's start with the command itself. As you're comfortable with the command line, you'll find the basic structure intuitive. The program you'll use is the SSH client, simply called ssh.
The most common syntax is:ssh username@hostname
ssh: This invokes the SSH client program on your local machine.username: This is the name of the user account you want to log in as on the remote server.hostname: This is the address of the remote server. It can be an IP address (e.g.,192.168.1.10) or a domain name (e.g.,server.example.com).
If your username on your local machine is the same as your username on the remote server, you can use a shorter version: ssh hostname. The client will automatically assume you want to use your current username.
For a clear, written breakdown of this syntax, the following resource is a great reference.
SSH Essentials: Working with SSH Servers, Clients, and Keys
This article, 'SSH Essentials', provides a concise explanation of the basic connection command. It's the same guide we used in our last lesson, so the format will be familiar.
Please read the section 'Basic Connection Instructions', specifically the subsection 'Connecting to a Remote Server'. It covers the two main forms of the ssh command we just discussed.
2. Your First Connection: A Step-by-Step Guide
Now, let's walk through the process of making a real connection.
Step 1: Verify Your SSH Client
First, let's ensure the ssh client is available on your Arch Linux system. While it's almost certainly installed, it's good practice to know how to verify commands exist. You can use the which command to find the path to the executable.
which ssh
You should see output like /usr/bin/ssh, confirming the client is ready to use. The following short video clip demonstrates this.
Linux Crash Course - Connecting to Linux Servers via SSH
This clip from Learn Linux TV quickly shows how to confirm that the SSH client is installed on your system, which is the first step before attempting a connection.
Watch from 04:55 to 05:48. The presenter demonstrates using which ssh to check for the client.
Step 2: The Host Authenticity Prompt (The "Man-in-the-Middle" Defense)
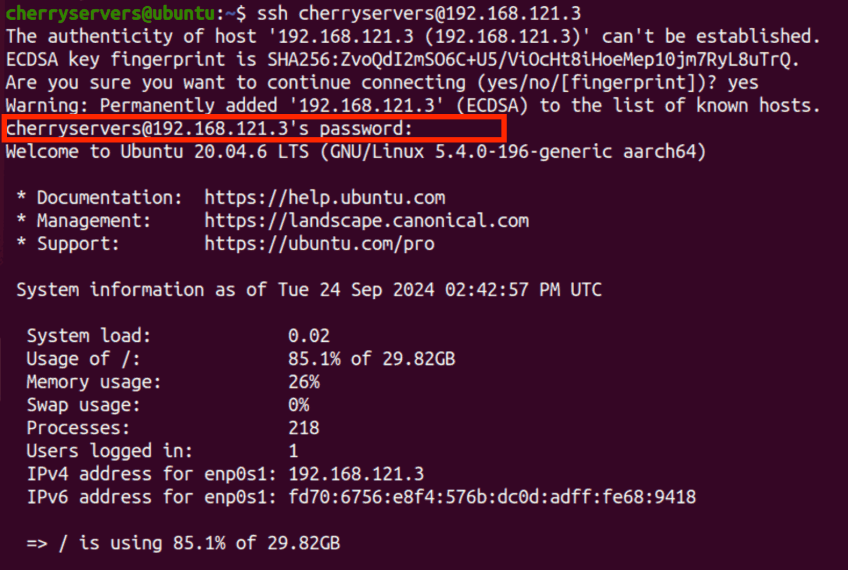
Remember our discussion about Host Authentication from the last lesson? The first time you connect to any new server, you'll see it in action. Your SSH client will display a message similar to this:
The authenticity of host '192.168.1.10 (192.168.1.10)' can't be established.
ECDSA key fingerprint is SHA256:AbCdEfGhIjKlMnOpQrStUvWxYz1234567890abcDEF.
Are you sure you want to continue connecting (yes/no/[fingerprint])?
This is not an error. This is SSH's built-in defense against Man-in-the-Middle (MITM) attacks. Your client is telling you, "I've never seen this server before. Here is its unique 'fingerprint'. Can you confirm this is the correct machine?"
If you type yes, your client will save the server's public host key to the ~/.ssh/known_hosts file on your local machine. On all future connections, it will automatically check that the server presents the same key. If the key ever changes, SSH will give you a loud warning, as it could mean you're being redirected to a malicious server.
This infographic provides an excellent visual summary of this crucial security feature.

Step 3: Authenticating and Logging In
After you accept the host key, you will be prompted for the password for the user account on the remote server. When you type, you won't see any characters on the screen (not even asterisks). This is a standard security feature in Linux terminals.
The following video puts all these pieces together in a clear, practical demonstration.
Linux Crash Course - Connecting to Linux Servers via SSH
Watch this segment from Learn Linux TV for a complete walkthrough of a first-time SSH connection, including the host authenticity prompt and password entry.
Watch from 06:12 to 09:23. Pay close attention to the sequence: running the ssh command, responding 'yes' to the prompt, entering the password, and finally, getting a shell on the remote server. The presenter also shows how to end the session with the exit command.
Here is a static image of what the entire process looks like in a terminal.
Practice: Connect to Your Target VM
Now it's your turn. In your virtual lab environment, you should have an attacker machine (your Arch Linux host) and a target machine. For this exercise, let's assume you're using a common vulnerable VM like Metasploitable2.
-
Start your Metasploitable2 virtual machine.
-
Find its IP address. You can often see this on the login screen of the VM's console.
-
The default credentials for Metasploitable2 are typically
msfadminfor both the username and password. -
From your Arch Linux terminal, connect to it using the command:
ssh msfadmin@<IP_ADDRESS_OF_METASPLOITABLE> -
Follow the prompts: type
yesto accept the host key, and then enter the passwordmsfadmin. -
If successful, your command prompt will change, indicating you are now in a shell session on the Metasploitable2 machine.
-
Run a command like
whoamiorls -lto confirm you are executing commands on the remote system. -
When you are finished, type
exitand press Enter to close the connection and return to your local shell.
3. Common Connection Scenarios
While the basic command works most of the time, there are a few common variations you will encounter.
Connecting to a Non-Standard Port
By default, SSH servers listen on TCP port 22. However, for basic security (or to avoid conflicts), a system administrator might change this. If you try to connect to a server that uses a different port without specifying it, your connection will be refused.
To specify a port, you use the -p option:
ssh -p <PORT_NUMBER> username@hostname
For example, to connect to a server on port 2222:
ssh -p 2222 msfadmin@192.168.1.10
The video you watched earlier also demonstrates this exact scenario and explains why an admin might change the default port.
Linux Crash Course - Connecting to Linux Servers via SSH
Let's revisit the Learn Linux TV video to see how to handle servers that don't use the default port. This is a very common situation in real-world environments.
Watch the segment from 09:23 to 12:48. The presenter intentionally makes a connection fail and then shows how to fix it by using the -p flag.
This is a critical detail in penetration testing, as a port scan might reveal an SSH server running on an unusual port, which could be an entry point.
Conclusion
You have now successfully moved from SSH theory to hands-on practice. You've made your first secure connection, understood the critical host verification step, and learned how to adapt the command for non-standard configurations.
Key Takeaways:
- The basic SSH command syntax is
ssh username@hostname. - The first-time connection prompt to verify a host's fingerprint is a crucial security feature to prevent MITM attacks. Your approval is stored in
~/.ssh/known_hosts. - Password authentication is a simple method, but be aware that your password entry will be invisible in the terminal.
- Use the
-pflag to specify a custom port if the server is not running on the default port 22. - To end your remote session and return to your local machine, simply type
exit.
Next Lesson Preview:
Password authentication is functional, but it has weaknesses (like being susceptible to brute-force attacks). The industry standard for secure, automated, and convenient access is SSH key-based authentication. In our next lesson, you will learn how to generate your own public/private key pair and set up a passwordless login to a remote server, significantly hardening your access method.