Hello! In our last lesson, we developed a complete workflow for debugging AI-generated code, transforming a buggy script into a functional Flask application. This brings us to the final, exciting step in the prototyping process: sharing your creation.
This lesson addresses the learning outcome: Prepare and deploy a simple Python web application to a free hosting service like Streamlit Community Cloud. We'll take the skills you've developed in generating and debugging code and learn how to make your prototypes live and accessible to anyone with a web browser. This is a crucial skill for both sharing work with colleagues and showcasing a minimum viable product (MVP) for a startup idea.
To make the deployment process as smooth as possible, we'll be using Streamlit, a Python library designed for creating web apps with incredible speed. While our previous prototype used Flask, deploying Flask apps often requires more complex configurations. Streamlit is optimized for rapid development and has a fantastic, free hosting platform that's perfect for our goals. Learning to deploy with Streamlit will give you one of the fastest ways to go from a Python script to a shareable web app.
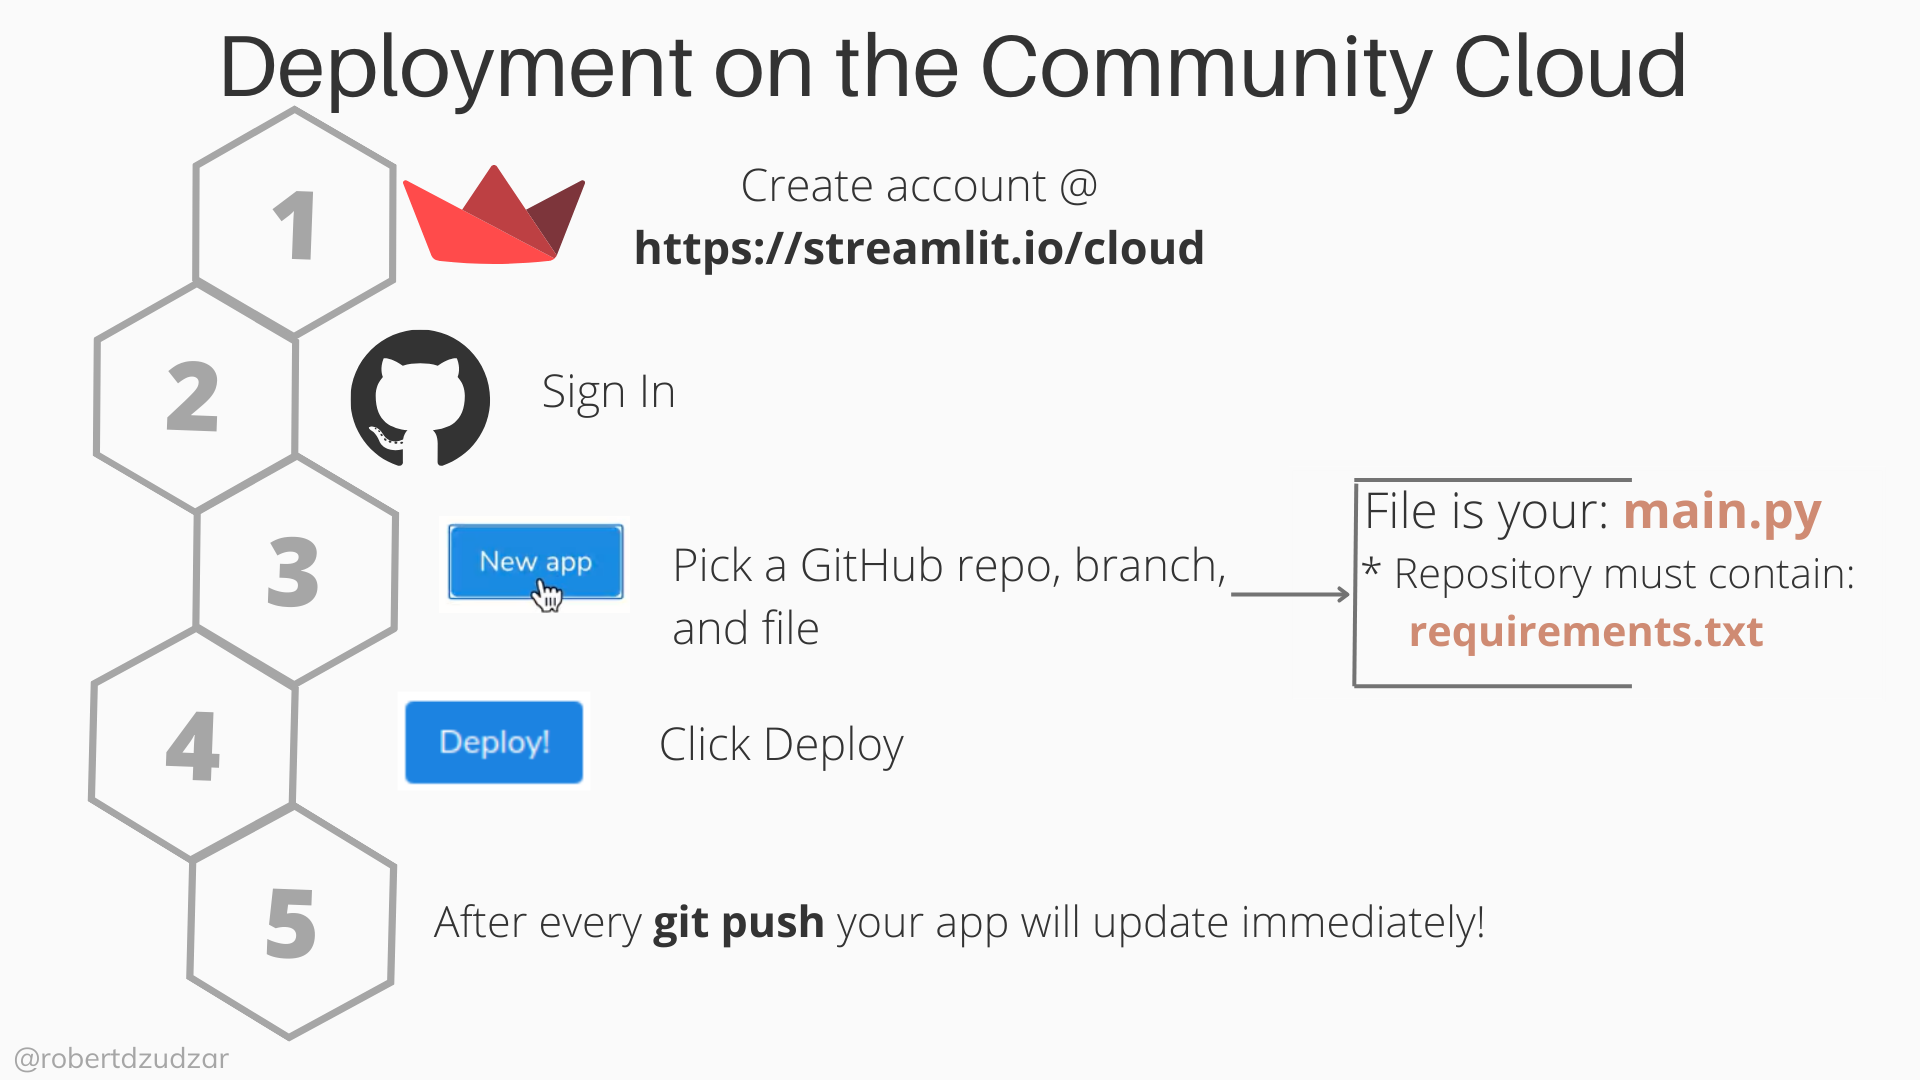
The overall workflow we'll follow is straightforward:

1. Preparing Your App for Deployment
Before you can deploy an app, you need to prepare a package that the hosting service can understand. This involves two key components: your Python script and a list of its dependencies.
The Python Script
For this exercise, we'll start with a simple "Hello World" Streamlit app. Create a file named app.py with the following code:
import streamlit as st

st.title('My First Deployed App')

st.write('Hello, world! This app is live on Streamlit Community Cloud.')


# A simple interactive element
name = st.text_input('What is your name?')

if name:
    st.write(f'Hello, {name}!')
This script creates a title, writes a line of text, and includes a simple text input box to demonstrate Streamlit's interactivity.
The Dependencies File (requirements.txt)
When Streamlit Cloud builds your app, it needs to know which Python libraries to install. You specify these in a requirements.txt file.
For our simple app, this file will contain only one line:
streamlit
You can create this file manually. If your app used other libraries like pandas or numpy, you would add them to this file, each on a new line.
2. The Deployment Workflow: From GitHub to Live App
Streamlit Community Cloud works by connecting directly to your GitHub account. This enables a powerful feature: continuous deployment. Every time you push an update to your GitHub repository, your live app updates automatically.
Step 1: Create a GitHub Repository
- Go to your GitHub account and create a new public repository. You can name it something like
streamlit-deployment-demo. - Add the
app.pyandrequirements.txtfiles you just created to this repository. You can do this by uploading the files directly through the GitHub web interface or by usinggitfrom your terminal.
Your repository should now contain these two files.
Step 2: Deploy via Streamlit Community Cloud
Now for the main event. The following video from the official Streamlit team provides a perfect walkthrough of the entire process, from signing up to seeing your app go live.
How to Deploy Your App to Streamlit Community Cloud
This video is your primary guide for this lesson. It clearly demonstrates the five steps required to deploy your application using the free Streamlit Community Cloud, showing how to connect your GitHub account and launch the app.
Please watch the sections that cover the core deployment process: Set up an account (04:03 - 06:44): Follow along to sign up for Streamlit Community Cloud. Be sure to use the 'Continue with GitHub' option to authorize access, which makes deployment seamless. Create a GitHub repo (06:44 - 08:19): You've already done this, but watch this part to confirm your setup is correct. Deploy your app (08:19 - 10:02): This is the most important part. See how to select your repository, branch, and main file path to initiate the deployment. Pay attention to the logs that appear, as they are key for troubleshooting.
For a text-based reference that you can keep open while you work, the official Streamlit documentation provides the same steps in a concise format.
Deploy your app on Community Cloud
This is the official documentation for deploying an app. Use it as a checklist or to clarify any steps from the video.
Quickly read the sections 'Select your repository and entrypoint file' and 'Watch your app launch'. They provide a clear, step-by-step written guide to the deployment dialog.
By following these resources, you will have a live, public URL for your application. Congratulations!
3. Managing and Updating Your Deployed App
Your work doesn't stop once the app is live. You'll need to manage it, update it, and occasionally troubleshoot it.
-
Updating Your App: As mentioned, any
git pushto your main branch on GitHub will automatically trigger a rebuild and update your app. Try it now: change the text inapp.py, commit the change, and push it to GitHub. You'll see your live app update within a minute or two. -
Managing Settings: In the Streamlit Cloud dashboard (share.streamlit.io), you can manage your apps. As shown in the first video (at 10:02), you can click the settings for an app to give it a more memorable custom URL.
-
Troubleshooting: If your app fails to deploy, the cause is almost always an issue in your
requirements.txtfile (e.g., a typo or a missing library). When viewing your app, click the "Manage app" button in the bottom-right corner to view the logs. This will show you the exact error message, which you can use to debug the problem. This process is very similar to the debugging workflows we covered in the last lesson.
The following resource provides excellent written guidance on these management and troubleshooting topics.
Deploying to Streamlit Community Cloud
This guide provides practical tips on managing your deployed apps, which is a crucial next step after the initial deployment.
Please read these three short sections: 43.2 Managing your community cloud apps: This explains the dashboard where you can see all your apps. 43.3 Troubleshooting your app: This details how to use the 'Manage app' button and logs to find errors. 43.4 Updating your App: This confirms how automatic updates work after a git push.
4. Putting It All Together: Your Turn
You now have the complete workflow to take a Python script and share it as a web app. Given your finance background and interest in building tools, imagine converting a financial calculation you might do in a spreadsheet into a shareable app.
As a challenge, try using Gemini to help you build and deploy a simple mortgage or investment calculator.
Example prompt for Gemini:
"I want to build a simple web app using Python and Streamlit. The app should calculate the future value of an investment.
It needs three input fields:
- Principal amount (a number input)
- Annual interest rate (a number input)
- Investment duration in years (a slider from 1 to 30)
When the user changes any input, it should calculate and display the future value using the formula
FV = P * (1 + r)^t.Please generate the full Python code for the
app.pyfile."
Once you have the code, create the corresponding requirements.txt, push it to a new GitHub repo, and deploy it. You'll have a functional, shareable financial tool in under 30 minutes.
Conclusion
You've reached the end of our rapid prototyping module and have successfully mastered the full development lifecycle: from planning and generating code with an AI to debugging and now, deploying a live application. This is a powerful combination of skills that is fundamental to leveraging AI for your startup ambitions and professional work.
Key Takeaways:
- Streamlit Community Cloud offers a fast, free, and straightforward way to deploy Python web apps.
- The deployment process hinges on a GitHub repository containing your
app.pyscript and arequirements.txtfile listing all dependencies. - Deployment is continuous:
git pushyour changes, and your live application updates automatically. - Troubleshooting deployment issues typically involves checking the application logs for errors related to your code or dependencies.
Next Up:
With the ability to build and deploy AI-powered prototypes, the next logical step is to ensure your skills remain current in this rapidly evolving landscape. The final module of our course, "Building a System to Stay Current in AI," is dedicated to just that. In our next lesson, we will begin by learning how to set up a curated information system of newsletters, channels, and communities to effectively track AI tool developments.