In the previous lesson, we learned how to construct Pandas DataFrames and Series, the foundational structures for handling labeled data in Python. You now know how to organize data into a tabular format, which is the first step in any analysis. But once the data is in a DataFrame, how do you pull out the specific pieces of information you need?
This lesson will focus on that very question. We'll explore the essential techniques for selecting and filtering data from a DataFrame. Your goal is to become proficient with three primary methods: selecting data by its integer position, by its descriptive label, and by conditions based on the data's values. Mastering these skills is fundamental for cleaning data, performing analysis, and preparing datasets for machine learning models.
The Two Main Indexers: loc and iloc
When you want to select data from a DataFrame, Pandas provides two main tools called "indexers": .loc and .iloc. At first, they can seem confusingly similar, but they have a clear and distinct purpose:
.iloc(Integer Location): This indexer is used to select data based on its integer position. It works just like indexing a list or array in Python or JavaScript. You use numbers like 0, 1, 2, etc., to specify which row or column you want..loc(Location): This indexer is used to select data based on its label. This means you use the index's value (which might be a number, a date, or a string) and the column's name.
Let's begin by watching a great tutorial that walks through the basics of using these two indexers. We will use a similar small DataFrame for our own examples.
import pandas as pd

people = {
    'first': ['Corey', 'Jane', 'John'],
    'last': ['Schafer', 'Doe', 'Doe'],
    'email': ['CoreyMSchafer@gmail.com', 'JaneDoe@email.com', 'JohnDoe@email.com']
}
df = pd.DataFrame(people)
Python Pandas Tutorial (Part 2): DataFrame and Series Basics - Selecting Rows and Columns
Watch the following segments from the "Python Pandas Tutorial" by Corey Schafer. He provides a clear, practical introduction to iloc and loc.
First, focus on the section explaining iloc, which is based on integer positions. Watch from the introduction of iloc. Pay attention to how you can select single rows, multiple rows using a list, and specific cells using row and column numbers. Next, watch the segment on loc, which uses labels. Watch from the introduction of loc. Notice how it uses index labels for rows and column names for columns.
Deeper Dive into iloc and loc
As you saw in the video, both indexers use a similar syntax, df.indexer[rows, columns], but what you put inside the brackets differs. Let's solidify this understanding.
Positional Selection with .iloc
Since you have experience with JavaScript arrays, .iloc should feel quite natural. It's all about the zero-based position of rows and columns.
- Select the first row:
df.iloc[0] - Select the first and third rows:
df.iloc[[0, 2]](passing a list of positions) - Select a specific cell (first row, second column):
df.iloc[0, 1] - Select the first two rows and the first two columns:
df.iloc[0:2, 0:2]
Notice the slice 0:2. A crucial point with .iloc is that slicing is exclusive of the end point. So, 0:2 gets positions 0 and 1, which is standard behavior in both Python and JavaScript.
Label-based Selection with .loc
The .loc indexer works with the names of your rows and columns. For columns, this is straightforward—it's the column's string name. For rows, it's the value in the DataFrame's index. By default, the index is just integers (0, 1, 2, ...), which can make .loc and .iloc look identical for basic row selection.
The power of .loc becomes clearer when you have a meaningful index. Let's set the 'email' column as our index:
df.set_index('email', inplace=True)
print(df)
# Output:
#                             first     last
# email
# CoreyMSchafer@gmail.com     Corey  Schafer
# JaneDoe@email.com            Jane      Doe
# JohnDoe@email.com            John      Doe
Now, you can select a row using a meaningful label:df.loc['JaneDoe@email.com']
And you can select specific columns for that row:df.loc['JaneDoe@email.com', 'first']
The Slicing Trap: An Important Distinction
Here is one of the most common points of confusion between .loc and .iloc. When you slice with .loc, the range is inclusive of both the start and end points.
Let's use the original df with the default integer index to see this clearly:
df.iloc[0:2]selects rows at positions 0 and 1 (2 rows total).df.loc[0:2]selects rows with labels 0, 1, and 2 (3 rows total).
This subtle difference is critical to remember. The following article provides an excellent explanation of this and other nuances.
The Rule Everyone Misses: How to Stop Confusing loc and iloc in Pandas | Towards Data Science
This article from Towards Data Science does a fantastic job of highlighting the key differences between loc and iloc. Focus on the section that discusses slicing.
Read the section Slice a Range of Rows. Pay close attention to the examples and the explanation of why .loc is inclusive and .iloc is exclusive.
To summarize the main ways to use loc and iloc, this table is an excellent reference.
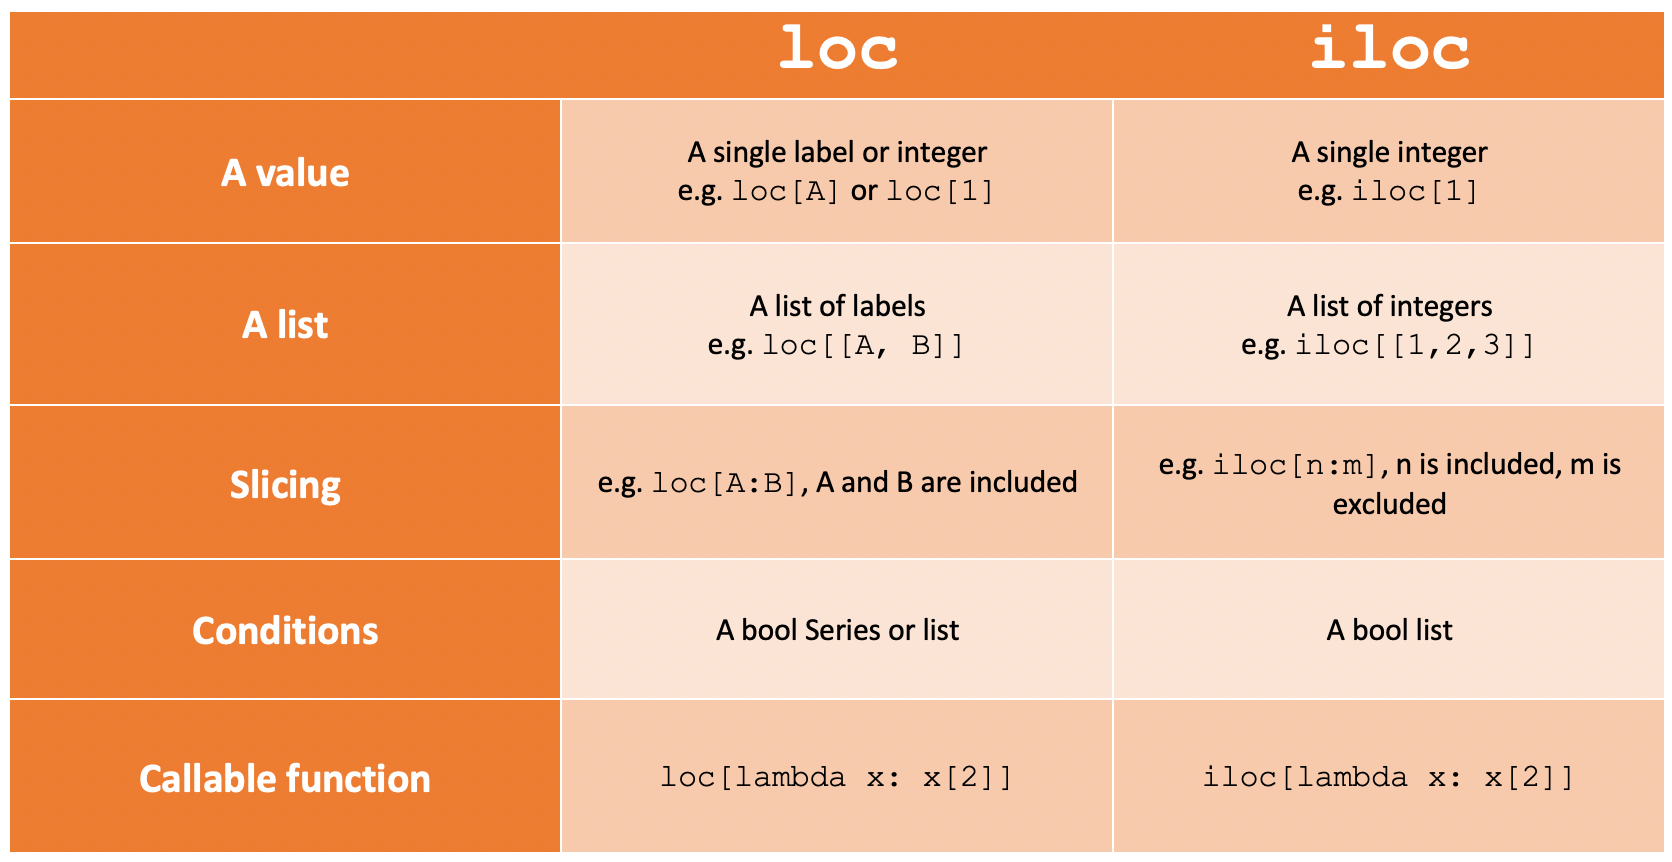
Conditional Filtering with Boolean Indexing
So far, we've selected data based on its position or label. But what if you want to select data based on its value? For example, "find all people with the last name 'Doe'." This is known as boolean indexing, and it's one of the most powerful features of Pandas.
The process involves two steps:
- Create a logical condition. For example,
df['last'] == 'Doe'. Pandas will evaluate this for every row and produce aSeriesofTrueandFalsevalues. - Pass this boolean
Seriesto the.locindexer..locwill return only the rows where the value wasTrue.
df.loc[df['last'] == 'Doe']
This is the fundamental pattern for asking questions of your data. The following video provides a fantastic, step-by-step intuition for how this works.
Boolean indexing in Pandas made simple
This video by Reuven Lerner, "Boolean indexing in Pandas made simple," brilliantly breaks down the concept.
Watch the video from this segment. The instructor first shows how a comparison operator on a Series creates a boolean Series, and then demonstrates how feeding this boolean Series into .loc filters the DataFrame. This directly mirrors the process described above.
You can also combine multiple conditions using the & (and) and | (or) operators. Because of how Python operators work, you must wrap each condition in parentheses.
df.loc[(df['last'] == 'Doe') & (df['first'] == 'John')]
This is the standard way to perform complex queries on your data. For a final review, the article below provides clear, copy-pasteable examples for all three types of indexing we've discussed.
Pandas iloc and loc – quickly select data in DataFrames
This article provides a great summary of all the selection methods.
First, review the section on iloc to see more examples of integer-based selection. Then, read through the section on boolean indexing with loc to see how conditions are applied. Start at the introduction to boolean indexing and continue to the code example showing selection based on a name.
Conclusion
In this lesson, you've learned the three essential methods for selecting and filtering data in Pandas, moving from simply having data in a DataFrame to actively querying it.
Here are the key takeaways:
.ilocis for integer-position-based selection. It's zero-indexed and its slicing is exclusive of the endpoint, like standard Python lists..locis for label-based selection, using the DataFrame's index and column names. Its slicing is inclusive of the endpoint.- Boolean indexing is used with
.locto filter data based on conditional logic (e.g.,df['column'] > 5). This is the primary method for asking analytical questions of your dataset.
You now have the core skills to manipulate DataFrames. In our next lesson, we will put this to practical use by learning how to load a dataset from an external file (a CSV) and perform initial inspections—the true starting point for any real-world data science project.