Hello! Welcome to the final lesson in our C++ Fundamentals module.
In the last lesson, you mastered if, else if, and else statements, which are essential for making your programs execute different code paths based on various conditions. We ended by noting that long if-else if chains, while powerful, can sometimes become cumbersome.
Today, we'll explore a more specialized tool for that exact situation. This lesson addresses the learning outcome: Use switch statements for multi-way branching based on a single variable. You'll learn how to write cleaner, more readable code when you need to check a single variable against a list of specific, constant values.
1. The switch Statement: A Cleaner Alternative
Imagine you have a variable and you need to perform a different action for each of its possible values (e.g., if menu_choice is 1, do this; if it's 2, do that; if it's 3, do something else). You could write this with an if-else if-else ladder, but it can get repetitive.
A switch statement is designed for this exact scenario. It takes a single variable and "switches" to the code block that matches the variable's value.
Look at this image, which compares the two structures. You can see how switch can make the logic look more organized and focused.

2. Anatomy of a switch Statement
The switch statement has a few key parts:
switch (variable): The statement starts with theswitchkeyword, followed by the variable you want to evaluate. This variable must be of an integer type, likeintorchar.case value:: Eachcaseis a label for a specific value the variable might have. Thevaluemust be a constant (e.g.,5,'A').break;: This keyword is crucial. It tells the program to exit theswitchblock after acasehas been executed. We'll explore what happens if you forget it later.default:: This is an optional but highly recommended part. The code underdefault:runs if the variable's value doesn't match any of thecaselabels. It's similar to the finalelsein anif-else ifchain.
This flowchart provides a great visual of the execution flow.
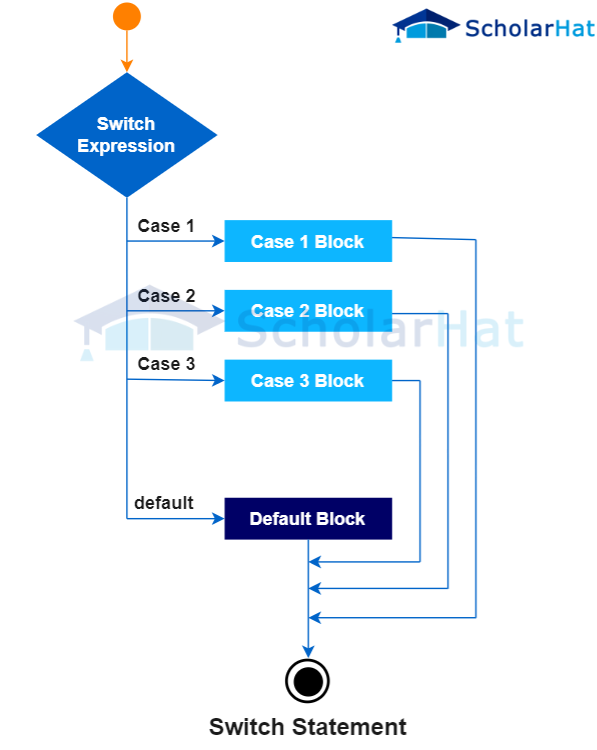
To see the syntax in action, let's watch a video that breaks it down.
Switch Case - C++ Tutorial For Beginners #10
This video from NeuralNine provides a clear and concise explanation of the basic syntax of a switch statement.
Watch from 01:04 to 03:07. Pay close attention to the roles of the switch, case, break, and default keywords as the presenter builds a simple example.
For a quick reference, here are the main rules summarized from the GeeksforGeeks article "Switch Statement in C++".
This resource clearly lists the rules you need to follow when writing a switch statement. Reading this will solidify your understanding of the syntax.
Read the section titled 'Rules of the switch Statement'. Take note of the allowed data types for case values and the rule about duplicate cases.
3. The Importance of break and "Fall-Through"
As mentioned, the break statement is vital. When a case matches, the program executes the code within it. If it encounters a break, it immediately exits the entire switch block.
But what happens if you omit the break?
If there's no break, the program will continue executing the code in the next case blocks until it either hits a break or reaches the end of the switch statement. This behavior is called fall-through, and it's one of the most important concepts to understand to avoid bugs. While sometimes intentional, it's usually an error for beginners.
This next video demonstrates this "fall-through" behavior perfectly. Understanding this is key to using switch statements correctly.
C++ Tutorial for Beginners 7 - Switch Statement
This video from ProgrammingKnowledge provides an excellent demonstration of what happens when you intentionally leave out a break statement.
Watch from 06:36 to 09:39. The presenter shows how omitting break after case 'a': causes the code for the next case (case 'A':) to run as well. This is the concept of fall-through.
While often a bug, fall-through can be used deliberately to have multiple cases execute the same block of code. This is a clean way to handle different inputs that should have the same outcome.
Here's a common and acceptable way to use fall-through:
char input = 'y';

switch(input) {
  case 'y':
  case 'Y':
    // Code for 'yes' runs for both 'y' and 'Y'
    std::cout << "You chose YES." << std::endl;
    break;
  case 'n':
  case 'N':
    std::cout << "You chose NO." << std::endl;
    break;
  default:
    std::cout << "Invalid choice." << std::endl;
    break;
}
4. Practical Example: A Simple Calculator
Let's see the switch statement in a more complete program. Building a simple calculator is a classic example that shows how switch can elegantly handle different operations based on user input.
Switch Case - C++ Tutorial For Beginners #10
Let's return to the NeuralNine video. The presenter builds a simple calculator, which is a perfect practical application for a switch statement.
Watch from 03:07 to 06:48. Notice how the program takes a char operator (+, -, *, /) from the user and uses it in the switch expression to select the correct arithmetic operation.
Test your understanding!
What will the following code print to the console? Why?
#include <iostream>

int main() {
    int value = 2;
    switch (value) {
        case 1:
            std::cout << "One ";
        case 2:
            std::cout << "Two ";
        case 3:
            std::cout << "Three ";
            break;
        case 4:
            std::cout << "Four ";
            break;
        default:
            std::cout << "Default ";
    }
    return 0;
}
Show answer
The code will print: Two Three
Explanation:
- The
switchexpression isvalue, which is2. - The program jumps to
case 2:. It prints "Two ". - There is no
breakaftercase 2:, so execution "falls through" to the next case. - The code in
case 3:is executed. It prints "Three ". - It then encounters the
break;statement incase 3:and exits theswitchblock.
5. switch vs. if-else if: When to Use Which?
Now that you know both structures, how do you decide which one to use?
switch Statement |
if-else if Ladder |
|---|---|
| Evaluates a single variable against multiple values. | Can evaluate multiple, unrelated conditions. |
Conditions must be constant int or char values. |
Conditions can be complex boolean expressions (>, <, &&, ` |
| Often cleaner and more readable for long lists of values. | More flexible and powerful for complex decision-making. |
Cannot check ranges directly (e.g., grade >= 90). |
Ideal for checking ranges of values. |
In short:
- Use a
switchstatement when you have a single integer or character variable and a list of discrete values to check against. - Use an
if-else ifladder for everything else: checking ranges, using complex logical expressions, or evaluating different variables in each condition.
Conclusion
Congratulations on completing the C++ Fundamentals module! You've built a solid foundation, moving from a simple "Hello, World!" to making intelligent decisions in your code.
Key Takeaways from this Lesson:
- The
switchstatement provides a clean way to perform multi-way branching based on the value of a single integer or character variable. - The key components are
switch,case,break, anddefault. - The
breakkeyword is crucial for exiting theswitchblock and preventing unintentional fall-through. - Fall-through can be used deliberately to allow multiple cases to execute the same code.
- A
switchis best for checking against a list of constant values, whileif-else ifis better for ranges and complex conditions.
You are now ready to move beyond the absolute basics. In our next lesson, we will begin a new module and explore loops. You'll learn how to make your program repeat actions, which unlocks the ability to process large amounts of data, build menus, and solve a whole new class of problems.