Hello! Welcome back to the course.
In our last module, you successfully designed and charted the heart of your doily—the central medallion. You made deliberate choices about its structure and translated that vision into a precise, hand-drawn blueprint. Now, we move from the doily's center to its body, where we'll explore one of the most beloved and defining elements of retro crochet: the pineapple motif.
This lesson focuses on understanding this classic design element from the inside out. Before you can incorporate pineapples into your work, you need to recognize their structure. Our goal is to deconstruct the anatomy of a classic pineapple motif, identifying its base, netting, and crown. Think of this as an anatomical study; by understanding the "bones" of the motif, you'll be able to manipulate, adapt, and eventually create your own variations.
The Anatomy of a Pineapple Motif
At first glance, a pineapple motif looks like a single, complex shape. In reality, it's a modular component built in three distinct stages. Understanding these stages is the key to mastering its design.
The three parts are:
- The Base: The foundation or starting point of the motif.
- The Netting: The main body, which gives the pineapple its characteristic width and lacy texture.
- The Crown: The tapered top that brings the motif to a neat point.
Let's break these down one by one, using a step-by-step tutorial to see how they are constructed.
How to Crochet the Pineapple Stitch
To understand the structure of a pineapple motif, it's helpful to see how one is crocheted from the ground up. This tutorial from The Spruce Crafts builds a classic pineapple. We will analyze its instructions to identify the different anatomical parts.
You don't need to crochet this right now, but read through the instructions in Steps 1 through 7. As you read, try to spot where one part of the structure ends and the next begins. We will be referring to these steps throughout the lesson.
1. The Base: The Foundation
Every pineapple needs an anchor. The base is a small, self-contained set of stitches that serves as the launching point for the rest of the motif. It is almost always worked into a single point (like the center of a shell) or a small chain space in the previous round of your doily. Its function is to establish the starting point from which the pineapple will fan out.
In the tutorial you just reviewed, Steps 1 and 2 create this base. The instructions have you create a small foundation chain and then work (2 dc, ch 2, 2 dc) into it. The article even explicitly states, "This is the base of your pineapple."
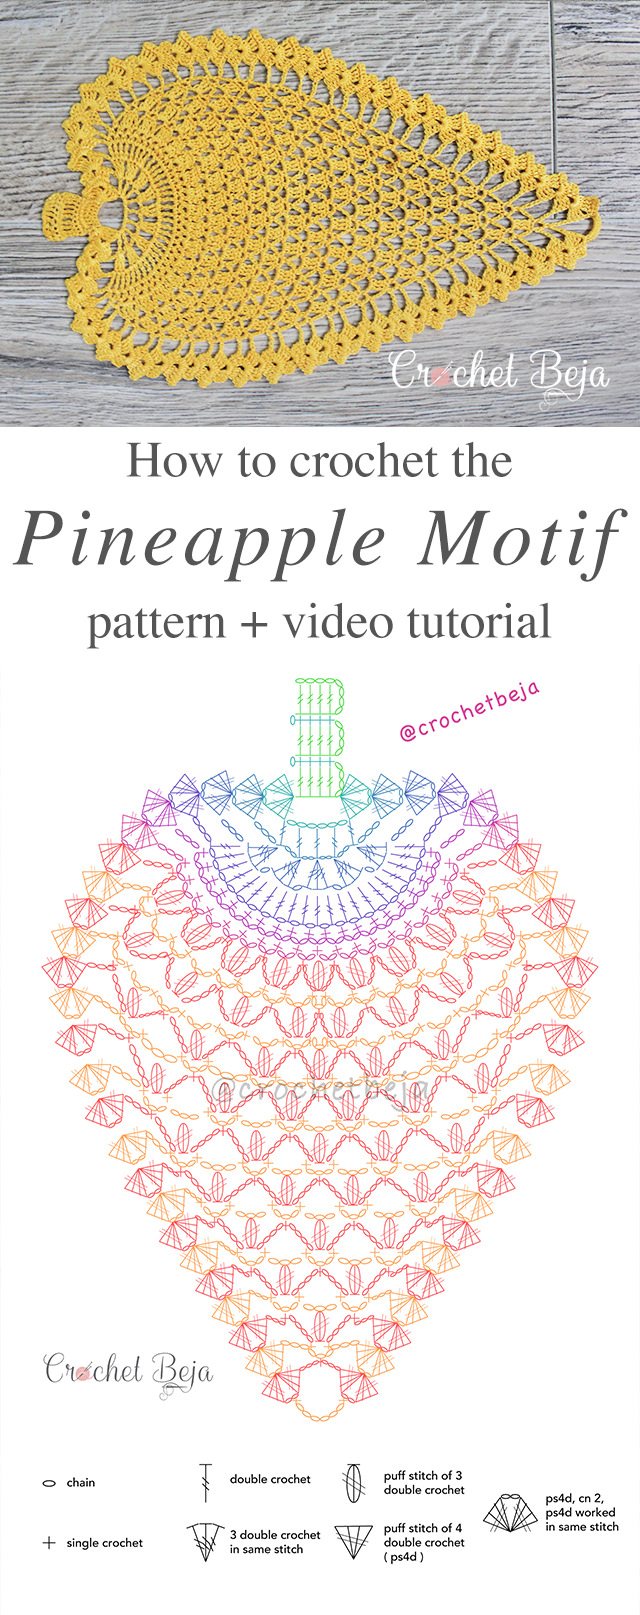
Look at the chart below. The first row (labeled '1') shows a similar structure: a small shell of stitches that acts as the foundation. This compact cluster of stitches is the unmistakable sign of a pineapple's base.

2. The Netting: The Body and Texture
The netting is the most substantial part of the pineapple, forming its main body. This section itself is built in two phases:
- Phase A: Expansion: Immediately following the base, there is a single row of many tall stitches (like double or treble crochet) worked into the center of the base. This row's purpose is to rapidly create the full width of the pineapple. In the tutorial, this is Step 3, where you work 13 treble crochet stitches into the
ch-2space of the base. - Phase B: Lace Creation: Following the expansion row, a series of rows made of chain-loops and single crochets are worked. This creates the iconic openwork "net" texture. In the tutorial, Step 4 prepares for this by separating the tall stitches with
ch-1spaces, and Step 5 creates the first full row ofch-3netting loops.
The chart below uses color-coding and a clear stitch legend. You can see the base in Row 1. Row 2 is the expansion phase, using puff stitches to create width. Rows 3 through 7 clearly show the lace creation phase, with the repeating pattern of chain loops forming the distinctive net.
3. The Crown: The Tapered Finish
The crown is the final section of the motif. Its function is to decrease the width of the netting systematically, bringing the pineapple to an elegant, tapered point.
This is accomplished by reducing the number of chain loops in each successive row. The tutorial from The Spruce Crafts explains this mechanism clearly in Step 6: "each time you will skip the first ch-3 space." This simple instruction is the engine of the decrease. Each row has one fewer loop than the last, until you are left with just a single loop at the very top, as described in Step 7.
Looking back at the first chart (resource LINK), you can trace this decrease visually. Count the number of chain loops (the curved lines) in each row from the middle to the top. You'll see the number diminish until only one remains, forming the crown.
Test your understanding!
Take another look at the chart for the yellow pineapple motif (resource LINK).
- Which row number corresponds to the base?
- Which row number is the expansion row that creates the main width?
- Which rows form the lacy netting?
- Which row forms the final, single loop of the crown?
Show answer
- Base: Row 1 (the single puff stitch).
- Expansion: Row 2 (the fan of 7 puff stitches).
- Netting: Rows 3, 4, 5, 6, and 7 create the body of the netting.
- Crown: Row 8 is the final single chain loop that completes the crown.
Summary of Anatomy
Here is a simple table to summarize what we've covered:
| Part | Function | Typical Construction |
|---|---|---|
| Base | Provides a solid anchor for the motif. | A small shell or fan of stitches (e.g., (2dc, ch2, 2dc)) worked into a single point. |
| Netting | Creates the width and lacy texture of the body. | 1. An expansion row of many tall stitches (dc, tr). 2. Multiple rows of chain-loops. |
| Crown | Tapers the motif to a finished point. | Successive rows of decreasing chain-loops, ending in a single loop. |
Conclusion
You can now look at a seemingly complex pineapple motif and see it for what it is: a logical, three-part construction. This ability to deconstruct a pattern is the first and most critical step in learning to design one. You've learned to identify the base that anchors the motif, the netting that forms its body, and the crown that gives it a finished shape.
Key Takeaways:
- A classic pineapple motif is not a single entity, but is composed of a base, netting, and crown.
- The base is a small, dense foundation.
- The netting begins with a wide expansion of tall stitches, followed by rows of chain loops to create the lacy fabric.
- The crown is formed by systematically decreasing the number of chain loops in each row to create a tapered point.
- This anatomical structure is consistent even when the specific stitches (e.g., double crochet vs. puff stitch) are changed.
Next Lesson:
Now that you can analyze a pineapple motif, it's time to create one. In the next lesson, you will get out your drafting tools and chart a single pineapple motif on graph paper, translating your understanding of its anatomy into a practical design.