Hello! Welcome back.
In this module, we've laid the complete foundation for the heart of your doily. We started by evaluating the structural differences between magic rings and chain loops. Then, we explored two opposing design philosophies: the dense, textured world of solid medallions and the light, airy structure of openwork medallions.
This lesson is the culmination of that work. Your goal is to synthesize everything you've learned to chart a complete center medallion design of approximately 5 rounds on a radial grid. This isn't just about following steps; it's about making deliberate design choices and translating your creative vision into a practical, usable chart.
Step 1: The Design Brief
Before pen ever touches paper, a designer needs a plan. For your 5-round medallion, you need to make a few key decisions. This is where you define the personality of your doily's center.
- Foundation: Will you use a magic ring for a tight, seamless center, or a chain loop for a more distinct central opening?
- Style: Do you envision a solid, fabric-like center (using sc, dc, or clusters)? A lacy, openwork web (using chains and tall stitches)? Or a hybrid that perhaps starts solid and transitions to openwork?
- Stitch Palette: What are your primary stitches? This choice influences both the texture and the math. Shorter stitches like single crochet require a different increase formula than taller stitches like double or treble crochet.
- Number of Segments: Will your design have 6, 8, 10, or 12 points of repeat? This is determined by the number of stitches in your first round and sets the geometric foundation for the entire doily.
Test your understanding!
Before moving on, take a moment to write your own "design brief" for the medallion you plan to chart today. There's no wrong answer! Just articulate your choices. For example:
- Foundation: Chain 6 loop.
- Style: Hybrid - starting solid and becoming more open.
- Stitch Palette: Popcorn stitches, double crochet, and chain stitches.
- Segments: 8.
What will your brief be?
Step 2: Preparing Your Canvas - The Radial Grid
You've expressed a preference for hand-charting, so preparing your "canvas"—the radial grid—is a vital part of the process. As we covered in Module 3, you can use a compass and protractor to create a perfect grid tailored to your chosen number of segments.
However, to save time, you can also use pre-made polar graph paper.
Free Printable Polar Graph Paper
This link provides printable polar graph paper, which is an excellent starting point for drafting circular designs. Having a clean grid lets you focus on the stitch placement rather than the underlying geometry.
Follow the link to the 'graph-paper.net' website and download a PDF of the polar graph paper. Look for one that has clear concentric circles and radial lines. You can choose one with a number of segments that matches your design choice (e.g., 12 or 24 lines, which can be used for 6, 8, or 12 segments).
Once you have your paper, whether hand-drawn or printed, you're ready to start charting. Given your background in web design, you can think of your radial grid as the wireframe for your design, and your stitch symbol key (which you developed in Module 3) as your component library. Now, you'll assemble these components to build the "UI" of your medallion.
Step 3: Charting, Round by Round
This is where the math of flat circles meets creative expression. You'll plot your stitches onto the grid, ensuring each round adds the necessary circumference to keep the medallion flat.
A Refresher on the Math
Remember the basic formula for a flat circle: each round, you must add a number of stitches equal to the number of stitches in your first round. For example, if you start with 12 dc, you add 12 stitches every round.
The Secret Crochet Circle Formula
Let's quickly review the standard increase formulas. Shelley Husband's article, 'The Secret Crochet Circle Formula', provides a clear, concise summary of the math for different stitch heights.
Please read the sections 'The Formula for a flat circle' and 'How to make a real circle'. Focus on the logic: Round 3 is (inc, 1 st), Round 4 is (inc, 2 sts), Round 5 is (inc, 3 sts), and so on. Also, pay close attention to the tip on staggering the increases on alternate rounds to avoid a polygonal shape.
The Charting Process
Let's walk through a hypothetical 5-round design.
- Round 1: Start at the center. Draw your foundation (a small circle for a chain loop, or just the stitches for a magic ring). Place your first round of stitches. For example, 12 dc. Your chart now has 12 segments.
- Round 2: Apply the first increase. This is almost always an increase in every stitch from the previous round. On your chart, you would draw two
dcsymbols originating from eachdcin Round 1. Your stitch count is now 24. - Round 3: Here comes a design choice. The standard formula is
[inc, 1 dc]repeated around. You would chart this as(2 dc in one st, 1 dc in next st)around your grid. But you could also introduce openwork:[2 dc in one st, ch 1]repeated. Chart this by drawing the stitches and the small circle symbol for the chain. - Round 4: The standard formula is
[inc, 2 dc]. If you're staggering your increases, you might do[1 dc, inc, 1 dc]. This breaks up the "increase line" and makes the circle rounder. On your chart, you would draw this sequence within each of your 12 segments. - Round 5: The standard is
[inc, 3 dc]. Let's say you want to introduce a cluster, like a popcorn stitch, for texture. Your repeat might be[popcorn st in one st, 3 dc]. You would use your symbol for the popcorn stitch, followed by the threedcsymbols, repeated in each segment.
The image below shows a finished medallion and the chart that created it. Notice how the chart visually communicates the structure.

Step 4: Your Turn to Design and Chart
Now it's time to create your own 5-round medallion chart.
- Use your Design Brief from Step 1.
- Prepare your Radial Grid from Step 2.
- Begin charting Round 1, establishing your stitch count and segments.
- Chart Rounds 2 through 5. For each round, consciously decide how you will increase. Will you use a standard increase? Introduce a chain space? Form a cluster?
- Use the math as your guide. If you start with 8 stitches, you need to add 8 stitches (or their equivalent in chain spaces) each round.
- Stagger your increases on at least one or two of the rounds to ensure a more perfect circle.
- Review your finished chart. Does it look balanced? Is it clear? Does it match your initial vision?
This exercise is the core of the lesson. Take your time and enjoy the process of seeing your design come to life on paper. This hand-drawn chart is the master blueprint for your doily.
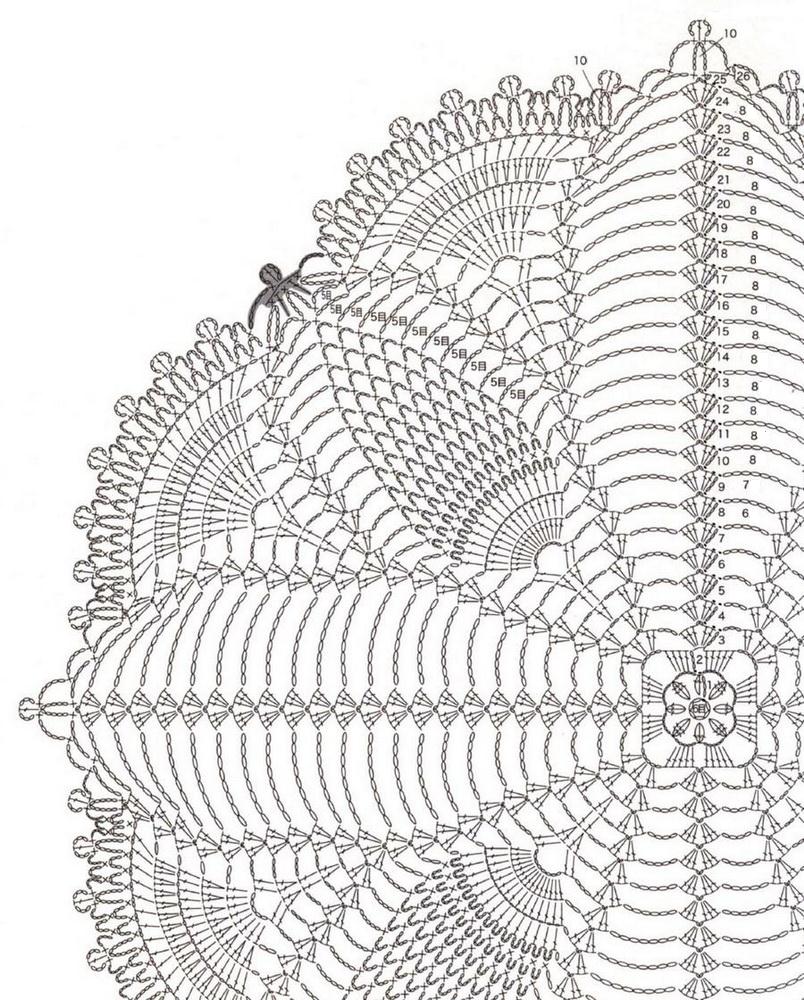
Once you are comfortable with this process, you can create much more complex centers, like the one shown in the chart below, which starts as a square and cleverly transitions into a circle using the same principles of controlled increases.
Conclusion
Congratulations! You have now mastered the art and science of designing and charting a doily's central medallion. You've moved from analyzing individual components to synthesizing them into a complete, original design. This blueprint is the first major piece of your final doily pattern.
Key Takeaways:
- Designing a medallion is a process of making deliberate choices about its foundation, style, stitch palette, and geometric structure.
- A radial grid is your essential tool for translating a circular design from your imagination onto paper.
- The mathematical principles of flat circle expansion are the technical foundation that supports your creative choices.
- By combining solid stitches, clusters, and openwork, and by staggering increases, you can create a huge variety of beautiful and structurally sound medallion designs.
This completes our module on the doily's center. Now that you've created the heart of the doily, we will begin building the body.
Next time: We will move into one of the most iconic and beautiful motifs of vintage crochet: the pineapple. You will learn to deconstruct its anatomy and, later, how to integrate it seamlessly into a circular design.