Hello! Let's continue our journey into the world of Alteryx macros.
In our last lesson, we focused on the "what" and "why" of iterative macros. You learned that they are essentially loops designed to solve problems that require repetition, such as goal-seeking, resource allocation, or optimization. We also established the crucial logic of having two distinct outputs: a final output for records that have met their goal, and an iteration output for records that must loop back to be processed again.
Today, we shift from theory to practice. This lesson is all about the "how." We will dive into the Alteryx interface to configure the core engine of an iterative macro. By the end of this lesson, you will know how to set up the properties that control the looping mechanism, establish a maximum number of iterations to prevent infinite loops, and manage how data is combined at the output.
1. Setting the Workflow Type to Iterative
Before you can access any of the special iterative settings, you must first declare that your workflow is an iterative macro. This tells Alteryx to enable the features needed for looping.
This is a simple but critical first step. You do this in the Workflow - Configuration pane.

To see this in action, the following video clip demonstrates this initial setup.
The video 'Alteryx Iterative Macros' by The Information Lab shows how to change the workflow type. This is the foundational step for building any iterative macro.
Watch from 02:03 to 02:40. The presenter demonstrates navigating to the Workflow Configuration pane and changing the macro type. Notice how after this is set, the workflow is now ready for iterative configuration.
2. The Iterative Macro Control Panel: Interface Designer
Once you've set the workflow type, the main controls for the iterative process are found in the Interface Designer window (accessible via the View menu or Ctrl+Alt+D). Within the Interface Designer, you'll click the gear icon to access the Properties.
This Properties screen is the control panel for your macro's looping behavior.
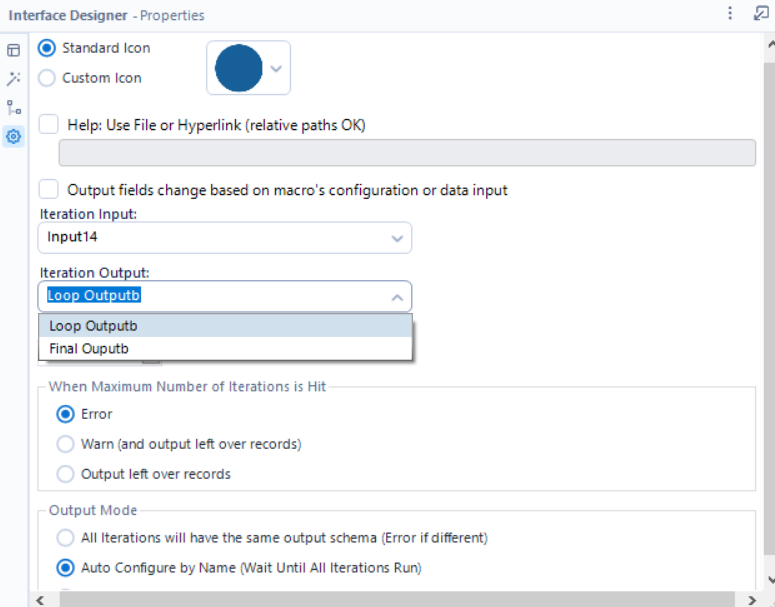
For an official breakdown of these settings, the Alteryx Help documentation is an excellent reference.
Design Iterative Macro - Alteryx Help
The official Alteryx Help page provides concise definitions for each property we will be discussing. It's a great resource to keep handy.
Read section 3, which begins with 'Configure the Iterative Macro Properties'. Familiarize yourself with the names of the settings: Iteration Input, Iteration Output, Maximum Number of Iterations, and Output Mode. We will explore each of these next.
3. Configuring the Loop: Iteration Input and Output
The heart of the iterative macro is the loop itself. To configure it, you must tell Alteryx two things:
- Iteration Input: Which
Macro Inputtool contains the data that will be processed in each loop? - Iteration Output: Which
Macro Outputtool contains the records that failed the condition and must be sent back to theIteration Inputfor another pass?
This is why, as we discussed in the last lesson, your macro logic must split the data stream into records that are "done" and records that need "more work."
The following video segment clearly demonstrates how to set up these outputs and then select them in the Interface Designer.
Let's watch how to practically define the iteration loop. Pay close attention to how the presenter names the Macro Output tools for clarity before configuring them in the Properties window.
First, watch from 07:32 to 09:10. This part shows how to create two Macro Outputs and label one as the 'iteration output' and the other as the final output. Then, watch from 10:17 to 11:05, where the presenter selects these named inputs and outputs in the 'Iteration Input' and 'Iteration Output' dropdowns in the Interface Designer.
Pro Tip: Always give your Macro Output tools clear, descriptive names (e.g., "Loop_Output" and "Final_Results"). This makes selecting the correct one in the Iteration Output dropdown much easier and less error-prone.
4. Setting the Safety Net: Maximum Iterations
An iterative macro's condition might never be met, leading to an infinite loop that can freeze Alteryx. The Maximum Number of Iterations setting is a crucial safety net to prevent this.
You should set this to a reasonably high number that you don't expect a normal run to reach. If the macro hits this limit, you can decide what happens:
- Error: Stops the workflow completely. This is useful during development to catch logic errors.
- Warn: Issues a warning but allows the workflow to finish, outputting the records that were processed.
- Output leftover records: Simply outputs whatever records were still in the loop when the limit was hit, without a warning.
The video below explains this setting.
Now let's look at configuring the maximum number of iterations. This is a simple but vital setting for creating robust macros.
Watch the segment from 11:05 to 11:30. The presenter explains the purpose of the 'Maximum Number of Iterations' and the options for what to do when it's hit.
5. Managing Data Schema: Output Mode
As the iterative macro runs, records that meet the exit condition are passed to the final macro output. The Output Mode determines how Alteryx combines these records from each successful iteration. This is important if the data schema (the column structure, names, and types) might change between iterations.
The key options are:
- All iterations will have the same output schema: The strictest option. Alteryx will throw an error if the schema changes. Use this if you expect the output structure to be identical in every loop.
- Auto Configure by Name: More flexible. It unions records by matching column names. This is useful if the number or order of columns might vary, but the names are consistent.
- Auto Configure by Position: Unions records based on their column position (e.g., column 1 from all iterations are combined, column 2 from all iterations, etc.). This is useful if column names might change but their order remains the same.
The final setting, Output Mode, is important for handling potentially complex outputs. Let's see how it works.
Watch from 11:30 to 12:14. The presenter gives practical advice on when to choose 'Auto Configure by Name' or 'Auto Configure by Position'.
A Final Practical Tip: Ordering Your Output Anchors
You may notice that the output anchors on your final macro tool don't appear in the order you want. For example, your main results might come out of the second anchor, which can be confusing. You can easily fix this.
Here is a great quality-of-life tip for making your macros more intuitive to use. This video shows how to re-order the output anchors.
Watch from 14:14 to 15:00. The presenter navigates to the 'Tree' view in the Interface Designer and simply drags the Macro Outputs into the desired order. This is a simple but powerful way to improve your macro's usability.
Conclusion
Today, you've moved from the theory of iterative macros to the practical steps of configuring their engine. You now know how to set up the properties that govern the entire iterative process.
Key Takeaways:
- An iterative macro must first be declared in the Workflow Configuration.
- The core settings are located in the Interface Designer > Properties view (the gear icon).
- Iteration Input and Iteration Output define the loop by specifying where the data comes from and where it goes back to.
- Maximum Number of Iterations is a safety control to prevent infinite loops.
- Output Mode determines how Alteryx unions the results from each loop, which is important when data schemas might change.
- You can improve a macro's usability by reordering its output anchors in the Interface Designer's tree view.
Now that you've mastered the configuration panel, you're ready to put it all together. In our next lesson, we will build a complete iterative macro to solve a goal-seeking problem, applying all the properties you learned today.