Hello! Welcome to our next lesson on Alteryx macros.
In the previous lesson, we explored the "control panel" of an iterative macro—the properties in the Interface Designer. You learned how to configure the iteration input and output, set a maximum number of loops, and manage the output schema.
Today, we will put that knowledge into practice. Our goal is to build a complete iterative macro from scratch to solve a goal-seeking problem. You will see how the logic of the workflow and the settings you learned about come together to create a powerful, looping process. We will construct a macro that calculates the growth of an investment over a user-specified number of years, a classic goal-seeking scenario.
1. The Anatomy of a Goal-Seeking Macro
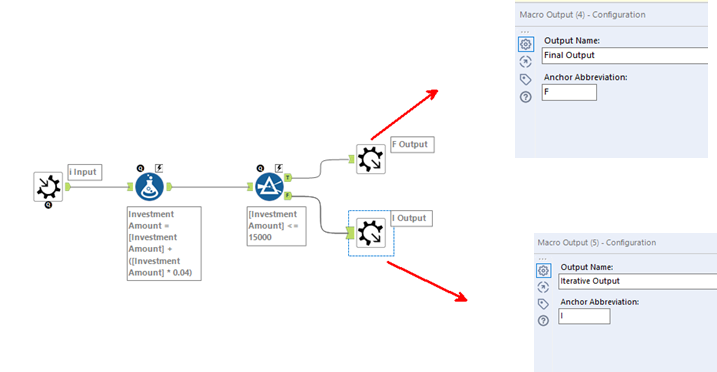
Before we start building, let's establish the fundamental structure. A goal-seeking or convergence macro works by repeatedly processing a set of records until a specific condition is met. The workflow inside the macro must contain these core components:
- Macro Input: The starting point for the data that will be looped.
- The Process: One or more tools that modify the data in each iteration, moving it closer to the goal.
- The Condition Check: A
Filtertool that determines if a record has met the goal. This is the most critical part of the logic. - Final Output: A
Macro Outputtool that collects records that have met the condition (e.g., from theTrueanchor of theFilter). - Iteration Output: A second
Macro Outputtool that sends records that have not yet met the condition (e.g., from theFalseanchor of theFilter) back to the beginning of the loop.
This diagram illustrates a simple goal-seeking problem where an investment amount is increased by 4% in each loop until it exceeds $15,000.
2. Building a Compound Interest Calculator
Now, let's build a practical example. We will create an iterative macro that calculates compound interest. The user will provide an initial investment, an interest rate, and the number of years. The macro will loop once for each year, updating the investment amount, until the target number of years is reached.
The following video provides a complete walkthrough of this process. We will go through it step-by-step.
We will use the video 'Alteryx Iterative Macros' from The Information Lab as our guide. It clearly demonstrates each stage of building the macro.
First, watch the introduction from 00:00 to 01:34 to understand the problem we are about to solve.
Step 1: Initial Setup
First, we need to set up a new workflow, add a Macro Input, and tell Alteryx that this will be an iterative macro.
Let's begin by preparing our canvas and setting the correct workflow type.
Watch from 01:34 to 02:40. Follow along as the presenter: Adds a Text Input tool with sample data and converts it to a Macro Input. Clicks on the canvas background to open the Workflow Configuration. Sets the macro type to Iterative Macro. This is the crucial step you learned about in the last lesson.
Step 2: The Core Logic - Calculating One Year's Interest
Next, we build the part of the workflow that executes in every loop. Here, it's a Formula tool that calculates the new savings amount after one year of interest. We will also add an interface tool to let the user set the interest rate dynamically.
Now, let's build the processing step of our loop. This involves calculating the new principal and connecting it to a user control.
Watch from 02:40 to 04:50. Observe how the presenter: Adds a Formula tool to update the 'Savings Amount'. Adds a Numeric Up Down tool from the Interface tool palette so the user can enter an interest rate. Connects the Numeric Up Down tool to the Formula tool, which automatically adds an Action tool. Configures the Action tool to 'Replace a specific string', ensuring only the interest rate value in the formula is updated.
Step 3: The Condition Check - Has the Target Year Been Reached?
This is where we define our "goal." We want the macro to stop after a certain number of years. We can achieve this by using a special constant available in macros: Engine.IterationNumber. This constant starts at 0 for the first iteration and increases by 1 for each subsequent loop.
We will use a Filter tool to check if Engine.IterationNumber + 1 is equal to the user's desired number of years.
Let's implement the condition that controls the looping. We'll use the iteration number to stop the macro after the correct number of loops.
Watch from 04:50 to 07:32. Pay close attention to how: A Filter tool is added to create the condition [Engine.IterationNumber]+1 = 5 (using 5 as a placeholder). A Text Box interface tool is added to allow the user to specify the 'Number of years'. An Action tool connects the Text Box to the Filter to dynamically update the number of years in the condition.
Step 4: Configuring the Outputs
Now we connect our Filter tool's outputs to Macro Output tools.
- True Anchor: The condition is met (the target number of years has been reached). The data from here goes to our final output.
- False Anchor: The condition is not met. The data from here goes to our iteration output to be looped back through the macro.
With our logic in place, we need to direct the data flow. This step involves setting up the two distinct macro outputs.
Watch from 07:32 to 09:10. Notice the critical step of naming the macro outputs clearly, for example, 'Iteration Output' and 'Final Output'. This makes configuration in the next step much easier.
Step 5: Final Configuration and Testing
We're now ready to configure the iterative properties in the Interface Designer, applying what you learned in the last lesson. We'll then save the macro and test it in a new workflow.
Let's bring it all together. We will configure the iterative properties, save the macro, and run it to see our results.
Watch from 09:10 to 15:21. This longer segment covers the final and most important steps: (09:10 - 12:14): Configuring the Properties in the Interface Designer. The presenter sets the 'Iteration Input' and 'Iteration Output' (using the clear names from the previous step), sets the 'Maximum Number of Iterations', and discusses the 'Output Mode'. (12:14 - 15:21): Saving the macro (.yxmc file) and testing it in a parent workflow. The video also covers troubleshooting a common error and re-ordering the output anchors for better usability.
3. A Quick Look at Convergence Problems
The compound interest macro is a classic goal-seeking problem—it runs a set number of times. Another common use case is a convergence problem, where the macro runs until the data stops changing.
Consider a scenario where you need to clean messy data. For example, replacing multiple cryptic IDs in a formula string with human-readable names.
Creating a TWB (Tableau Workbook) Audit Workflow in Alteryx
The article 'Creating a TWB (Tableau Workbook) Audit Workflow in Alteryx' describes a perfect example of a convergence macro. You don't need to read the whole article, but understanding its logic is very insightful.
Read the section 'Cleaning up the Calculations with an Iterative Macro'. Focus on the logic described in step 3. The macro replaces one messy field at a time and then checks if any messy fields still exist. If they do, the record loops back. If not, it's considered 'clean' and goes to the final output. The loop stops when the data converges on a 'clean' state.
The logic is slightly different but follows the same core pattern:
- Process: Clean one piece of the data.
- Condition: Does the data still need cleaning?
- Iteration Output: If yes, loop back.
- Final Output: If no, the record is finished.
Conclusion
Congratulations! You have now walked through the entire process of building a functional iterative macro. You combined workflow logic with interface configuration to solve a goal-seeking problem.
Key Takeaways:
- Iterative macros are built around a core loop: Process -> Condition Check -> Split Output.
- Goal-seeking problems often use the
Engine.IterationNumberconstant or check if a value has reached a target. - Convergence problems loop until the data itself stops changing from one iteration to the next.
- Clear naming of
Macro Outputtools is essential for easy configuration in the Interface Designer. - Building an iterative macro involves both designing the data flow on the canvas and setting the loop behavior in the properties.
In our next lesson, we will tackle another powerful and highly practical use case for iterative macros: handling API pagination. You will build a macro that can repeatedly call an API to retrieve all pages of a dataset, a common challenge in data integration.