Hello! Welcome back.
In our last lesson, we explored the "why" and "when" for using standard, batch, and iterative macros. We learned that standard macros are ideal for packaging a sequence of tools that performs a common, repeatable task.
Today, we move from theory to practice. This lesson will guide you through building your first standard macro. By the end of our session, you will be able to configure a standard macro using Macro Input, Macro Output, and Interface tools. This is a fundamental skill for the Alteryx Advanced Certification and for making your own workflows more efficient and scalable.
We will cover the essential components that make a macro work and then walk through building a complete example from start to finish.
1. The Anatomy of a Standard Macro
Before we build, let's understand the key building blocks. A standard workflow becomes a macro when you introduce specific tools from the Interface tool palette.
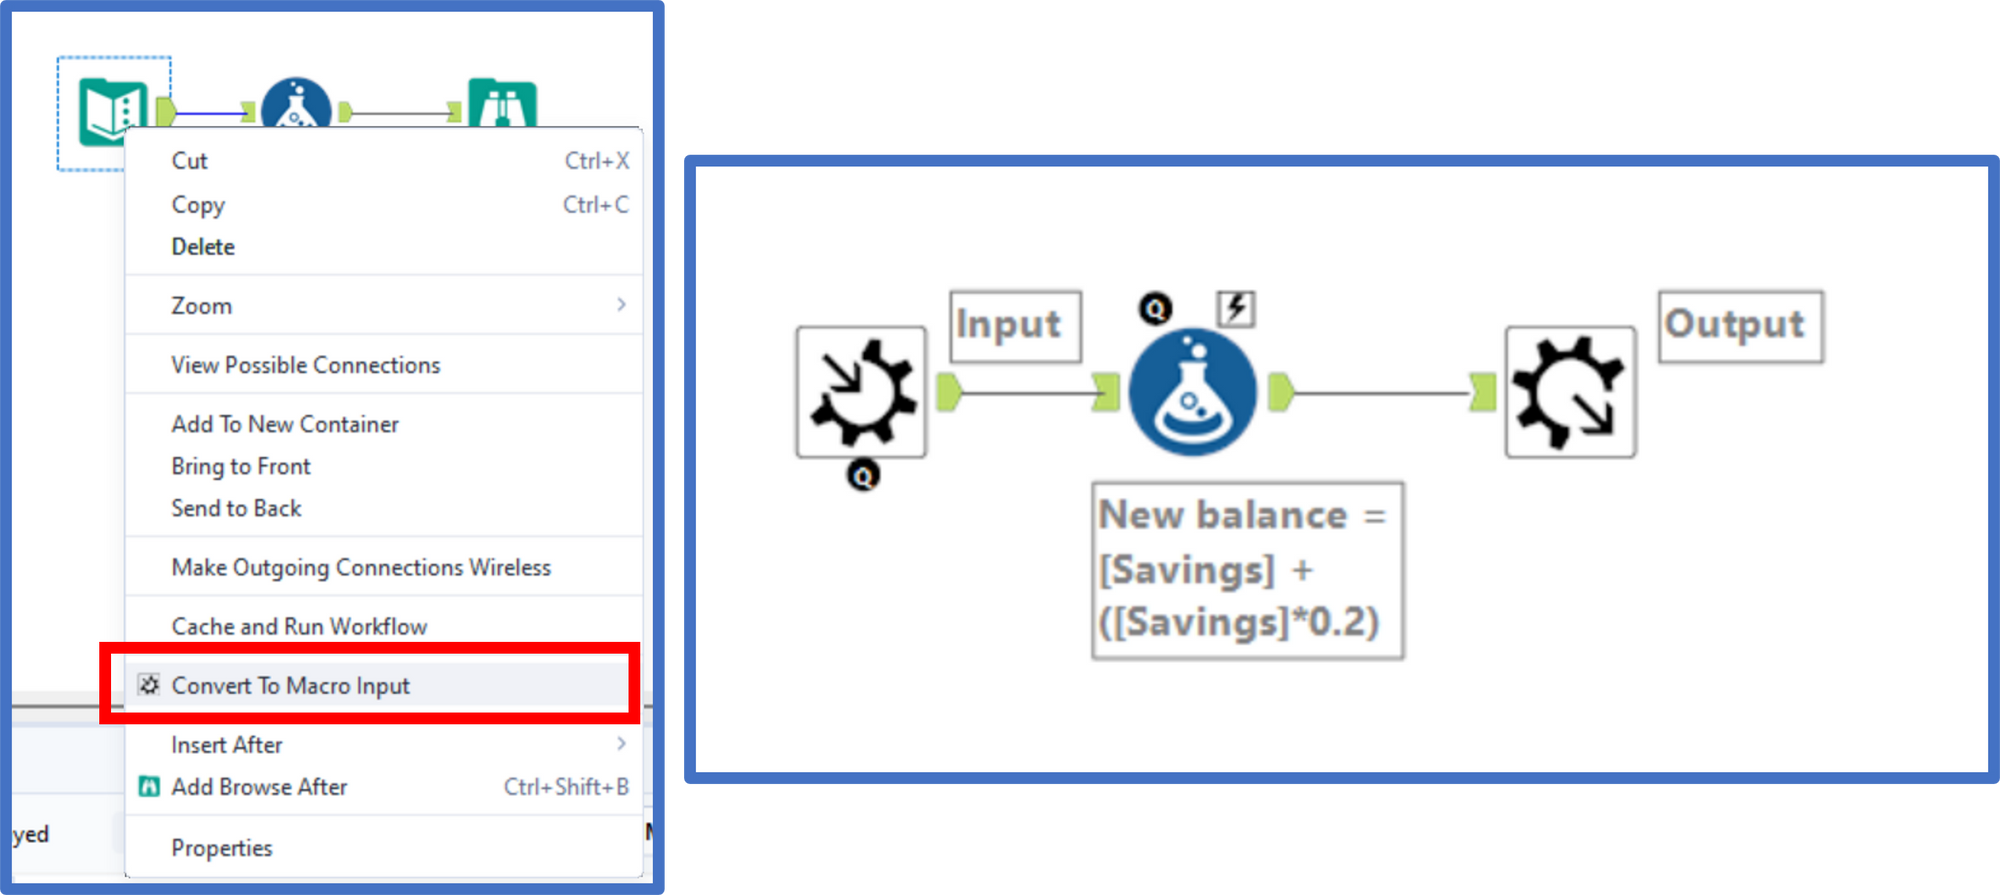
The three most fundamental components are:
- Macro Input Tool: This is the entry point for data into your macro. It replaces the standard Input Data tool you're used to. When you're building the macro, you'll configure it with template or dummy data so Alteryx knows the expected data structure (field names, data types, etc.).
- Macro Output Tool: This is the exit point for data. It creates an output anchor on your final macro tool, allowing you to connect it to other tools in a workflow.
- Interface Tools: These are what make a macro dynamic and user-friendly. They create the configuration options for your macro tool. Examples include a Drop-Down list, a Text Box, or a Check Box. These tools allow a user to change how the macro operates without having to open it and edit the internal logic.
To get a more detailed look at the input and output tools, please read the following sections from a helpful article by phData.
So You Want to Build Alteryx Macros (Part 2) - phData
This article clearly defines the purpose and configuration of the Macro Input and Macro Output tools.
Please read the sections titled 'Macro Input' and 'Macro Output'. Pay close attention to the configuration options for the Macro Input tool, especially 'Template Input' and 'Show Field Map', as these are crucial concepts.
One final, critical piece is the Action Tool. An Interface tool (like a Drop Down) on its own doesn't do anything. The Action tool acts as the bridge, taking the user's selection from the Interface tool and using it to update a specific tool within the macro's logic.
2. Building a Standard Macro: A Guided Walkthrough
Now, let's put these concepts together and build a practical standard macro. We will follow a video tutorial that creates a macro to calculate the number of boxes required to ship a certain number of units, where the box size is a user-selectable option.
This video from The Information Lab provides a complete, step-by-step guide to creating a standard macro. We will watch it in segments to focus on each part of the process.
You can watch the entire video (approx. 12 minutes), but I recommend following the segmented approach below for a structured learning experience.
Step 1: Setting up the Canvas and Macro Input
First, we need to tell Alteryx we're building a macro and provide it with some sample data to work with.
- Watch: Please watch from 0:00 to 4:45.
- What's happening:
- The workflow type is changed from "Standard Workflow" to "Standard Macro" in the Workflow Configuration pane. (Note: Dragging a Macro Input tool onto the canvas does this automatically).
- A Macro Input tool is added. Instead of connecting to a real file, the "Text Input" option is used to create dummy data directly within the tool. This defines the schema (a
unitsfield) the macro expects. - The "Show Field Map" option is discussed. This is what allows a user to connect a field with a different name (e.g., "Quantity") to the macro's internal field ("Units").
Step 2: Adding Core Logic and a User Interface
Next, we build the process we want to automate and add an interface element for the user.
- Watch: Please watch from 4:45 to 7:42.
- What's happening:
- A Formula tool is added to calculate the
Number of Boxes. Initially, a static value (6) is used as the divisor. This is our placeholder. - A Drop Down tool is added from the Interface palette. This will allow the user to choose the box size. The options (6, 12, 24) are manually entered.
- A Formula tool is added to calculate the
Step 3: Connecting the Interface to the Logic
This is where the magic happens. We connect the user's choice to our Formula tool.
- Watch: Please watch from 7:42 to 9:42.
- What's happening:
- The output of the Drop Down tool is connected to the lightning bolt anchor on the Formula tool. This automatically creates an Action tool.
- The Action tool is configured to
Update a specific stringwithin the formula's expression. It's told to find the placeholder6and replace it with whatever value the user selects from the Drop Down.
Step 4: Finalizing, Saving, and Testing
To finish, we add an output, save the macro, and test it in a new workflow.
- Watch: Please watch from 9:42 to the end.
- What's happening:
- A Macro Output tool is added to create an exit point for the processed data.
- The workflow is saved. Notice the file extension is .yxmc, for "Alteryx Macro".
- In a new workflow, the macro is inserted by right-clicking the canvas. It now appears as a single tool with our Drop Down configuration.
- A common error is shown: when the input data has a different field name ("Quantity" instead of "Units"), the macro fails.
- The fix is to go back into the macro, enable the "Show Field Map" option in the Macro Input tool, and re-save it. This exposes the mapping option in the macro's configuration, allowing the user to align their fields with the macro's expected fields.
By following these steps, you have seen the entire lifecycle of building, configuring, and deploying a standard macro.
Conclusion
In this lesson, we moved from concept to creation. You learned how to configure the essential components of a standard macro and saw how they work together to package a repeatable, dynamic process into a single, reusable tool.
Key Takeaways:
- A standard macro is a workflow saved as a .yxmc file.
- Macro Input brings data in, using template data during the build phase.
- Macro Output sends processed data out.
- Interface Tools (e.g., Drop Down, Text Box) create the user configuration panel for your macro tool.
- The Action Tool is the critical link that applies the user's choices from an Interface tool to update a specific tool within the macro.
- The "Show Field Map" option on the Macro Input tool provides flexibility, allowing your macro to be used with data sources that have different field names.
In our next lesson, we will focus exclusively on the powerful Action tool. We've only seen one of its capabilities today ("Update Value"). Next time, we will explore its different update methods and how it can be used to dynamically change the configuration of a wide variety of Alteryx tools.