Hello! Welcome back to our course on mastering Alteryx for your Advanced Certification.
In the previous lesson, we built our first standard macro. We saw how Macro Input, Macro Output, and Interface tools work together. Most importantly, we had our first encounter with the Action tool, seeing it act as a bridge between a user's selection in a Drop Down tool and a formula in our workflow.
Today, we're going to put that Action tool under the microscope. Its importance cannot be overstated; it is the engine that drives all dynamic behavior in macros and analytic apps. By the end of this lesson, you will be able to describe the function of the Action tool and its different update methods. Understanding this is absolutely critical for building the flexible and powerful solutions required for the certification exam.
1. The Core Function: How the Action Tool Works
At its heart, the Action tool's job is to dynamically update the configuration of a workflow tool at runtime.
Think of any tool you've configured in Alteryx—a Filter, a Formula, an Input Data tool. You set its properties in the configuration window. These settings are normally static. The Action tool lets you change those settings on the fly, using a value from an Interface tool (like a Text Box or a Drop Down) or a Control Parameter in a batch macro.
 The Action tool, found in the Interface tool palette. It connects user input to workflow logic.
The typical setup involves three parts:
- An Interface Tool (e.g., Text Box) that collects input from the user.
- An Action Tool that receives the user's input.
- A Workflow Tool (e.g., Filter) whose configuration will be updated.
When you connect an Interface tool to the special "lightning bolt" anchor of a workflow tool, Alteryx automatically places an Action tool in between. Let's see this in action.
Alteryx - Intro to Interface Tools - Part I
This video from Nathan Patrick Taylor provides a clear, practical example of the Action tool's most common use case: updating a Filter tool based on user input in a Text Box.
Please watch from 03:33 to 07:00. Pay close attention to how connecting the tools creates the Action tool and how it is then configured to update a specific part of the filter's expression.
As you saw in the video, the key steps to configure the Action tool were:
- Select the Action Tool: After it's automatically placed, you click on it to open its configuration.
- Choose the Value to Update: You navigate a tree-like structure that represents the target tool's underlying XML configuration. In the video, this was
Operands -> Operand - value="selection". - Specify the Update Method: The default action is
Update Value, which replaces the entire selected element. The video demonstrated a very common and powerful technique: checking the box for "Replace a specific string". This allows you to substitute just a portion of the configuration, like changing"selection"without touching the rest of the filter expression[DepartmentName] == "selection".
This Interface Tool -> Action Tool -> Workflow Tool pattern is the fundamental building block of all macros and analytic apps.
2. The Many "Update Methods" of the Action Tool
While updating a value in a filter or formula is common, the Action tool is far more versatile. It has a wide range of "action types" (or update methods) that allow you to modify almost any aspect of a workflow.
To get a comprehensive view of these capabilities, the best place to look is the official Alteryx documentation.
The official Alteryx Help page for the Action tool contains a definitive list of its capabilities. We will focus on the table of Action Types.
Please open the article and scroll down to the table under the 'Configure the Tool' section. Skim through the 'Action Type' column and the 'Description' column. You don't need to memorize every option, but aim to get a broad sense of the different kinds of updates the Action tool can perform.
That's a long list! To make it easier to understand, we can group these action types into several key categories:
A. Updating Values and Expressions
This is the category we're most familiar with. It's about changing values inside a tool's configuration.
- Update Value (Default): The most common type. It replaces a selected configuration element with the input value.
- Update Cell: Specifically for changing a single cell in a Text Input tool.
- Update Value with Formula: Lets you use an expression to construct the new value, often combining multiple interface inputs.
- Update Raw XML with Formula: The most advanced option. It gives you complete control to rewrite a tool's underlying XML, but requires you to understand the XML structure.
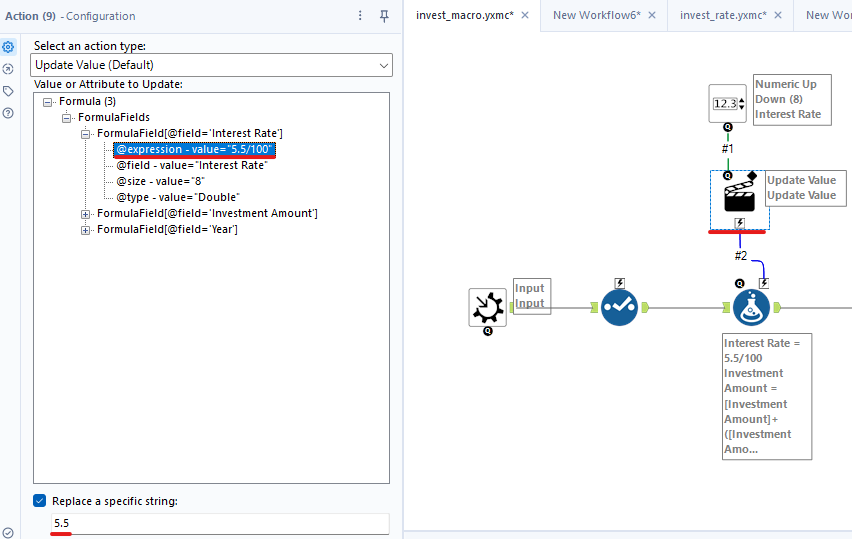
B. Changing Data Sources and Destinations
These actions allow your macro or app to dynamically read from or write to different files or locations.
- Update Input Data Tool: Changes the entire file path for an Input Data tool.
- Update Output Data Tool: Changes the entire file path for an Output Data tool.
- Update Directory with Folder Browse: Updates the path used by the Directory tool.
C. Controlling Workflow Logic and Data Flow
This is a powerful category that allows you to change the very structure of your workflow's execution.
- Enable/Disable Container: Turns an entire Tool Container on or off. This is essential for creating optional steps in a workflow (e.g., "Would you like to generate a summary report?").
- Update Detour Direction: Changes the path data takes through a workflow by controlling a Detour tool, allowing you to switch between two different processing streams.
D. Modifying Field Selections
These actions are used to dynamically change which data fields are used by a tool.
- Update Select with multi-select List Box: Allows a user to choose which fields pass through a Select tool.
- Update Field List: Updates the field selection in tools like Find Replace or Join.
By understanding these categories, you can begin to see how the Action tool enables you to build incredibly flexible and user-driven workflows.
3. A Look at the Action Tool in a Batch Macro
In our previous lesson, we briefly discussed batch macros, which run a process once for each record in an input stream. The Action tool is also central to how they work. In a batch macro, you use a Control Parameter instead of an Interface tool. The Control Parameter feeds one value at a time to the Action tool, which then updates a workflow tool for that specific batch.
This clip from The Information Lab shows the Action tool being used in the context of a batch macro. Notice the pattern is nearly identical to what we've already seen.
Please watch from 03:27 to 05:05. Observe how the Control Parameter is connected to a Formula tool, creating an Action tool. The configuration is the same: Update Value with Replace a specific string to change the box size for each batch.
This reinforces that the Action tool's function remains consistent, whether it's receiving a single value in a standard macro or a stream of values in a batch macro.
Conclusion
Today we took a deep dive into the Action tool, the cornerstone of dynamic workflow development in Alteryx. You are now equipped with a solid understanding of its function and its wide range of capabilities.
Key Takeaways:
- The Action tool's primary function is to dynamically update the configuration of a workflow tool at runtime.
- It acts as a bridge, taking input from an Interface tool (in standard macros/apps) or a Control Parameter (in batch macros).
- The Action tool offers many update methods (Action Types) that can be grouped into categories: updating values, changing file paths, controlling workflow logic, and modifying field selections.
- The most common configuration pattern involves using
Update Valuecombined with theReplace a specific stringoption to precisely target and change part of an expression or value.
In our next lesson, we will put this knowledge into practice as we learn to update tool configurations dynamically within a macro using the Action tool. We'll tackle more complex scenarios and solidify your ability to build truly robust and flexible macros.