Hello! Welcome to the next lesson in your journey to Alteryx Advanced Certification.
In our last session, we explored the theoretical side of the Action tool. We learned about its role as the engine for dynamic behavior in macros and apps, and we surveyed the many different "update methods" or action types it offers.
Today, we're moving from theory to practice. You're going to get hands-on experience and learn precisely how to use the Action tool to make a macro's behavior dynamic. This is a fundamental skill, and by the end of this lesson, you will be able to confidently update tool configurations dynamically within a macro using the Action tool.
1. From Static Workflow to Dynamic Macro
Let's start with a basic workflow that we'll convert into a macro. Imagine a common task: you have a dataset of transactions, and you need to filter it for a specific product category.
- Start with a standard workflow: Input Data -> Filter -> Macro Output.
- Configure the Filter tool: For now, set a static filter, for example,
[Category] == "Office Supplies". - Convert to a Macro: Right-click the Input Data tool and select "Convert to Macro Input". This changes the workflow type to a Standard Macro. Add a Macro Output tool after the Filter tool.
At this point, you have a macro, but it's not very useful because it always filters for "Office Supplies". Our goal is to let the person using the macro decide which category to filter for. This is where the Action tool comes in.
2. Configuring the Action Tool: A Step-by-Step Guide
To make our filter dynamic, we need to introduce an Interface tool and use an Action tool to connect it to the Filter tool.
First, let's refine our Filter tool's expression. It's a best practice to use a distinct placeholder string that is easy to target. Change the expression in your Filter tool to:
[Category] == "placeholder"
Now, let's walk through the process of making this dynamic.
Step by step guide into creating a Macro
The article 'Step by step guide into creating a Macro' from The Data School provides an excellent walkthrough of this exact process. We will follow its logic to add a Drop Down and configure the Action tool.
Please read the sections 'Building a Standard Macro', 'Macro Input Tool', 'Macro Output Tool', 'Drop Down Tool', and 'Action Tool'. Pay close attention to how the Action tool is automatically created and then configured.
Let's break down the crucial steps for configuring the Action tool, as described in the article:
- Add an Interface Tool: Drag an Interface tool (like a Drop Down or Text Box) onto the canvas.
- Create the Connection: Drag the anchor from the bottom of your Interface tool to the lightning bolt anchor (
?) on the top of the tool you want to update (your Filter tool). When you make this connection, Alteryx automatically adds an Action tool between them. - Configure the Action Tool: This is the most important step. Click on the newly created Action tool to open its configuration pane.
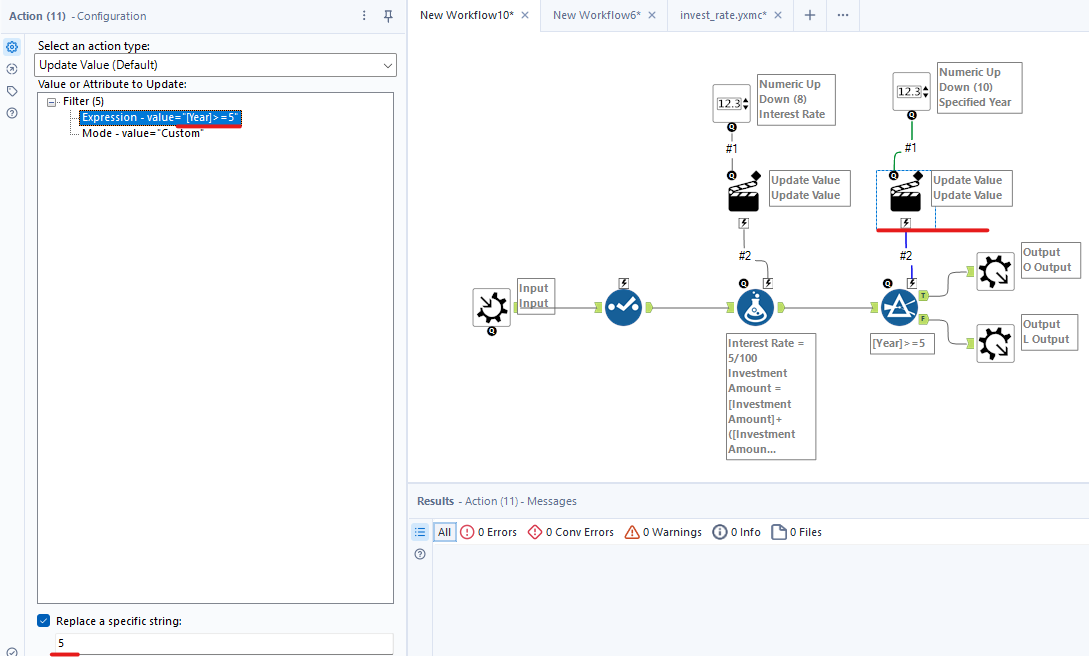
- Select Action Type: For our purpose, the default
Update Valueis what we need. - Select Value to Update: You'll see a tree-like view of the Filter tool's configuration. You need to tell the Action tool exactly which part of this configuration to change. Navigate through the tree to find your placeholder. It will look something like this:
Expression - value="[Category] == "placeholder"". - Specify the Replacement: At the bottom of the configuration pane, check the box for
Replace a specific string:. In the text box that appears, type your placeholder value:placeholder.
- Select Action Type: For our purpose, the default
That's it! You have now instructed the Action tool to take the value from the Drop Down tool and substitute it for the word "placeholder" in the Filter tool's expression.
3. A Second Common Use Case: Updating a Formula
The pattern you just learned is extremely versatile. You can use it to update almost any tool. Let's consider another common scenario: updating a numeric value within a Formula tool.
Imagine your macro performs a calculation that involves a commission rate, and you want the user to be able to specify this rate.
The process is nearly identical:
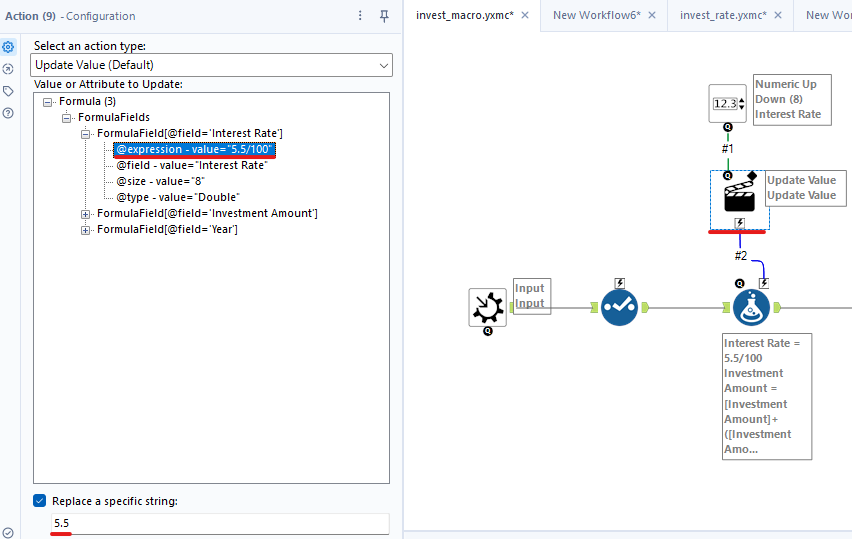
- In your Formula tool, create an expression with a placeholder, e.g.,
[Sales] * 0.05. Here,0.05is our placeholder value. - Add a
Numeric Up Downtool from the Interface palette. This is a great choice for numeric inputs. - Connect the Numeric Up Down tool to the lightning bolt anchor of the Formula tool. An Action tool appears.
- Configure the Action tool:
- Action Type remains
Update Value. - In the configuration tree, navigate to the expression in your Formula tool.
- Check
Replace a specific string:and enter0.05.
- Action Type remains
Now, the value selected by the user in the Numeric Up Down tool will be injected into your formula, replacing 0.05.
4. Testing Your Dynamic Macro
You can't run a macro with interface tools by simply clicking the normal 'Run' button. You need to test it using the Analytic App interface.
Alteryx - Intro to Interface Tools - Part I
In the last lesson, we watched a video that demonstrated how to run and test a workflow with interface tools. Let's quickly review that part.
Please re-watch the clip from 05:53 to 06:50. Notice how the 'Run as Analytic App' button (the magic wand icon next to 'Run') opens a user interface where you can provide a value before the workflow executes.
To test your macro:
- Click the Run as Analytic App button (the magic wand icon).
- An interface window will pop up, showing the Interface tools you added (e.g., your Drop Down or Numeric Up Down).
- Enter or select a value and click Finish.
- Alteryx will run the macro using the value you provided. Check the output of the Macro Output tool to confirm that the Action tool correctly updated the configuration of your Filter or Formula tool.
Alternatively, you can save your macro (.yxmc file) and then use it in a separate, new workflow. To do this, right-click on the canvas of the new workflow and go to Insert > Macro to find and place your saved macro. This is how you would use your creation in a real project.
Conclusion
In this lesson, you moved from knowing what the Action tool does to knowing how to use it. This practical skill is essential for passing the Advanced Certification and for building powerful, reusable solutions in Alteryx.
Key Takeaways:
- The standard process for making a tool dynamic is: Interface Tool -> Action Tool -> Workflow Tool.
- Use a clear placeholder value in your target tool's configuration.
- The
Replace a specific string:option in the Action tool is the key to precisely updating part of a tool's configuration. - This pattern is repeatable for updating Filters, Formulas, and many other tools.
- Test macros containing Interface tools by using the Run as Analytic App interface (magic wand icon).
In our next lesson, we'll expand on this foundation. You'll learn how to configure a batch macro using a Control Parameter, where the Action tool will update a workflow tool not just once, but repeatedly for every record in a control input.