Hello! Welcome back to our series on Alteryx Spatial Analytics.
In the last lesson, we established the conceptual foundation by identifying the three fundamental spatial object types: points, lines, and polygons. You learned what they represent and how Alteryx handles them as a special SpatialObj data type.
Today, we'll build directly on that knowledge to address the learning outcome: Import and correctly configure spatial data from various file formats (e.g., shapefiles). This is the practical first step in almost any spatial analysis project. We'll cover the two most common scenarios you'll encounter: importing files that are already spatial, and creating spatial data from simple coordinate files like CSVs.
1. Importing Native Spatial Files
The most straightforward way to work with spatial data is to import a file that's already in a spatial format. Alteryx supports a wide range of these formats. For the Advanced Certification, the most important one to know is the ESRI Shapefile (.shp).
Shapefiles are a popular standard for geographic data and usually come as a collection of several files (.shp, .shx, .dbf, etc.). You only need to select the .shp file, and Alteryx will handle the rest.
The process is as simple as using the Input Data tool you're already familiar with.

Let's see an example of this in action.
Spatial Analytics in Alteryx (Part 1)
The following article from The Data School UK demonstrates how to import an ESRI shapefile. It's a great example of how Alteryx seamlessly brings in data that already contains spatial objects.
Please read the section titled '2/ Create Spatial Objects in Alteryx'. Focus on the part where the author imports the ESRI shapefile (.shp). Notice how the 'Spatial Object' field is immediately available in the results window after import.
As you saw in the reading, after importing the shapefile, the results grid immediately shows a SpatialObj field containing Polygon objects. No further conversion is needed.
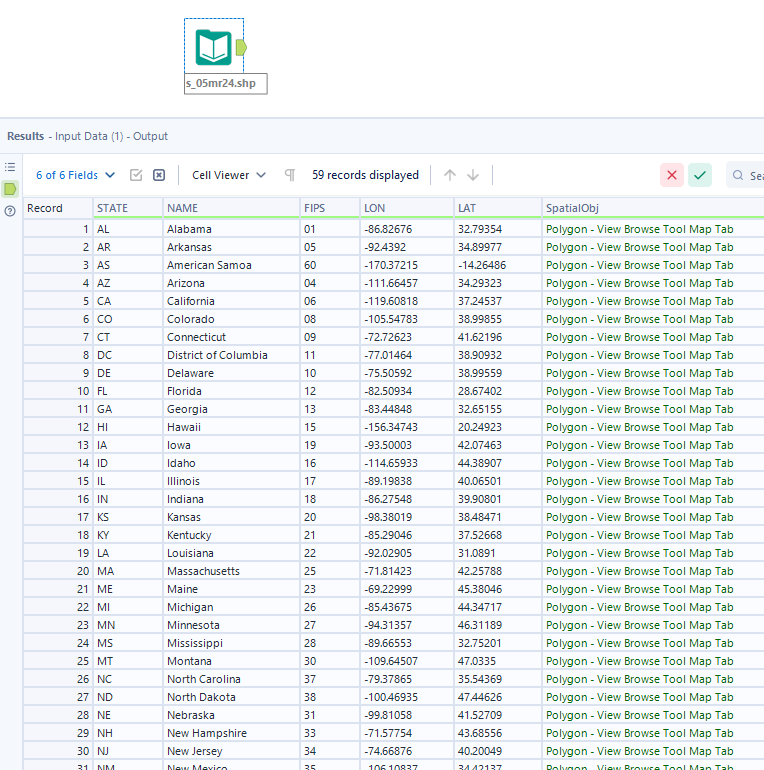
This direct import method works for any file format where the spatial objects are already defined, such as .kml (Google Earth) or .tab (MapInfo).
2. Creating Spatial Data from Coordinate Files
More often, your data won't start in a spatial file format. You might receive a simple text file, like a CSV or an Excel spreadsheet, that contains columns for latitude and longitude. In this scenario, you need to import the data and then configure it to create spatial objects.
This is a multi-step process that combines tools you already know with a new one from the Spatial tool category.
The workflow is typically:
- Input the data (e.g., a CSV file).
- Configure the data types to ensure they are correct.
- Create the spatial point objects from the coordinate fields.
- Verify the result using the Browse tool.
Let's walk through this process with a detailed guide.
Spatial Tools in Alteryx: Part 1
This article provides a clear, step-by-step guide for converting non-spatial data (a CSV with latitude and longitude) into spatial points in Alteryx.
Please read from the beginning of the article down to the end of 'Step 4: Explore Your Spatial Data with the Browse Tool'. Pay close attention to each step: Step 1: Using the Input Data Tool for a CSV. Step 2: The crucial step of using the Select Tool to change data types to 'Double'. Step 3: Using the Create Points Tool to generate the spatial object. Step 4: Using the Browse Tool to visualize the result.
Key Configuration Step: Data Types
As highlighted in the article, one of the most common pitfalls is incorrect data types. When Alteryx imports data from a text file, it might interpret coordinate fields as strings. The Create Points tool requires numeric data types to function.
- Best Practice: Always place a Select tool after your Input Data tool when working with coordinate data. Use it to verify and change your latitude and longitude fields to a
Doubledata type. ADoublecan accommodate the decimal precision required for geographic coordinates.
3. Hands-On Practice
Let's build a quick workflow to solidify this second method. Instead of downloading a file, we'll use the Text Input tool to simulate a data file.
-
Create your "file": Drag a Text Input tool onto the canvas. Create three columns:
Location,Latitude, andLongitude. Enter the following data:Location Latitude Longitude London 51.5072 -0.1276 Paris 48.8566 2.3522 New York 40.7128 -74.0060 -
Configure Data Types: Add a Select tool. Change the data type for both
LatitudeandLongitudefrom the defaultV_StringtoDouble. -
Create Points:
- From the Spatial tool palette, add a Create Points tool.
- In the configuration window, make sure the "Longitude Field" is set to your
Longitudecolumn and the "Latitude Field" is set to yourLatitudecolumn. Alteryx is usually good at guessing this, but it's important to verify.
-
Verify: Add a Browse tool after the Create Points tool and run the workflow.
Once the workflow runs, click on the Browse tool. In the configuration window, you should see your three data points in the results grid. More importantly, select the Map tab. You should now see three points plotted on the world map, confirming that you have successfully imported and configured the data.
Conclusion
Mastering how to get data into Alteryx is the gateway to all spatial analysis. Today, you've learned the two primary pathways for doing so.
Key Takeaways:
- You can directly import spatial file formats like ESRI Shapefiles (
.shp) using the Input Data tool. The spatial objects will be ready to use immediately. - For non-spatial files like CSVs that contain coordinate data, you must follow a process:
- Input the file.
- Use a Select tool to ensure Latitude and Longitude fields are a
Doubledata type. - Use the Create Points tool to generate the spatial object.
- Use the Browse tool to visually verify your points on the map.
In this lesson, we used the Create Points tool as part of the import process. In our next session, we'll dive deeper into this fundamental tool, covering its configuration options in more detail as we tackle the next learning outcome: Create spatial point objects from latitude and longitude data.