Hello! Welcome back to our module on Applied Spatial Analytics.
In our last lesson, we focused on creating the "containers" for our analysis by using the Trade Area tool to generate radius and drive-time polygons. You learned how to define market boundaries around key locations. However, a container isn't very useful until you know what's inside it.
Today, we'll answer that question. We will learn how to take our trade area polygons and find which other spatial objects—like customers or competing stores—fall within them. This process is a cornerstone of spatial analysis, acting like a geographic version of a join or a lookup.
Learning Outcome: Perform spatial matching to identify relationships between two sets of spatial objects.
We will master the Spatial Match tool, learning how to configure it to identify various spatial relationships and filter our data based on geography.
1. The Core Concept: Target and Universe
The Spatial Match tool is designed to establish a spatial relationship between two sets of spatial objects. To use it effectively, you must understand its two distinct inputs:
- Target (T): This input receives the objects you are investigating. Think of these as the "things" you want to find. Common examples include customer location points, mobile asset locations, or smaller geographic areas.
- Universe (U): This input receives the reference geographies or "containers." These are the larger areas you are checking against. Examples include the trade area polygons we created last lesson, sales territories, states, or flood zones.
The tool then checks for a specified relationship between each Target object and the Universe objects.

2. Types of Spatial Relationships
The power of the Spatial Match tool lies in the different ways it can define a "match." Let's explore the most common relationships.
To get a clear, visual understanding of these concepts, start by studying the official Alteryx documentation. It includes simple diagrams that illustrate each relationship type.
Spatial Match Tool - Alteryx Help
This is the official Alteryx Help page for the Spatial Match tool. It provides a definitive guide to its configuration and options.
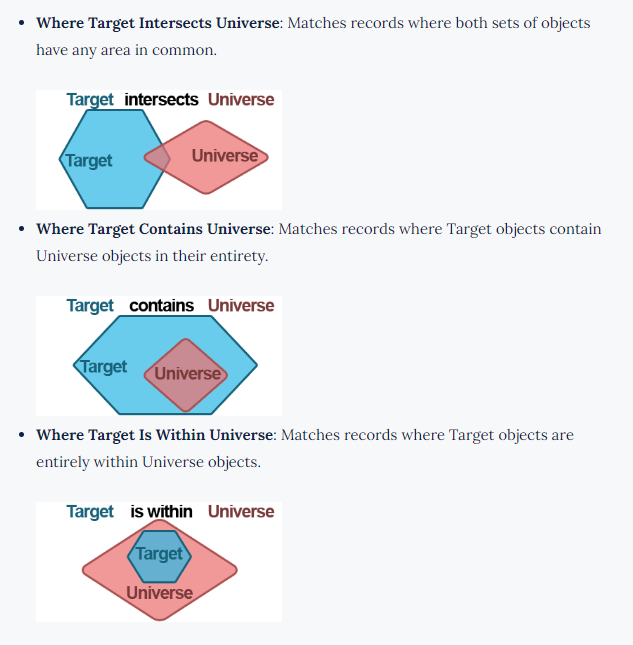
Please read the section 'Configure the Tool', focusing on point #3, 'Specify the type of Spatial Match to calculate.' Pay close attention to the diagrams illustrating 'Where Target Intersects Universe,' 'Where Target Contains Universe,' and 'Where Target Within Universe.' These three are the most important relationships to understand.
To summarize the key relationships:
- Where Target Within Universe: This is the most common use case. It finds Target objects that are completely inside Universe objects. For example, finding customers (points) who are within a trade area (polygon).
- Where Target Intersects Universe: This is a broader match. It finds Target objects that overlap in any way with a Universe object. This is useful for finding, for example, sales territories (polygons) that intersect with a proposed delivery zone (polygon).
- Where Target Contains Universe: This finds Target objects that completely enclose Universe objects. For example, finding which US states (Target polygons) contain a specific set of store locations (Universe points).
- Where Target Touches Universe: This finds objects whose boundaries touch but do not overlap.
3. A Practical Walkthrough
Let's put this theory into practice by continuing the case study from our previous lesson. We have already created trade area polygons around a store; now we need to find the customers located within those areas.
The following reading builds directly on the workflow we examined last time.
Alteryx Designer: An Introduction to Spatial Analytics
The Billigence article provides a great end-to-end example. After creating the trade areas, the very next step is to perform a spatial match to find the customers.
Please read the section 'Task 2: Identity the customers found within a 5-mile radius...' which focuses entirely on the Spatial Match Tool. Notice how the customer points are connected to the Target input and the office trade areas are connected to the Universe input. Also, observe the relationship they chose: 'Target is Within Universe'.
As the article demonstrates, the process is logical:
- Inputs: The customer location points are our Target, and the trade area polygons are our Universe.
- Configuration: We configure the tool to find where the
Target is Within Universe. - Outputs: The tool produces two outputs:
- Matched (M): All customer records that were found inside a trade area polygon. The customer's data is now joined with the data of the polygon it's inside (e.g., RadiusSize).
- Unmatched (U): All customer records that were not inside any of the trade area polygons.
This simple operation is incredibly powerful and is a fundamental building block for almost any location-based business analysis.
4. Hands-On Practice
Now it's your turn to build it. Let's expand on the workflow you created in the last lesson.
Scenario: You have the 5-minute drive-time polygon for the Midtown Store you created previously. Now, you've been given a short list of potential high-value customers and need to identify which ones are located within that 5-minute drive-time.
-
Open the Alteryx workflow from the last lesson. You should have:
- A
Text Inputfor the "Midtown Store". - A
Create Pointstool for the store. - A
Trade Areatool configured for a 5-minute drivetime.
- A
-
Add a new Text Input tool to your canvas. Enter the following customer data:
CustomerID Latitude Longitude Cust_01 40.7505 -73.9934 Cust_02 40.7580 -73.9855 Cust_03 40.7420 -73.9881 Cust_04 40.7550 -73.9780 -
Add a Create Points tool connected to this new
Text Input. Configure it to create spatial points from the customerLatitudeandLongitudefields. -
Drag a Spatial Match tool onto the canvas.
- Connect the output of the customer
Create Pointstool to the Target (T) input anchor. - Connect the output of the 5-minute drivetime
Trade Areatool to the Universe (U) input anchor.
- Connect the output of the customer
-
Configure the Spatial Match tool:
- The Target spatial object should be the
SpatialObjfrom the customer stream. - The Universe spatial object should be the
SpatialObj_TradeAreafrom the store stream. - Under "Specify the type of Spatial Match to calculate," select Where Target Within Universe.
- The Target spatial object should be the
-
Add two Browse tools: one connected to the Matched (M) output and one to the Unmatched (U) output.
-
Run the workflow.
- Click the
Browsetool on the M output. You should see the customers who are inside the drive-time zone. - Click the
Browsetool on the U output. You will see any customers who are outside it. - In the map view of the
Browsetool on theManchor, you'll see the customer points overlaid on the drive-time polygon, visually confirming the match.
- Click the
You have now successfully performed a spatial match to enrich your customer data with location intelligence!
Conclusion
In this lesson, you mastered the Spatial Match tool, a critical component of applied spatial analytics. You learned how to think in terms of "Targets" and "Universes" and how to select the correct spatial relationship to answer a specific business question.
Key Takeaways:
- The Spatial Match tool establishes relationships between two sets of spatial objects: the Target (what you're looking for) and the Universe (the areas you're checking against).
- The most common relationship is
Where Target Within Universe, used to find points inside polygons. - Other key relationships include
IntersectsandContains, which are useful for polygon-on-polygon analysis. - The tool splits the data into Matched (M) and Unmatched (U) streams, making it easy to see what falls inside and outside your geographic criteria.
Preview of the Next Lesson:
We've now identified which customers are in our trade area. The next logical step is to perform calculations on them. How many customers are there? What are their total sales? While you could do this by feeding the 'M' output into a Summarize tool (as seen in the Billigence article), Alteryx provides a specialized tool for this exact purpose. In the next lesson, we will explore the Spatial Process tool, which is designed to efficiently aggregate data within geographic regions.