Welcome to the fourth lesson in our introduction to Python. In our last session, we equipped our programs with the ability to make decisions using if, elif, and else statements. This allowed us to control the flow of execution based on conditions. So far, we have primarily worked with single pieces of data—one number, one string of text, one boolean value—stored in variables.
This lesson will introduce a powerful new concept that lets us manage ordered collections of data. We'll be focusing on the learning outcome: Create and manipulate lists using indexing, slicing, and common methods. Lists are one of the most fundamental and versatile data structures in Python. Mastering them is a crucial step that moves you from writing simple scripts to building more complex and data-driven applications.
1. What is a List?
In programming, we often need to work with groups of related items. For example, a list of student names, a sequence of measurements from a sensor, or the daily steps you've walked in a week. A list in Python is a data structure that serves exactly this purpose.
A list is an ordered and mutable collection of items. Let's break down these two key properties:
- Ordered: The items in a list have a defined sequence, and that sequence will not change unless you explicitly change it. The first item you put in remains the first, the second remains the second, and so on.
- Mutable: This means you can change the list after it has been created. You can add new items, remove existing items, or change the items that are already in the list.
You can think of a list as a series of numbered boxes, where each box can hold any piece of data (an integer, a string, or even another list).
Python Lists (for absolute beginners)
The article "Python Lists (for absolute beginners)" from Afternerd provides an excellent theoretical foundation for what lists are and how they are created. It aligns well with your preference for understanding core principles first.
Please read the following sections: "What is a list?": This section defines a list and explains the crucial concept of it being an ordered collection. "How to create a list?": Review this part to see the syntax for creating empty lists and lists initialized with items. "What type of elements can I store in a python list?": This section explains the flexibility of lists in holding different data types, including other lists.
As you've read, creating a list is straightforward. You use square brackets [], and separate the items with commas.
# An empty list
empty_list = []


# A list of integers
primes = [2, 3, 5, 7, 11]


# A list of strings
shopping_list = ["apples", "bread", "milk"]


# A list with mixed data types
mixed_list = ["hello", 100, True, 3.14]


# A list containing another list (a nested list)
nested_list = [1, 2, ["a", "b"]]
2. Accessing and Slicing Lists
Since lists are ordered, every item has a specific position. This position is called an index. In Python, as in most programming languages, indexing starts from zero. This means the first item is at index 0, the second at index 1, and so on.
You can also use negative indices to count from the end of the list. Index -1 refers to the last item, -2 to the second-to-last, and so forth. This is particularly useful when you want to access the end of a list without knowing its length.
Beyond accessing single items, we often need to extract a portion of a list, or a "sub-list". This operation is called slicing.
How to Access Lists in Python (Indexing & Slicing Explained) | #Python Course 24
The channel "Data with Baraa" provided a clear visual explanation for conditionals, and this video does the same for indexing and slicing. It will help you build a strong mental model for how to access list elements.
Please watch the following segments: What is indexing?: Understand why we need indices and the concept of 0-based counting. Using positive and negative indices: See how to retrieve specific items from the start or end of the list. Introduction to slicing: Learn the basic idea of slicing to get multiple items. Slicing with defaults: Discover the convenient shortcuts for slicing from the beginning or to the end of a list.
Let's summarize the syntax for indexing and slicing.
Indexing: Accessing a single element
my_list[i] returns the element at index i.
letters = ['a', 'b', 'c', 'd', 'e']
print(letters[0])   # Output: 'a'
print(letters[2])   # Output: 'c'
print(letters[-1])  # Output: 'e'
Slicing: Accessing a sub-list
The general syntax is my_list[start:end:step].
start: The index of the first item to include (inclusive). If omitted, it defaults to 0.end: The index of the first item to exclude. If omitted, it defaults to the end of the list.step: The interval to skip between items. If omitted, it defaults to 1.
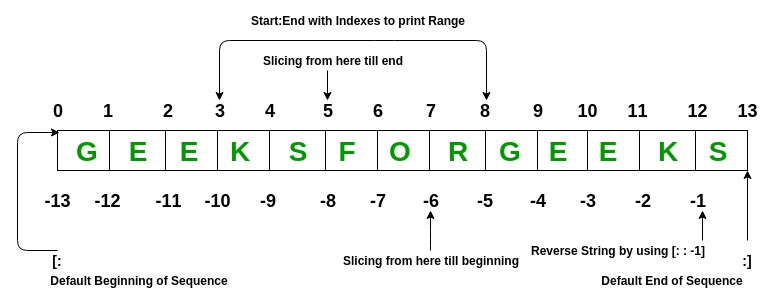
Let's see it in action:
letters = ['a', 'b', 'c', 'd', 'e', 'f', 'g']


# Get elements from index 2 up to (but not including) index 5
print(letters[2:5])   # Output: ['c', 'd', 'e']


# Get the first three elements
print(letters[:3])    # Output: ['a', 'b', 'c']


# Get all elements from index 4 to the end
print(letters[4:])    # Output: ['e', 'f', 'g']


# Create a full copy of the list
print(letters[:])     # Output: ['a', 'b', 'c', 'd', 'e', 'f', 'g']


# Get every second element
print(letters[::2])   # Output: ['a', 'c', 'e', 'g']


# Reverse the list
print(letters[::-1])  # Output: ['g', 'f', 'e', 'd', 'c', 'b', 'a']
3. Modifying Lists: Methods
One of the most important properties of lists is their mutability—the ability to be changed after creation. This is a significant difference from strings, which are immutable. With a string, you cannot change a character; you have to create a new string. With a list, you can change, add, or remove elements directly. This flexibility is what makes lists so powerful.
Python Lists (for absolute beginners)
Let's return to the Afternerd article. The section on mutability provides one of the clearest explanations of this concept for a beginner. Understanding this difference between mutable and immutable types is a cornerstone of Python programming.
Please read the section "How to modify and write elements to a list?", paying close attention to the TypeError you get when trying to modify a string, and the explanation of what really happens when you re-assign a string variable. This will solidify why lists are different.
Python provides a set of built-in functions, called methods, that you can use to modify lists. A method is a function that "belongs" to an object. You call it using dot notation, like my_list.method_name().
The following video from "Programming with Mosh" gives a concise tour of the most common methods for adding, removing, and finding items in a list.
This video provides a fast-paced but clear demonstration of the most common list methods you'll use every day.
Adding and Removing Items: Watch how to use .append(), .insert(), .pop(), .remove(), del, and .clear(). Finding Items: Learn about .index(), .count(), and the in operator.
Here is a summary of the most important list methods, with some code examples.

Adding Elements
append(item): Adds an item to the end of the list.insert(index, item): Inserts an item at a specific index.
numbers = [1, 2, 3]
numbers.append(4)      # numbers is now [1, 2, 3, 4]
numbers.insert(0, 0)   # numbers is now [0, 1, 2, 3, 4]
print(numbers)
Removing Elements
remove(item): Removes the first occurrence of a specific value.pop(index): Removes the item at a specific index and returns it. If no index is specified, it removes and returns the last item.clear(): Removes all items from the list.del my_list[index]: Thedelstatement removes an item at a specific index (it's not a method, but a Python statement).
letters = ['a', 'b', 'c', 'b', 'd']
letters.remove('b')      # Removes the first 'b'. letters is now ['a', 'c', 'b', 'd']
print(letters)

last_item = letters.pop()  # Removes and returns 'd'. letters is now ['a', 'c', 'b']
print(last_item)         # Output: d
print(letters)

del letters[0]           # Removes item at index 0. letters is now ['c', 'b']
print(letters)
Other Useful Methods
index(item): Returns the index of the first occurrence of an item. Raises an error if the item is not found.count(item): Returns the number of times an item appears in the list.sort(): Sorts the list in place (modifies the original list).reverse(): Reverses the order of elements in the list in place.
numbers = [3, 1, 4, 1, 5, 9, 2]
print(numbers.count(1))   # Output: 2
print(numbers.index(4))   # Output: 2

numbers.sort()            # Sorts the list in place
print(numbers)            # Output: [1, 1, 2, 3, 4, 5, 9]

numbers.reverse()         # Reverses the sorted list in place
print(numbers)            # Output: [9, 5, 4, 3, 2, 1, 1]
Conclusion
In this lesson, we've explored Python's list data structure, a versatile tool for managing ordered collections of data. You've learned how to create, access, and manipulate lists, which is a significant step forward in your programming journey.
Here are the key takeaways:
- Lists are ordered and mutable collections of items enclosed in square brackets
[]. - You can access individual items using indexing, with
my_list[0]for the first item andmy_list[-1]for the last. - You can extract sub-lists using slicing with the
[start:end:step]syntax. - Because lists are mutable, their contents can be changed after creation.
- A rich set of methods like
append(),insert(),remove(), andpop()allow for flexible manipulation, while methods likesort()andreverse()help organize the data within the list.
You've now learned how to handle individual variables and ordered collections of them. In our next lesson, we'll introduce another fundamental concept in programming: loops. Loops will allow us to repeat actions, such as performing an operation on every single item in a list, making our programs far more efficient and powerful.