Hello! Welcome to the final module of your course on changing a car tyre.
In the last lesson, you safely lowered your vehicle back onto the ground and removed the jack. The spare tyre is now fitted, and the lug nuts are hand-tight. You are at the final, and most critical, stage of securing the wheel.
This lesson addresses the learning outcome: Tighten the lug nuts in the correct star pattern using the lug wrench and explain its importance. We will cover why a specific tightening sequence is crucial for safety and how to perform it correctly using the tools you have in a roadside emergency.
Part 1: The "Why" Behind the Star Pattern
You might wonder why you can't just tighten the lug nuts in a circle. The reason is all about ensuring the wheel sits perfectly flat and centred on the hub. As a designer, you can think of it like stretching a canvas on a frame; you work on opposite sides to apply even tension and prevent the material from pulling to one side. Securing a wheel works on the same principle.
To understand the mechanics, please read the following article.
Tightening Lug Nuts: The Criss-Cross Pattern Explained
This article from TyrePlex explains the science behind the star pattern and the dangers of not following it.
Please read from the beginning down to the heading 'Tighten In the Air or on the Ground?'. Focus on the explanation of 'wheel flexing' and the potential issues caused by unevenly torqued nuts.
As the article explained, tightening the lug nuts in sequence (like going clockwise) can cause the wheel to tilt slightly. When you tighten one nut, it pulls that part of the wheel against the hub. If you then tighten the nut next to it, you are concentrating all the pressure on one side, which can cause the other side to lift away from the hub. This can result in:
- Wheel Flexing: The wheel isn't mounted perfectly flat, leading to a "wobble" that might not be immediately obvious.
- Loose Nuts: As the wheel settles during driving, the nuts you tightened first can become loose.
- Vibrations: Uneven pressure can cause vibrations while driving, especially during braking.
- Potential for Detachment: In a worst-case scenario, loosened lug nuts can work themselves free, leading to the catastrophic failure of the wheel detaching from the car.
The star pattern is designed specifically to prevent these issues by applying clamping force evenly across the entire surface of the wheel hub.
Part 2: How to Perform the Star Pattern
Now for the practical application. The "star" or "criss-cross" pattern simply means you always tighten the nut that is most directly opposite the one you just finished.
The image below shows the correct sequence for wheels with different numbers of lug nuts. Most passenger cars have four or five.
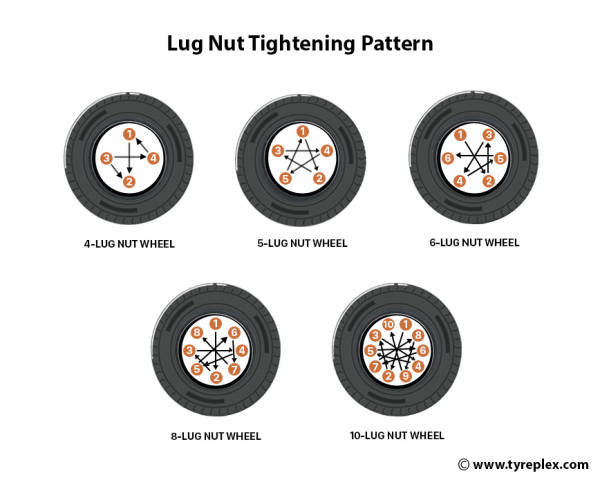
Here is the step-by-step process for tightening the lug nuts on your now-grounded vehicle:
- Position the Wrench: Place the lug wrench securely onto the first lug nut.
- Apply Force: Using both hands, push down on the wrench firmly to tighten the nut. Your goal is to make it as tight as you can using your body weight, but without straining or using excessive force.
- Follow the Pattern: Move to the lug nut directly opposite the one you just tightened (as shown in the diagram) and repeat the process.
- Continue the Sequence: Continue tightening the nuts in the star pattern until you have tightened all of them.
- Final Check: Go around the wheel one more time in the same star pattern, giving each nut a final, firm pull to ensure they are all equally snug.
Important Safety Note: It might be tempting to stand on the lug wrench to get extra leverage. Do not do this. You risk stripping the threads on the lug stud or nut, breaking the stud off entirely, or slipping and injuring yourself. The force from your arms is sufficient for an emergency fix.
Part 3: Final Tightening and Best Practices
The final tightening must be done with the car on the ground. The friction between the tyre and the pavement prevents the wheel from turning as you apply force with the wrench, ensuring you can get the nuts properly tight.
The following reading reinforces the tightening procedure and introduces the concept of torque specifications, which is the professional standard for this job.
The Importance of Tightening Wheel Lug Nuts
This article from Detroit Wheel and Tire summarizes the key safety reasons for proper tightening and introduces best practices, including the use of a torque wrench and re-checking.
Please read the sections titled 'Why Tightening Lug Nuts is Critical' and 'How to Properly Tighten Lug Nuts'. Pay special attention to the advice about re-checking torque after driving.
Lug Wrench vs. Torque Wrench
For a roadside change, the lug wrench that comes with your car is the right tool for the job. However, as the article mentions, the professional tool is a torque wrench. This tool allows a mechanic to tighten the lug nuts to a precise specification (measured in foot-pounds or Newton-metres) set by the car manufacturer.
Your lug wrench doesn't measure torque, so you rely on feel. That's perfectly fine for getting you to a garage, but it's not a permanent solution.
The Most Important Final Step
As highlighted in the reading, lug nuts can settle after being driven on for the first time. It is critical to re-check their tightness after driving a short distance.
- Rule of Thumb: After changing a tyre, re-check the lug nuts with your wrench after approximately 50 miles (or 80 kilometres) of driving. Pull over somewhere safe and give each nut a firm pull (in the star pattern!) to make sure none have come loose.
Conclusion
Congratulations! You have successfully completed the most safety-critical part of a tyre change. By tightening the lug nuts correctly, you've ensured the wheel is securely and evenly attached to your vehicle.
Key Takeaways:
- The star pattern is essential for applying even pressure and preventing the wheel from flexing, wobbling, or detaching.
- Final tightening must be done with the vehicle on the ground to prevent the wheel from spinning.
- Use your lug wrench to get the nuts as tight as you can by hand, but never stand on the wrench.
- After a roadside change, plan to visit a garage to have the nuts tightened to the manufacturer's torque specification.
- Always re-check the lug nut tightness after driving about 50 miles.
In our next and final lesson, we'll cover the wrap-up: securely stowing the damaged tyre and tools, and understanding the limitations of driving on a temporary spare.