Hello! Welcome back to your course on how to change a car tyre.
In the previous lesson, you successfully mounted the spare tyre and hand-tightened the lug nuts in a star pattern. The car is still raised, and the wheel is securely seated and ready for the next phase.
Today's lesson focuses on a critical transition: safely lowering the vehicle completely and removing the jack. This step may seem simple, but doing it correctly is essential for stability and safety. We'll cover why a slow, controlled descent is important and walk through the exact steps to get your car back on solid ground.
Part 1: The Importance of a Slow and Steady Descent
Before we touch the jack, it's crucial to understand why you can't just lower the car quickly. Dropping the car's weight suddenly can introduce several risks. As someone focused on a safe and correct process, understanding these potential pitfalls is key.
The following resource explains the most common mistake people make at this stage and how to avoid it.
Common Mistakes Made When Changing a Tire
This article from RedlineStands.com explains the safety and mechanical reasons for lowering your vehicle gradually. This will give you the 'why' behind the procedure we're about to perform.
Please read the section titled 'Failing to Lower the Vehicle Slowly'. Focus on the three main risks associated with lowering the car too quickly.
As you just read, lowering the vehicle too fast is a serious mistake. To recap, a slow, controlled descent ensures:
- Jack Stability: A sudden drop can shift the vehicle's weight, potentially making the jack unstable or causing it to slip.
- Proper Tyre Seating: It allows the spare tyre to settle evenly onto the ground and against the wheel hub without any abrupt force.
- Component Protection: It prevents undue stress on your car's suspension parts.
With this safety principle in mind, let's move on to the practical steps.
Part 2: Step-by-Step Guide to Lowering and Removing the Jack
The process of lowering the vehicle is essentially the reverse of lifting it. You'll operate the jack in the opposite direction, slowly and carefully.

Here's how to proceed:
-
Lower the Vehicle Partially: Turn the jack handle counter-clockwise to begin lowering the car. Go slowly until the spare tyre just makes contact with the ground. The tyre should be touching the pavement, but not yet bearing the car's full weight. The jack should still be supporting most of the load.
- Why this step? At this stage, the tyre has enough friction with the ground to prevent it from spinning when you apply the wrench. This is the ideal position to begin the final tightening of the lug nuts, which we will cover in the very next lesson.
-
Lower the Vehicle Completely: Continue turning the jack handle counter-clockwise. You will feel the resistance lessen as the car's full weight transfers from the jack to the tyre and the ground. Keep going until the jack is fully collapsed and is no longer supporting any weight.
-
Remove the Jack: Once the jack is completely lowered and free of any load, simply slide it out from underneath the vehicle.
The following resource provides a concise walkthrough of this final lowering phase.
This guide from Go Nissan South clearly outlines the final steps of lowering the vehicle and removing the jack.
Please read 'Step 12: Lower the Vehicle All the Way Down, Remove the Jack'. You'll notice 'Step 11' describes the partial lowering we just discussed, which prepares the wheel for final tightening.
You have now safely returned the vehicle to the ground. The spare tyre is on, and the damaged tyre is off. You're on the home stretch.
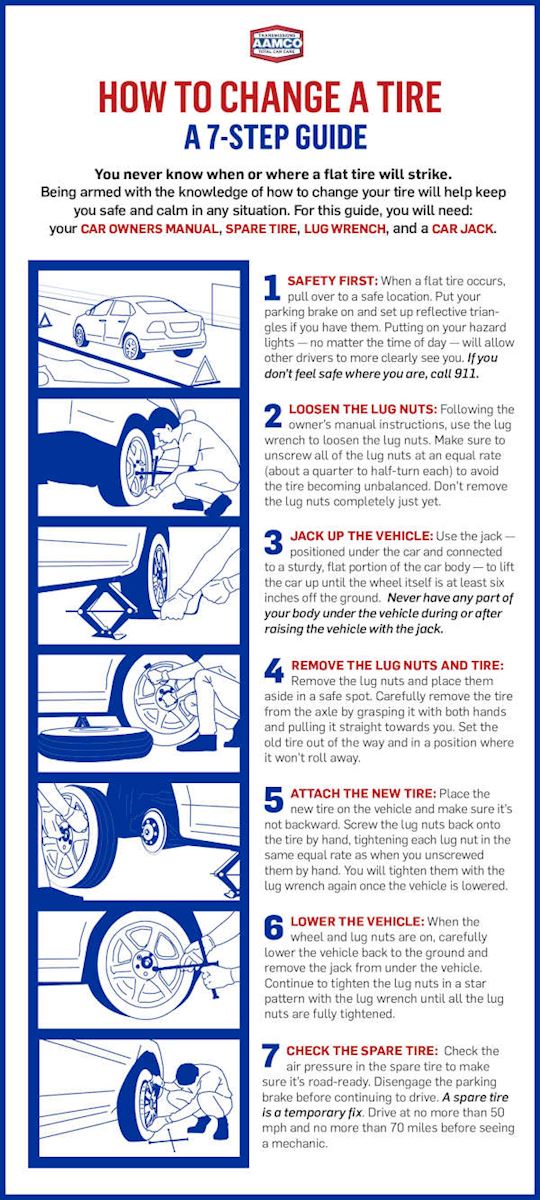
The infographic below shows where our current step—"LOWER THE VEHICLE"—fits into the overall process.
Conclusion
Well done. You've safely brought the car back down to the ground and removed the jack. By lowering the vehicle slowly and in stages, you've ensured stability and protected your car's components, following the best practices for a roadside tyre change.
Key Takeaways:
- Always lower the vehicle slowly to maintain stability and allow the spare tyre to seat correctly.
- The process involves a two-step descent: first, lower until the tyre touches the ground, and then lower it completely.
- Only remove the jack after the vehicle's full weight is on the ground and the jack is completely free of any load.
In our next lesson, we will perform the final and arguably most critical safety step: properly tightening the lug nuts in the correct star pattern with the lug wrench. This will ensure your wheel is securely fastened for the drive to a garage.