In our last lesson, you successfully connected an external CSS file to your HTML document, establishing the fundamental link between your content's structure and its presentation. Now, with that connection in place, we can begin the exciting work of actually styling your page.
This lesson focuses on a core concept of CSS: selectors. A selector is a pattern that tells the browser precisely which HTML element or elements you want to apply a style to. Think of it as addressing a letter: you need the right address to ensure your message gets to the intended recipient. By the end of this lesson, you will be able to target HTML elements using the three most fundamental types of selectors: element, class, and ID.
The CSS Rule Structure
Before we dive into selectors, let's quickly review the structure of a CSS rule. A rule consists of two main parts:
- The Selector: The pattern that identifies which element(s) to style.
- The Declaration Block: One or more declarations, enclosed in curly braces
{}. Each declaration includes a CSS property (likecolororbackground-color) and a value, separated by a colon.
/*  Selector | Declaration Block         */
/*           | Property : Value;         */
/*           -------------------         */
p            { color    : blue;          }
Our focus today is entirely on the first part: the selector.
1. The Element Selector
The most basic way to select elements is by their HTML tag name. This is called an element selector (or sometimes a type selector). If you want to style all the paragraphs on your page, you use the p selector. If you want to style all level-two headings, you use h2.
This is a powerful tool for applying a consistent, base style across your entire site. For example, you might want all paragraphs to have the same font size and color.
Let's watch a clear demonstration of how element selectors work.
CSS Selectors Tutorial for Beginners
In this video, Dave Gray explains and demonstrates the element selector, showing how a single rule can affect all elements of a specific type on the page.
Watch from the beginning to the explanation of the element selector. Notice how styling the body affects everything through inheritance, and styling p affects all paragraphs at once.
The element selector is great for broad strokes, but it's not very specific. What if you want to make some paragraphs stand out, but not all of them? For that, we need a more targeted approach.
2. The Class Selector
The class selector is one of the most common and versatile tools in CSS. It allows you to create a "group" that you can apply to any number of elements, even if they are different types (e.g., a <p> and an <li>). You can then write a CSS rule that targets every element in that group.
This is done in two steps:
- In your CSS, you define a class using a period (
.) followed by a name you choose (e.g.,.highlight). - In your HTML, you add the
classattribute to any element you want to be part of that group (e.g.,<p class="highlight">).
The video below gives an excellent analogy and shows why class selectors are so essential for creating reusable styles.
CSS Tutorial — Selectors, Element, Class and ID (3/13)
This clip from ColorCode explains the purpose of class selectors, focusing on their reusability. It demonstrates how to apply the same style to multiple, non-consecutive elements.
Watch the segment on class selectors. Pay close attention to the syntax (. in CSS, class="..." in HTML) and the example of alternating styles for paragraphs.
Key points about classes:
- They are reusable; you can apply the same class to many elements.
- An element can have multiple classes, separated by a space (e.g.,
class="dark important-text"). - Class names should be descriptive of the function of the style (e.g.,
.alert,.success-message) rather than the style itself (e.g.,.red-text).
3. The ID Selector
The ID selector is the most specific of the basic selectors. It is used to target one, and only one, unique element on a page.
Like classes, this is a two-step process:
- In your CSS, you define an ID rule using a hash symbol (
#) followed by a unique name (e.g.,#main-title). - In your HTML, you add the
idattribute to the single element you want to target (e.g.,<h1 id="main-title">).
The critical rule for IDs is: An ID name must be unique within a single HTML page. You cannot have two elements with id="main-title".
Let's see how ID selectors work and learn an important piece of advice about using them for styling.
CSS Selectors Tutorial for Beginners
Dave Gray returns to explain the ID selector, demonstrating its syntax and specificity. He also provides crucial advice on modern best practices for using IDs.
Watch this short clip on ID selectors. Note the # syntax and the warning he gives: while IDs can be used for styling, in modern web development they are more often reserved for JavaScript and in-page linking.
To summarize the advice from the video: it's generally better to use classes for your styling needs, even if you are only styling one element. This keeps your CSS more flexible and reusable. Reserve IDs for when you need a unique identifier for JavaScript functionality or for linking to a specific section of a page (e.g., <a href="#chapter1">).
Summary and Reference
You've now been introduced to the three foundational selectors. Let's use a textual resource from W3Schools to solidify the syntax and concepts for each.
This guide provides clear definitions and examples for the element, ID, and class selectors. It's a great reference to review the syntax.
Please read the following three sections: The CSS element Selector The CSS id Selector The CSS class Selector Focus on the syntax examples for each one: p, #para1, and .center.
This table provides a great at-a-glance summary of the selectors we've covered.
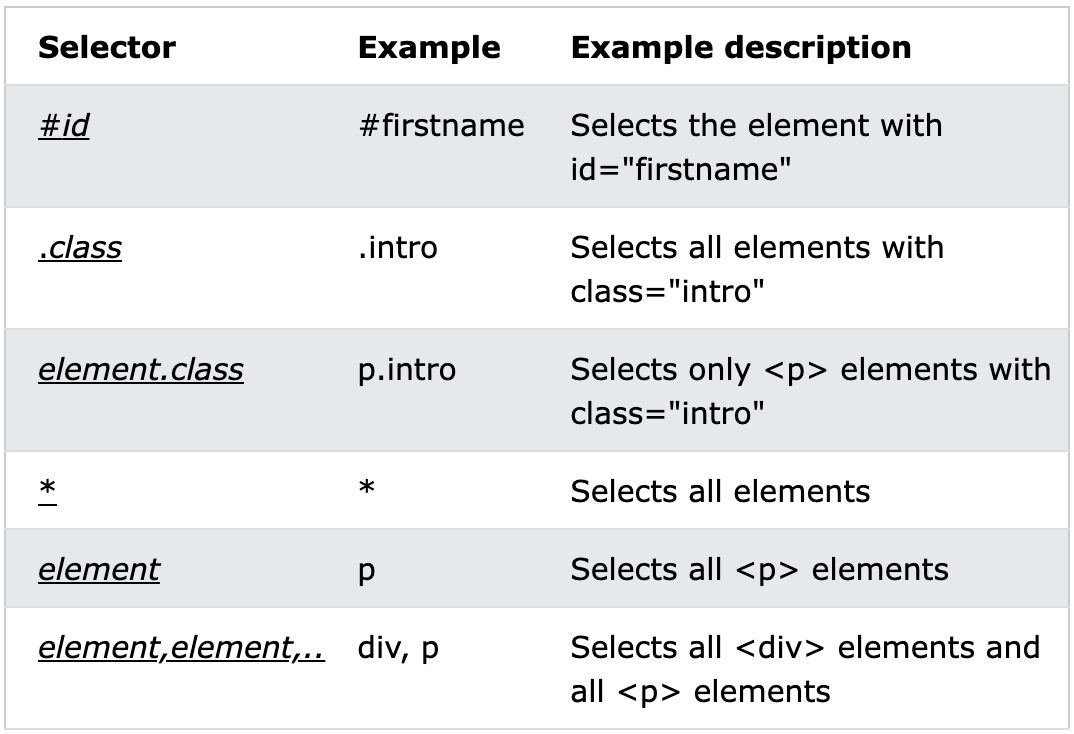
Practice Time
Let's apply this knowledge to the project you've been building.
-
Open your
index.htmlandstyles.cssfiles in your code editor. -
Element Selector: In
styles.css, add a rule to target all<p>elements. Let's give them a slightly darker text color and a bit more line height to make them easier to read.p { color: #333333; /* A dark gray */ line-height: 1.6; } -
ID Selector: In
index.html, find your main heading (your<h1>) and give it a unique ID.<h1 id="main-heading">Welcome to My Website</h1>Now, in
styles.css, create a rule to target that specific ID. Let's change its color.#main-heading { color: #005a9c; /* A nice shade of blue */ } -
Class Selector: Let's create a class for "important" text. In
styles.css, add this rule:.important-text { font-weight: bold; color: #c00; /* A dark red */ }Now, find a paragraph in your
index.htmlthat you want to emphasize and add the class to it.<p class="important-text">This is a very important paragraph.</p>You can apply this class to any other element you want to make important!
-
Save and View: Save both files and open
index.htmlin your browser.- Your
<h1>should be blue. - All your paragraphs should be dark gray with more space between the lines.
- The specific paragraph you targeted should be bold and dark red.
- Your
Conclusion
You have now mastered the fundamental skill of targeting elements on your web page. This is the foundation upon which all CSS styling is built. You've learned how to apply styles broadly with element selectors, how to create reusable styles with class selectors, and how to target unique elements with ID selectors.
Key Takeaways:
- Element Selector (
p): Styles all tags of a certain type. Good for general, base styles. - Class Selector (
.my-class): Styles any element with the correspondingclassattribute. It's reusable and the most common choice for styling. - ID Selector (
#unique-id): Styles the one element with the correspondingidattribute. It must be unique and is often reserved for JavaScript hooks. - The general rule for specificity is: ID > Class > Element.
In our next lesson, we will shift our focus from the selector to the declaration block. You'll learn about a wider range of CSS properties to control fonts, colors, and text formatting, giving you much more creative control over your page's appearance.