Welcome to the third module of our course! In the previous module, you did an excellent job learning how to build the fundamental structure of web pages using HTML. You can now create pages with text, images, links, lists, and even forms to collect user input. While your pages are functional, they are visually plain. This is where we begin our next journey: styling.
This lesson marks our entry into the world of Cascading Style Sheets (CSS), the language that brings design and presentation to the web. We will start with the most critical first step: learning how to connect your CSS rules to your HTML document. By the end of this lesson, you will be able to link an external CSS file to your HTML, setting the stage for all the styling work to come.
The Role of CSS
Think of HTML and CSS as two sides of the same coin. HTML provides the structure and meaning of your content—this is a heading, this is a paragraph, this is an image. CSS, on the other hand, controls the presentation and appearance—what color the heading is, what font the paragraph uses, how large the image is, and where it's positioned on the page.
There are three primary ways to apply CSS to an HTML document:
- Inline CSS: Styles are applied directly to a single HTML element using the
styleattribute. This is useful for very specific, one-off adjustments but is generally avoided because it mixes content and presentation. - Internal CSS: Styles are placed inside a
<style>tag within the HTML document's<head>section. This affects only the single page it's on and is useful for page-specific styles. - External CSS: Styles are defined in a separate file with a
.cssextension. This file is then linked to one or more HTML pages.

For almost all web development, external stylesheets are the preferred method. Why?
- Separation of Concerns: It keeps your HTML (content) and CSS (design) in separate files, making your code much cleaner, more organized, and easier to manage.
- Reusability: You can link a single CSS file to your entire website. If you want to change the color of all headings across 50 pages, you only need to edit one line in one file.
- Efficiency: When a user visits your site, their browser can download the CSS file once and "cache" it. This means for subsequent pages they visit, the styles load instantly without needing to be re-downloaded, making your site faster.
Linking an External Stylesheet
The process of connecting an external CSS file to your HTML involves two main steps: creating the CSS file itself, and then telling the HTML document where to find it.
Let's start by getting a clear overview from the Mozilla Developer Network (MDN), a key resource for web developers.
Getting started with CSS - Learn web development | MDN
This MDN article provides a foundational look at how CSS is added to a document, focusing on the highly recommended external stylesheet method.
Read the sections Adding CSS to our document and External stylesheets. Pay close attention to the <link> element and its attributes.
As you've just read, the magic happens with the <link> element placed inside the <head> of your HTML file.
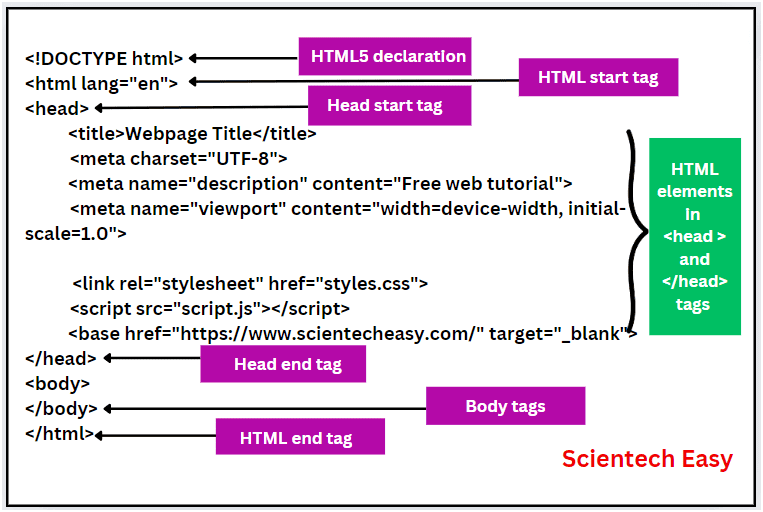
The <link> Tag in Detail
The <link> tag is a self-closing element (it doesn't need a closing </link> tag) and uses attributes to do its job. Two attributes are essential:
rel: This stands for "relationship" and tells the browser what the linked file is. For a stylesheet, the value must bestylesheet.href: This stands for "hypertext reference" and provides the path to the CSS file. This works just like thehrefin an anchor tag (<a>) or thesrcin an image tag (<img>).
How to Link CSS to HTML Files: An All-You-Need-to-Know Guide
This article from Hostinger provides a very clear, table-based breakdown of the <link> tag's attributes.
Read the section under the heading Key attributes of the tag. This table clearly defines the purpose of rel, href, and other optional attributes.
A Practical Walkthrough
Reading about it is one thing, but seeing it done is often the best way to learn. Let's watch a short video by web development instructor Kevin Powell, who will walk you through creating a CSS folder, making a stylesheet, and linking it to an HTML file. He also shows a critical final step: testing the connection.
HTML & CSS for Absolute Beginners: Creating and linking to a CSS file
This video provides a clear, step-by-step demonstration of the entire process, from file organization to testing.
First, watch how to create a CSS folder and file. Keeping your CSS in a dedicated folder is a great organizational habit. Next, see how to add the link element to the HTML's <head>. Pay close attention to his explanation of the rel and href attributes. Finally, watch the crucial step of testing the connection. This simple check will save you a lot of frustration in the future.
The process shown in the video is a professional workflow you should adopt:
- Organize: Create a
cssfolder in your project directory. - Create: Inside the
cssfolder, create a new file (e.g.,styles.css). - Link: In your
index.htmlfile, add<link rel="stylesheet" href="css/styles.css">inside the<head>section. - Test: Add a temporary rule to
styles.css(likebody { background-color: cornflowerblue; }), save both files, and refresh your browser to confirm it works.
If your test doesn't work, the most common issues are:
- A typo in the file path in the
hrefattribute. - Forgetting
rel="stylesheet". - Forgetting to save one or both of the files before refreshing the browser.
Practice Time
Now it's your turn to put this into practice. You'll use the HTML file you've been working on in previous lessons.
- Open your project folder in your code editor (like VS Code).
- Create a new folder and name it
css. - Inside the new
cssfolder, create a new file and name itstyles.css. - Open your
index.htmlfile. - Inside the
<head>section, add the<link>tag to connect to your new stylesheet. Remember the path needs to include the folder:href="css/styles.css". - Open your
styles.cssfile and add the following CSS rule:h1 { color: navy; } body { background-color: #f0f8ff; /* This is a light color called AliceBlue */ } - Save both
index.htmlandstyles.css. - Open
index.htmlin your web browser. Your page should now have a very light blue background, and any<h1>headings should be navy blue. If it works, you've successfully linked your stylesheet!
Conclusion
You have just taken the first and most important step in styling a website. By learning to create and link an external stylesheet, you have established a clean, scalable foundation for all your design work. This separation of structure (HTML) and presentation (CSS) is a core principle of modern web development.
Key Takeaways:
- CSS is the language used to style the visual presentation of HTML.
- Using an external stylesheet is the best practice for organization, maintainability, and performance.
- You link an external stylesheet by placing a
<link>tag in the<head>of your HTML document. - The
<link>tag must have arel="stylesheet"attribute and anhrefattribute pointing to the path of your.cssfile. - Always test your link with a simple style rule to ensure the connection is working correctly.
Now that your HTML and CSS files are connected, you're ready to start styling. In the next lesson, we will explore CSS selectors, which are the patterns you use to tell the browser exactly which HTML elements you want to apply your styles to.