Hello! Welcome back to your C++ ray tracer project.
In our last lesson, we designed and implemented a crucial piece of our renderer's architecture: the hittable_list class. We now have a container that can hold any number of hittable objects and, thanks to its own hit method, can intelligently find the closest object a ray intersects.
Today, we will put that class to work. We're moving from implementation to application. You will modify your main rendering logic to create a "world" containing multiple objects and trace rays into this scene. By the end of this lesson, you will have rendered your first image with more than one object, successfully identifying the closest intersection for each pixel.
This is the moment where our collection of individual geometric tests coalesces into a true scene renderer.
The Core Algorithm: Find the Closest Hit
The task is straightforward: for any given ray, we must check every object in our scene and figure out which one it hits first.
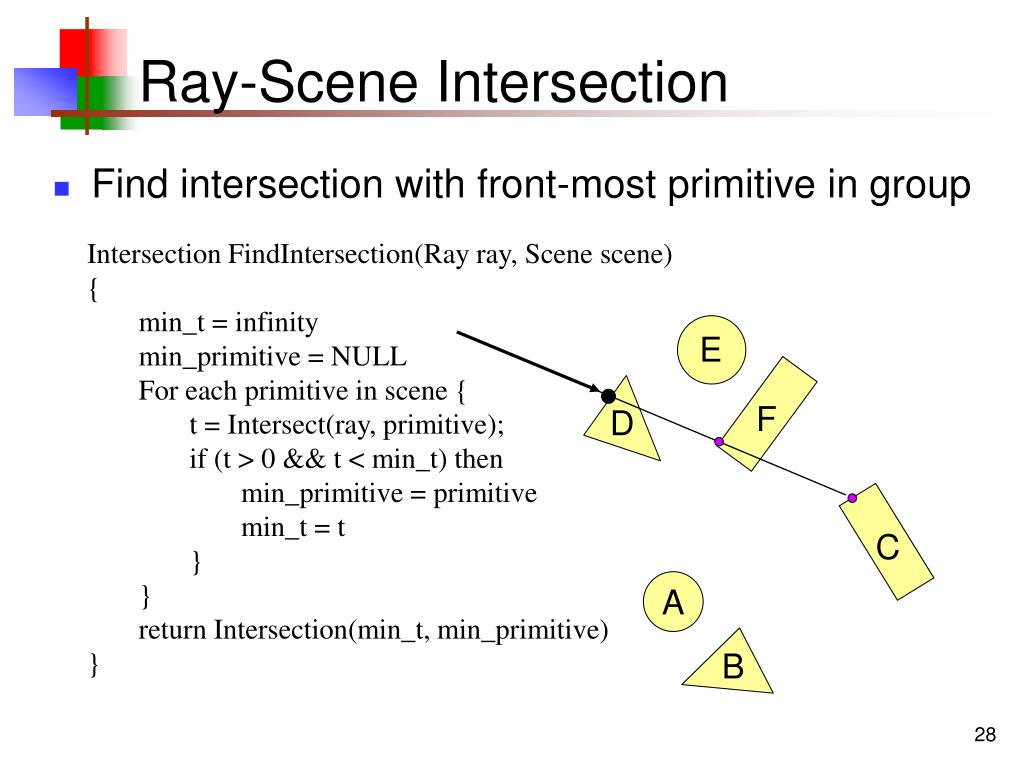
The algorithm, which you've already implemented within the hittable_list::hit method, follows these steps:
- Initialize a variable,
closest_so_far, to the maximum renderable distance (ray_tmax). - Iterate through each object in the list.
- For each object, call its
hitmethod, but with an important constraint: the new maximum distance isclosest_so_far. - If a hit is found that is closer than
closest_so_far, updateclosest_so_farto this new, smaller distance and record the details of this hit. - After checking all objects, the recorded hit details will be for the closest object.
This pattern is fundamental to ray tracing. To reinforce the concept, let's look at how another resource describes this exact logic.
Implementing Whitted Ray-Tracing in C++
The 'Overview of the Ray-Tracing Rendering Technique' article on Scratchapixel provides a high-level C++ implementation of a Whitted-style ray tracer. Pay attention to the trace() function, which is their name for the process of finding the closest intersection.
Read the short subsection describing the trace() function. Notice how it loops through a collection of objects, keeps track of the nearest hit distance (tNear), and stores a pointer to the object that was hit.
The trace function in the article does exactly what our hittable_list::hit method does. Now, let's integrate our class into the main program.
Updating the Main Program to Render a Scene
Our primary guide for implementation, Ray Tracing in One Weekend, has a chapter dedicated to this integration. We will now follow its steps to bring our scene to life.
Ray Tracing in One Weekend Series
Please read the section 'Now for the real thing...' from Ray Tracing in One Weekend. This section will walk you through the necessary changes in your main.cc file.
Start reading from the heading 'Now for the real thing...'. You'll see how to create a hittable_list called world, add sphere objects to it using make_shared, and update the ray_color function to take this world object. Follow the code changes to update your main.cc file.
Let's summarize the key steps to modify in your main.cc file:
1. Create the World and Add Objects
In your main() function, before your main render loop, instantiate hittable_list and add a couple of spheres. This uses the std::vector and std::shared_ptr concepts we covered earlier.
// In main()
hittable_list world;

world.add(make_shared<sphere>(point3(0, 0, -1), 0.5));
world.add(make_shared<sphere>(point3(0, -100.5, -1), 100));
Here, we've created two spheres. The second one is very large and positioned below the camera, which will serve as a simple ground plane.
2. Modify ray_color() Signature
Your ray_color() function currently probably takes a reference to a single hittable object. We need to generalize it to take the entire world.
Change its signature from something like color ray_color(const ray& r, const sphere& s) to:
color ray_color(const ray& r, const hittable& world)
3. Update the ray_color() Logic
Inside ray_color(), replace the call to the specific object's hit method with a call to the world's hit method.
// Inside ray_color()
hit_record rec;

// The original 't_max' is infinity, meaning we're interested in any hit, no matter how far.
// We check for hits from t=0.0 to infinity.
if (world.hit(r, 0.0, infinity, rec)) {
    // If we hit something, color based on its normal.
    return 0.5 * (rec.normal + color(1, 1, 1));
}

// If we hit nothing, return the background color.
vec3 unit_direction = unit_vector(r.direction());
auto a = 0.5 * (unit_direction.y() + 1.0);
return (1.0 - a) * color(1.0, 1.0, 1.0) + a * color(0.5, 0.7, 1.0);
(Note: You'll need to include the header for your hittable_list in main.cc)
4. Update the Call in the Main Loop
Finally, in your main rendering loop where you call ray_color for each pixel, make sure you pass the world object.
// Inside the nested for loops in main()
// ...
color pixel_color = ray_color(r, world);
write_color(std::cout, pixel_color);
After making these changes, compile and run your program. You should see your first multi-object render: a small sphere appearing to float above a much larger one that acts as the ground.
Test your understanding!
In the ray_color function, we pass a t_min of 0.0 to world.hit(). What would happen if we passed a slightly larger value, like 0.001? Why might this be a good idea, especially once we start calculating reflections?
Show answer
Passing a small positive value like 0.001 instead of 0.0 prevents "shadow acne." When a ray is reflected off a surface, its origin is the hit point on that surface. Due to floating-point inaccuracies, a new ray cast from that exact point might incorrectly self-intersect with the surface it just bounced from. By giving the ray a small minimum travel distance (t_min > 0), we effectively push its origin slightly off the surface, preventing these erroneous self-intersections. We will revisit this in detail when we implement materials.
Visualizing the Process
To see this process in action from a different perspective, let's watch a segment from The Cherno's series. His implementation details differ slightly (he puts the loop in the main trace function rather than a class method), but the core logic of iterating and finding the minimum hit_distance is identical.
Rendering Multiple Objects // Ray Tracing series
This clip from 'Rendering Multiple Objects' by The Cherno demonstrates modifying a TraceRay function to handle multiple spheres. It's a great practical look at the algorithm we've just integrated.
Watch from 20:54 to 25:52. Observe how he introduces a loop, tracks the closest sphere with a pointer, and uses a hit_distance variable (our closest_so_far) to ensure the nearest object is rendered.
Conclusion
Congratulations! You have successfully configured your renderer to trace rays against an entire scene of objects. This is a monumental step that transforms your project from a simple geometric calculator into a scalable rendering system.
Key Takeaways:
- By creating a
hittable_listand populating it inmain, you've defined your first "scene" or "world." - The
ray_colorfunction is now generalized; it operates on the abstracthittableinterface, not a concrete object type. It doesn't care if the "world" is one sphere or a million triangles in a complex model. - The core algorithm for finding the visible surface is to iterate through all objects and find the intersection with the smallest positive
tvalue. This logic is now encapsulated and working within yourhittable_list::hitmethod.
Your work today connects directly to how production renderers operate, albeit at a much simpler scale. Renderers like Arnold and Karma manage vast scenes containing millions or billions of primitives. Simply looping through every object, as we do now, would be impossibly slow. In a future module, we will explore acceleration structures (like the BVH you may have heard of) which are essential for making such scenes render in a reasonable amount of time.
Next Steps
Take a close look at the image you just rendered. Do you see the sharp, jagged edges along the silhouette of the sphere? This artifact is called aliasing. In our next lesson, we will investigate its cause and implement a fundamental technique to combat it: multi-sample anti-aliasing.