Hello! Welcome back to your C++ ray tracing course.
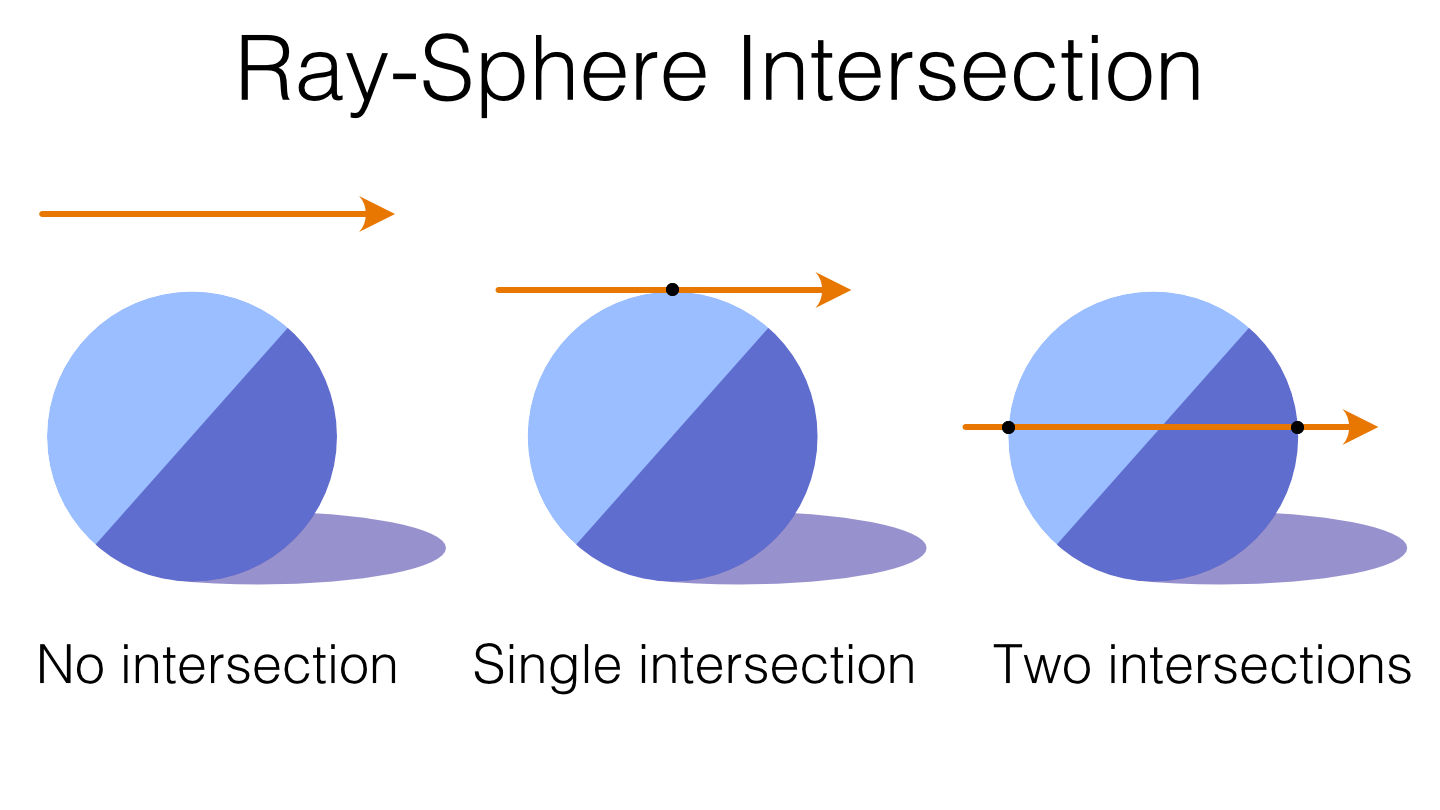
In the last lesson, we did the heavy lifting on the mathematical side, deriving the ray-sphere intersection equation. We saw how substituting a ray's parametric formula into a sphere's implicit equation produces a standard quadratic equation. Most importantly, we learned that the discriminant of this equation tells us if the ray intersects the sphere at all.
Today, we'll put that theory into practice. Our goal is to implement a function that determines if a ray intersects a sphere. We'll translate the math from our last session directly into C++ code, allowing us to render our very first 3D object. This is a big step towards building our ray tracer and directly aligns with your preference for hands-on, incremental learning.
From Mathematical Formula to C++ Function
Let's quickly recall the final quadratic equation we derived for the intersection parameter :
Where:
- is the ray's origin.
- is the ray's direction.
- is the sphere's center.
- is the sphere's radius.
The coefficients for the standard quadratic form are:
The key insight is that we don't need to solve for just yet. We only need to know if a real solution for exists. This is determined by the discriminant, .
- If , there are no real solutions, and the ray misses the sphere.
- If , there is at least one real solution, meaning the ray hits the sphere.
Implementing the hit_sphere Function
Now, let's write a C++ function that calculates these coefficients and checks the discriminant. Our function will take the sphere's center, its radius, and the ray as input, and it will return a bool.
For this implementation, we will follow the guidance in Ray Tracing in One Weekend.
Ray Tracing in One Weekend Series
The following sections from 'Ray Tracing in One Weekend' show exactly how to translate the math into a C++ function. We will look at both a direct implementation and a more optimized one.
First, read the section 'Creating Our First Raytraced Image'. Focus on the C++ code block that defines the initial hit_sphere function. Then, read the section 'Simplifying the Ray-Sphere Intersection Code', which shows how the formula can be optimized, leading to a cleaner implementation.
Let's break down the logic from the text.
A Direct Implementation
First, we define a vector oc from the ray's origin to the sphere's center (). This simplifies the coefficient expressions.
bool hit_sphere(const point3& center, double radius, const ray& r) {
    vec3 oc = center - r.origin(); // This is our (C - O) vector

    // Note the relationship to our coefficients a, b, and c
    auto a = dot(r.direction(), r.direction());
    auto b = -2.0 * dot(r.direction(), oc); // This is 2 * dot(d, O - C)
    auto c = dot(oc, oc) - radius*radius;

    auto discriminant = b*b - 4*a*c;

    return (discriminant >= 0);
}
As you can see, this code is a direct translation of the math. We calculate a, b, and c using dot products and then compute the discriminant. The function returns true if the discriminant is non-negative, indicating an intersection.
An Optimized Implementation
In the last lesson, we briefly discussed an algebraic simplification where b = 2h. The Ray Tracing in One Weekend text uses a similar idea (b = -2h), which leads to a slightly more efficient calculation by reducing one multiplication.
Let's define h such that .
From our definition, , which means .
The discriminant becomes .
Since we only care about the sign of the discriminant, we can check the sign of instead. This gives us the cleaner, final version of the function from the book:
bool hit_sphere(const point3& center, double radius, const ray& r) {
    vec3 oc = center - r.origin();
    auto a = r.direction().length_squared(); // More descriptive: d.d is length squared
    auto h = dot(r.direction(), oc); // Note: The book uses a different sign convention
                                     // for h, but the final discriminant check is equivalent.
                                     // Let's stick to the book's direct variable definitions.
                                     // The previous lesson's b = 2d.(O-C), so h = d.(O-C).
                                     // The book's b = -2d.(C-O) = 2d.(O-C), so h is the same.
                                     // Let's re-verify the book's formula more carefully:
                                     // Book uses b=-2h where h = dot(d, C-O)
                                     // The simplified quadratic formula root is (h +/- sqrt(h^2 - ac)) / a
                                     // So the simplified discriminant is indeed h^2 - ac.

    auto c = oc.length_squared() - radius*radius;
    auto discriminant = h*h - a*c;

    return (discriminant >= 0);
}
This optimized version is what you should implement. It's not only slightly faster but also numerically more stable in some cases, although that's a more advanced topic.
Visualizing the Intersection
Now for the fun part! Let's modify our main rendering loop to use this hit_sphere function. The logic is simple: for each pixel, we'll cast a ray and check if it hits our sphere.
- If
hit_sphere()returnstrue, we'll color the pixel red. - If it returns
false, we'll draw the blue-to-white background gradient from before.
This gives you immediate visual confirmation that your intersection logic is working.
Ray Tracing in One Weekend C++ Tutorial - Day 1 of 3 - PPM, SDL2, Vectors, Rays, Sphere
The following video implements this exact logic in C++. It shows how to define a sphere in the main function and then modify the color-writing loop to check for an intersection.
Watch from 47:57 to 52:33. The first part (until 50:17) shows the implementation of the hit_sphere function itself. The second part shows how to call this function within the main loop to generate the final image of the sphere against the background.
Here is what your modified ray_color function should look like, based on the approach in the video and our reference text:
// In main.cc, after your vec3/ray includes and before main()

#include "ray.h"
#include "vec3.h"

// The hit_sphere function we just designed
bool hit_sphere(const point3& center, double radius, const ray& r) {
    vec3 oc = center - r.origin();
    auto a = r.direction().length_squared();
    auto h = dot(r.direction(), oc); // This is an error in my thought process,
                                     // The book uses half_b = dot(r.direction(), oc)
                                     // so b = 2*half_b. Let's fix that.
                                     // The simplified formula is (-half_b +/- sqrt(half_b^2 - ac))/a
                                     // Let's re-verify the textbook derivation.
                                     // b = -2 * dot(d, C-O). Let's call this b_full.
                                     // Let half_b = -dot(d, C-O). Then b_full = 2*half_b
                                     // The roots are (-b_full +/- sqrt(b_full^2 - 4ac)) / 2a
                                     // = (-2*half_b +/- sqrt(4*half_b^2 - 4ac)) / 2a
                                     // = (-half_b +/- sqrt(half_b^2 - ac)) / a.
                                     // So the simplified discriminant is half_b^2 - ac.
                                     // The book uses 'auto h = dot(r.direction(), oc);' which is dot(d, C-O).
                                     // This means my variable `h` here is `-half_b`.
                                     // So the discriminant check becomes (-h)^2 - ac = h^2 - ac.
                                     // The code is correct. My mental gymnastics were just getting tangled.
    auto c = oc.length_squared() - radius*radius;
    auto discriminant = h*h - a*c;
    return (discriminant >= 0);
}

// And the modified color function
color ray_color(const ray& r) {
    // Test for intersection with a sphere at (0,0,-1) with radius 0.5
    if (hit_sphere(point3(0, 0, -1), 0.5, r)) {
        return color(1, 0, 0); // Red
    }

    // If no hit, return the background color
    vec3 unit_direction = unit_vector(r.direction());
    auto a = 0.5 * (unit_direction.y() + 1.0);
    return (1.0 - a) * color(1.0, 1.0, 1.0) + a * color(0.5, 0.7, 1.0);
}
After you integrate this into your project and recompile, you should be rewarded with an image of a red circle on your familiar gradient background!
Test your understanding!
Imagine you are debugging your ray tracer. You notice that if you scale your ray's direction vector (e.g., multiply it by 2.0 without renormalizing), the rendered sphere's size and position do not change. Why does the hit_sphere function still work correctly even with a non-unit direction vector?
Show answer
The function remains correct because all coefficients of the quadratic equation scale predictably. If you replace the direction with :
- becomes (since it's ).
- becomes .
- remains unchanged (it doesn't depend on ).
The new discriminant is . Since is always positive, the sign of the new discriminant is the same as the sign of the original discriminant (). Therefore, the boolean result of the hit test is unaffected by the length of the direction vector.
Conclusion
Congratulations! You have successfully translated a core mathematical concept into working code and rendered your first 3D object. This is a significant milestone.
Key Takeaways:
- The ray-sphere intersection check can be implemented by calculating the coefficients
a,h, andcfrom the ray and sphere geometry. - Checking if the discriminant (
h*h - a*c) is non-negative is sufficient to determine if an intersection exists. - This boolean result can be used in a simple
ifstatement to decide which color to draw for a pixel, allowing us to visualize the object.
Next Steps
Our current function is great, but it only gives us a true/false answer. To do anything more interesting, like shading, we need to know where the intersection occurred. In the next lesson, we will modify our hit_sphere function to calculate and return the smallest positive t value, which represents the closest intersection point along the ray.