Hello! Welcome back.
In our last lesson, we demystified the u and v parameters from our Möller-Trumbore intersection test, identifying them as barycentric coordinates. We then updated our hit_record to store these values, preparing for their primary use: interpolation.
Today, we will leverage that work to implement smooth shading by interpolating vertex normals using barycentric coordinates. This technique is the foundation for making low-polygon models appear as smooth, continuous surfaces. For someone with your background in VFX and 3D art, this concept bridges the gap between the faceted polygonal cages we see in a viewport and the smooth final surfaces rendered by production systems like Arnold or Karma. This is essentially the "how" behind operations like "Soften Edge" in Maya or manipulating vertex normals in Houdini.
Our goal is to transform a render that looks like the image on the left into one that looks like the image on the right, using the exact same underlying geometry.
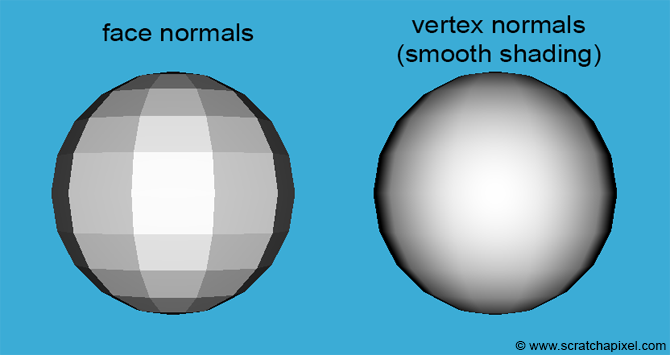
1. Flat Shading vs. Smooth Shading
So far, our triangles have had a single normal vector, calculated by taking the cross product of its two edge vectors. This is called a face normal. When every point on a triangle's surface is shaded using this single normal, the entire triangle gets a uniform appearance, leading to a faceted, blocky look. This is known as flat shading.
To overcome this, we can use a technique called smooth shading (also known as Gouraud shading, after its inventor Henri Gouraud). The core idea is to move away from face normals and instead define a normal for each vertex of the triangle. These vertex normals don't represent the orientation of the flat triangle itself, but rather the orientation of the idealized smooth surface that the polygon mesh is approximating.
By interpolating these vertex normals across the face of the triangle, we can calculate a unique, smoothly-varying normal for every single point on its surface.
Introduction to Shading (Normals, Vertex ...
The Scratchapixel article 'Introduction to Shading' provides an excellent explanation of this distinction. It directly contrasts flat and smooth shading and introduces the concept of vertex normals.
Read the section titled 'Flat Shading vs. Smooth Shading and Vertex Normals'. Focus on how vertex normals are used to create the illusion of a smooth surface and how they are interpolated using barycentric coordinates.
The image below illustrates this idea in 2D. On the left, face normals are perpendicular to the flat segments. On the right, vertex normals (blue) point away from the "true" underlying curve, and the interpolated normals (magenta) create a much smoother approximation.

2. The Interpolation Formula
This is where our work from the last lesson pays off. We can find the normal at any intersection point by calculating a weighted average of the three vertex normals (), using the barycentric coordinates () as the weights.
Given the convention from our Möller-Trumbore implementation, where is the weight for vertex , is for , and is for , the formula for the interpolated normal is:
After calculating , we must normalize it to ensure it's a unit vector before using it in any lighting calculations.
Vertex Attribute Interpolation // OpenGL Tutorial #9
To reinforce this concept, let's watch a short video from OGLDEV that explains vertex attribute interpolation. While it's presented in an OpenGL context, the underlying principle of using barycentric coordinates is universal and applies perfectly to our ray tracer.
Watch the sections that introduce barycentric coordinates and show how they are used to interpolate attributes. The key part is from 04:18 to 06:09, where it shows the formula for interpolating an attribute 'p' using barycentric coordinates a, b, c (which correspond to our w, u, v).
3. Implementation in C++
Let's translate this theory into code. This involves three steps: updating our triangle class, modifying its hit method, and then creating a test case with vertex normals.
Step 1: Update the Triangle Class
First, our triangle class needs to store the three vertex normals.
In your triangle.h (or equivalent file):
- Add three
vec3members for the normals:n0, n1, n2. - Update the constructor to accept these normals.
// In triangle.h

class triangle : public hittable {
  public:
    triangle(point3 _p0, point3 _p1, point3 _p2, shared_ptr<material> _material)
      : p0(_p0), p1(_p1), p2(_p2), mat_ptr(_material) {
        // By default, if no normals are provided, compute a single face normal.
        // We will overload the constructor for smooth shading.
        vec3 e1 = p1 - p0;
        vec3 e2 = p2 - p0;
        vec3 n = unit_vector(cross(e1, e2));
        n0 = n1 = n2 = n; // All normals are the same for flat shading
    }

    // New constructor for smooth shading
    triangle(point3 _p0, point3 _p1, point3 _p2, vec3 _n0, vec3 _n1, vec3 _n2, shared_ptr<material> _material)
      : p0(_p0), p1(_p1), p2(_p2), n0(_n0), n1(_n1), n2(_n2), mat_ptr(_material) {}

    virtual bool hit(const ray& r, double t_min, double t_max, hit_record& rec) const override;

  private:
    point3 p0, p1, p2;
    vec3 n0, n1, n2; // Vertex normals
    shared_ptr<material> mat_ptr;
};
Note: I've added a new constructor and modified the old one to act as a "flat shaded" default. This is good practice and allows both types of triangles in our scene.
Step 2: Modify the hit Method
Now, in the hit method, instead of calculating a face normal, we'll interpolate the vertex normals using the barycentric coordinates u and v that we already calculated and stored.
Introduction to Shading (Normals, Vertex ...
The Scratchapixel article on shading provides a code snippet that does exactly this. It uses uv.x and uv.y for what we call u and v.
Review the C++ code block in this short section. It shows the interpolation of vertex normals n0, n1, n2 using barycentric coordinates.
Here's how our triangle::hit method will look with this change. The logic for finding t, u, and v remains identical. We are just changing what we do after we find a valid hit.
// In triangle.cpp

bool triangle::hit(const ray& r, double t_min, double t_max, hit_record& rec) const {
    vec3 e1 = p1 - p0;
    vec3 e2 = p2 - p0;
    vec3 pvec = cross(r.direction(), e2);
    double det = dot(e1, pvec);

    const double epsilon = 1e-8;
    if (fabs(det) < epsilon)
        return false;

    double inv_det = 1.0 / det;
    vec3 tvec = r.origin() - p0;
    double u = dot(tvec, pvec) * inv_det;

    if (u < 0.0 || u > 1.0)
        return false;

    vec3 qvec = cross(tvec, e1);
    double v = dot(r.direction(), qvec) * inv_det;

    if (v < 0.0 || u + v > 1.0)
        return false;

    double t = dot(e2, qvec) * inv_det;

    if (t > t_min && t < t_max) {
        rec.t = t;
        rec.p = r.at(t);
        rec.mat_ptr = mat_ptr;
        rec.u = u;
        rec.v = v;

        // ---- NEW CODE FOR NORMAL INTERPOLATION ----
        const double w = 1.0 - u - v;
        vec3 outward_normal = unit_vector(w * n0 + u * n1 + v * n2);
        rec.set_face_normal(r, outward_normal);
        // ------------------------------------------

        return true;
    }

    return false;
}
Test your understanding!
A triangle has vertex normals , , and . A ray hits the triangle at a point with barycentric coordinates and . What is the un-normalized interpolated normal at this point?
Show answer
First, we find the third barycentric coordinate, :
.
The coordinates are . The intersection point lies on the edge between vertices and .
Now, we apply the interpolation formula:
The resulting normal points halfway between and , which makes perfect sense geometrically.
Step 3: Create a Test Scene
Finally, let's create a simple scene to see this in action. We'll make two triangles that share an edge to form a bent "quad". To get a smooth transition across the shared edge, the vertex normals for the shared vertices must be the same. A common way to generate such normals is to average the face normals of the adjacent triangles.
In your main.cpp or scene setup file:
// ... inside main()

hittable_list world;

auto green_mat = make_shared<lambertian>(color(0.2, 0.8, 0.2));

// Define the four vertices of a bent quad
point3 p0(-1, 0, 0);
point3 p1( 1, 0, 0);
point3 p2( 1, 1, 1);
point3 p3(-1, 1, 1);

// Calculate face normals for the two triangles
vec3 face_normal1 = unit_vector(cross(p1-p0, p2-p0)); // For triangle p0-p1-p2
vec3 face_normal2 = unit_vector(cross(p2-p0, p3-p0)); // For triangle p0-p2-p3

// Define vertex normals
// For vertices only used by one triangle, the vertex normal is just the face normal.
// For shared vertices (p0, p2), we average the face normals.
vec3 n0 = unit_vector(face_normal1 + face_normal2);
vec3 n1 = face_normal1;
vec3 n2 = unit_vector(face_normal1 + face_normal2);
vec3 n3 = face_normal2;

// Add the two smooth-shaded triangles to the world
world.add(make_shared<triangle>(p0, p1, p2, n0, n1, n2, green_mat));
world.add(make_shared<triangle>(p0, p2, p3, n0, n2, n3, green_mat));

// ... add a ground sphere, setup camera, and render
When you render this scene (you can visualize the normals directly by setting the pixel color to 0.5 * (normal + color(1,1,1))), you should see a smooth gradient across the central diagonal edge, rather than a sharp, hard line.
Conclusion
Congratulations! You've just implemented one of the most fundamental and visually important techniques in 3D graphics. This single feature dramatically elevates the realism of rendered polygonal meshes.
Key Takeaways:
- Flat shading uses one normal per face, causing a faceted look.
- Smooth shading uses one normal per vertex and interpolates them across the face.
- The interpolation is a weighted average of the vertex normals, with the barycentric coordinates of the hit point serving as the weights.
- The formula is straightforward: .
- Generating good vertex normals (e.g., by averaging face normals) is crucial for achieving a smooth appearance across shared edges.
Next Steps
Manually defining vertices and normals in code is effective for testing but impractical for complex models. In our next lesson, we will address this by learning how to create a basic parser to load triangle mesh data from an OBJ file. This will allow us to render complex models exported from applications like Houdini, Blender, or Maya, taking a major step towards a feature-complete, practical ray tracer.