Hello! In our previous lesson, we became data detectives, using Power Query's profiling tools to find quality issues in a dataset. You learned how to teach managers to spot errors, missing values, and inconsistencies before they can cause problems in an analysis.
Now, we'll address the learning outcome: Save and refresh queries for reusable data pipelines. This lesson is the capstone of our introductory module. It brings everything together to reveal the true power of Power Query: automation. For the managers in your workshop, this is the "magic trick"—the moment they see how the cleaning steps they defined can be applied again and again with a single click, saving hours of repetitive work. You'll be teaching them how to build their first automated data workflow.
From Recipe to Reusable Pipeline
Think of the "Applied Steps" you've seen as a recipe for cleaning data. Once you've perfected this recipe in the Power Query Editor, the final step is to save it and load the clean data back into Excel. This action transforms your one-time cleaning process into a reusable data pipeline.
Step 1: Loading Your Cleaned Data
After applying all your transformations, you need to bring the results out of the Power Query Editor. This is done using the Close & Load options on the Home tab.
- Close & Load: This is the default and most common option. It loads the output of your query into a new worksheet in your Excel file as a formatted table.
- Close & Load To...: This provides more control, allowing you to load the data directly into a PivotTable or just create a connection to the data source without loading all the rows into a sheet. For your workshop, focusing on the main "Close & Load" button is sufficient.
Once you load the data, Excel creates a "live" connection to your query, which you can manage from the Queries & Connections pane (usually found on the right side of your screen or accessible from the Data tab).
Step 2: The Core Concept of Refreshing
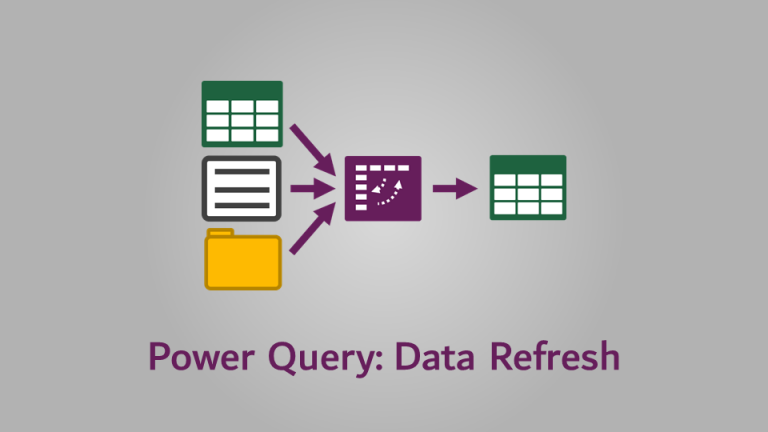
The real power of this process isn't just loading the data once. It's the ability to refresh it. When you hit "Refresh," you are telling Excel to perform the following actions automatically:
- Go back to the original data source (e.g., the folder with your CSV files).
- Pull in the latest version of the data.
- Re-apply every single step from your "Applied Steps" list in the exact same order.
- Update the table in your Excel sheet with the newly cleaned data.
This visual helps explain the concept at a high level.
Step 3: Refreshing in Action - The "Wow" Moment
Demonstrating this is the most impactful part of this topic. You'll show your workshop participants how a task that would normally require re-doing all the cleaning steps can be done in seconds.
We'll look at two common business scenarios.
Scenario 1: A New Monthly File Arrives
Imagine your managers receive a new sales report file each month. The first video shows how to set up a query to read from a folder and then what happens when a new file is added to that folder.
How to use Microsoft Power Query
This video by Kevin Stratvert provides a perfect end-to-end demonstration. It shows how to combine data from multiple yearly sales files and then, crucially, how to refresh the query to automatically incorporate a new year's file that is added later.
Watch from 12:26 to 15:56. Pay close attention to the sequence: He uses 'Close & Load' to get the combined data into Excel. He builds a PivotTable and PivotChart from this data. He adds a new file ('2020 data') to the source folder. He uses the 'Refresh All' button on the 'PivotTable Analyze' tab, and the chart updates instantly to include the new data. This is the key demonstration you'll want to replicate for the managers in your workshop.
Scenario 2: New Data is Added to an Existing File
In other cases, the source file itself is updated with new rows of data (e.g., a master list of transactions). The refresh process works just as seamlessly.
Learn to Automate Everything with Power Query in Excel (Download Files)
Now let's look at another common scenario: what happens when new rows are added to your original source file? This clip from Leila Gharani shows exactly that.
Watch from 13:56 to 14:28. Notice how new data is added to the source file, and a simple right-click and 'Refresh' in the final Excel table brings in the new, cleaned rows automatically.
Step 4: Automating the Refresh
Manually clicking "Refresh" is already a huge time-saver. But for true "set it and forget it" automation, you can configure the query to refresh itself. This is perfect for managers who want their reports to be up-to-date every morning when they open the file.
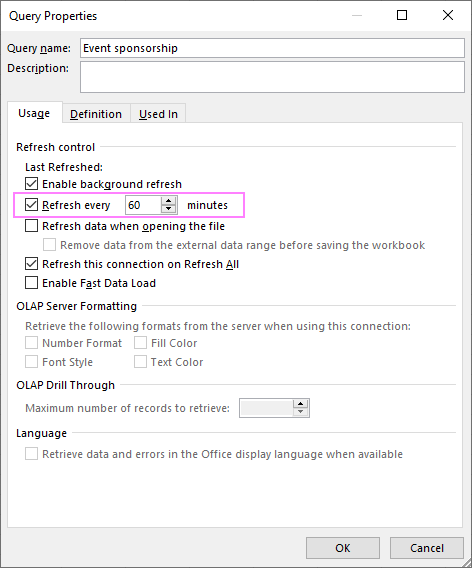
For the final piece of the automation puzzle, let's learn how to make Power Query refresh automatically. This article from Ablebits.com explains the settings available in the Query Properties.
Read the section titled 'Excel Power Query refresh', focusing specifically on the subsection 'How to auto refresh Power Query without opening the file'. This will show you the dialog box where you can set a refresh schedule (e.g., every 60 minutes) or trigger a refresh automatically when the workbook is opened.
The settings are found in the Query Properties dialog box. You can access this by right-clicking your query in the Queries & Connections pane and selecting "Properties...".
Test your understanding!
A manager receives a new Inventory_March.csv file. Last month, they spent two hours cleaning Inventory_February.csv (removing columns, filtering, etc.) using a Power Query that pulls data from a specific folder. This month, they've placed the new March file into that same folder. What is the most efficient next step for them to get a fully cleaned version of the combined February and March data?
Show answer
The most efficient step is to simply open their main Excel report file and click Data > Refresh All. They do not need to open the Power Query editor or rebuild any steps. Because the original query was set up to source data from the folder, refreshing it will automatically discover the new file, apply all the previously defined cleaning steps to it, and append it to the existing data.
Conclusion
This lesson completes the foundational workflow of Power Query. You've learned how to turn a series of manual cleaning steps into a powerful, automated, and reusable data pipeline. This skill is arguably one of the most valuable time-saving techniques for any manager who regularly works with data.
Key Takeaways for Your Workshop:
- "Close & Load" is the final step that saves your query and brings the clean data into Excel.
- This creates a reusable recipe that can be run again at any time.
- The "Refresh" button is the trigger that re-runs your entire cleaning process on the latest source data.
- This automates recurring tasks, saving significant time and ensuring consistency across reports.
- You can configure refreshes to happen automatically (e.g., when the file is opened) for maximum efficiency.
Preview of the Next Lesson:
Now that you have mastered the complete workflow—from importing data to creating a refreshable pipeline—we are ready to expand your cleaning toolkit. In our next module, Core Data Cleaning Techniques in Power Query, we will dive deep into the specific transformations you'll need. You'll learn the hands-on steps for removing duplicates, filtering rows, handling missing values, splitting columns, and more. We're moving from setting up the plumbing to controlling the precise flow of data.