Hello! Welcome to the first lesson in our module on Core Data Cleaning Techniques in Power Query.
In our last module, we focused on the big picture: identifying data quality issues and, most importantly, creating an automated, refreshable data pipeline. You learned how to teach managers the "magic" of Power Query—setting up a cleaning process once and having it run automatically with a single click.
Now, we'll begin building the specific "recipes" for that pipeline. This lesson addresses our first core technique: how to remove duplicate records from a dataset. Duplicate data is one of the most common and disruptive issues in business datasets. Getting rid of it is often the very first step in any trustworthy analysis. By the end of this lesson, you will be equipped to teach managers why duplicates are a problem and how to eliminate them efficiently using Power Query.
Why Duplicates Are a Problem for Managers
Before diving into the "how," it's crucial to establish the "why." For the managers in your workshop, this context is key. Duplicate records aren't just a minor annoyance; they can severely undermine business decisions.
Imagine a dataset of sales transactions. If a single $10,000 sale is accidentally recorded three times, your total sales figures will be inflated by $20,000. This could lead to incorrect sales forecasts, skewed performance reviews, and flawed inventory planning. In a customer contact list, duplicates could mean a company wastes money sending the same marketing material to one person multiple times, while also appearing unprofessional.
Data integrity is the foundation of reliable AI and analytics, and removing duplicates is the first step to building that foundation.
Removing Entirely Duplicate Rows
The most common scenario is when you have rows that are 100% identical. This usually happens due to a system glitch, a copy-paste error, or data entry mistakes. Power Query makes removing these effortless.
The fundamental process is to:
- Select all columns in your dataset.
- Use the "Remove Duplicates" command.
This video provides an excellent demonstration that you can replicate in your workshop. It starts by showing duplicates in Excel and then walks through the process in Power Query.
Remove Duplicates Using Power Query | Excel Tips & Tricks
Watch this video from the 'Excel with Paolo' channel. It clearly shows the problem of duplicate data and the correct way to remove it by selecting all columns. It also highlights a common mistake, which we will discuss next.
Watch from the beginning to 2:46. Pay close attention to these two moments: The initial mistake (01:21): He has only one column selected and the 'Remove Duplicates' action gives an unexpected result. The correction (01:55): He selects all columns (Ctrl+A or Shift-click) and then correctly removes the full duplicate rows.
As you saw, the key is to ensure all columns are selected. This tells Power Query to only remove a row if it's an exact copy of another row across every single column.
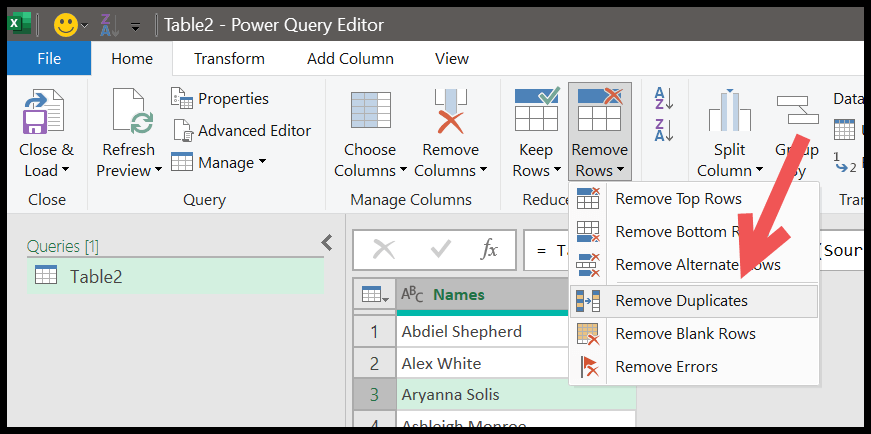
The command is found on the Home tab of the Power Query Editor, under the Remove Rows dropdown.
The Pitfall: Removing Duplicates Based on a Subset of Columns
The video highlighted a critical point: the result of "Remove Duplicates" depends entirely on which columns are selected.
- When all columns are selected: You remove rows that are identical in every way. This is safe and predictable.
- When only one or a few columns are selected: You are asking Power Query to keep only the first unique value or combination of values it finds in those specific columns.
This can be useful, but it's also risky for beginners. For example, if a manager has a customer list and removes duplicates based only on the "City" column, they will be left with a list containing just one customer per city, deleting all others!
For your workshop, you should emphasize that unless they have a very specific reason, managers should always start by selecting all columns to preserve the integrity of their data.
For a concise reference, the official Microsoft documentation is an excellent resource to share with your participants.
Working with duplicate values - Power Query
This Microsoft Learn article provides a straightforward, step-by-step guide on removing duplicates. It's a great reference to have on hand.
Read the section titled 'Remove duplicates', focusing on the subsections 'Remove duplicates from multiple columns' and 'Remove duplicates from a single column'. The screenshots and simple text make it easy to follow.
Test your understanding!
A manager has a list of 500 employee training records. They notice that Employee ID "1138" appears twice, once for a "Safety" course and once for a "Leadership" course. The manager selects only the Employee ID column and clicks "Remove Duplicates."
What will be the likely outcome, and what potential problem does this create?
Show answer
Outcome: One of the two rows for employee "1138" will be deleted. The table will now only show that employee "1138" took either the "Safety" or "Leadership" course, but not both.
Problem: This creates an inaccurate training history. The manager has lost valid information because their definition of a "duplicate" (a repeated Employee ID) was too broad. The two rows were not true duplicates; they represented two distinct training events for the same person.
Advanced Considerations for Your Own Knowledge
As the instructor, it's helpful for you to be aware of a few nuances that might come up. While you may not need to teach these in-depth in a beginner workshop, knowing them will help you answer questions confidently.
-
Case Sensitivity: By default, Power Query is case-sensitive. It sees "Apple" and "apple" as two different values. If you need to treat them as the same, you would either have to first transform the text to a standard case (e.g., all lowercase) or use a more advanced function.
-
Which Row is Kept? When you remove duplicates, Power Query doesn't guarantee which of the duplicate rows it will keep (e.g., the first, last, or one in the middle). For simple duplicate removal, this doesn't matter. But if you needed to, for example, "keep the most recent entry," you would need to first sort the data by date and then use a specific technique to ensure the sort order is preserved.
This article provides an excellent deep dive into these topics. It's a great resource for your own development.
How to Remove Duplicates in Power Query (Step-by-Step)
For a more advanced look at duplicate removal, this Gorilla BI article is fantastic. It covers the underlying function, case-insensitive removal, and how to handle the unpredictability of which row is kept.
Skim through the sections 'Removing Duplicates Case-Insensitive' and 'Inconsistent Results'. You don't need to memorize the M-code, but understand the concepts of case-sensitivity and the use of 'Table.Buffer' to create predictable outcomes. This will prepare you for advanced questions.
Conclusion
You have just learned the first and one of the most fundamental data cleaning operations. Ensuring a dataset is free from unwanted duplicates is critical for accuracy in any report, chart, or AI-driven insight.
Key Takeaways for Your Workshop:
- Duplicate data leads to inflated numbers and incorrect analysis.
- The primary method for cleaning is to select all columns and use Home > Remove Rows > Remove Duplicates.
- Be cautious when removing duplicates based on only a few columns, as it can lead to unintended data loss.
- Like all steps in Power Query, this action is recorded and becomes part of your automated, refreshable data pipeline.
Preview of the Next Lesson:
With our dataset free of duplicates, we can now focus on another common task: removing rows that are not relevant to our analysis. In the next lesson, we will explore how to filter rows based on specific criteria, allowing you to zero in on the exact data you need.