Introduction
Welcome back! In our last lesson, we established the crucial daily opening and closing procedures for your beauty mini-market. We created detailed checklists to ensure every day starts and ends with security, cleanliness, and financial accuracy. A key takeaway was the need for a two-person rule during opening and closing for safety.
This lesson builds directly on that foundation and addresses the learning outcome: Create a staff scheduling system to ensure adequate coverage.
Just as you would strategically plan a digital marketing campaign calendar to allocate resources effectively, a staff schedule is the operational calendar that deploys your most valuable asset—your team. A well-designed schedule is not just a roster; it's a strategic tool that balances excellent customer service, employee satisfaction, and your largest controllable expense: labor costs.
By the end of this lesson, you will understand the principles of effective retail scheduling and be able to create a practical system for your store, whether you choose a simple spreadsheet or dedicated software.
1. The Five Steps to a Great Retail Schedule
Before we get into the "how," let's establish the core principles. Creating a schedule isn't about arbitrarily filling time slots; it's a systematic process. The goal is to have the right people, with the right skills, in the right place, at the right time.
Let's start by reading a step-by-step guide that provides the foundational process for building a retail schedule.
How to Create the Best Retail Schedule: Complete Guide - Homebase
The article 'How to Create the Best Retail Schedule' from Homebase provides an excellent, practical framework for this task. We'll use this as our guide throughout the lesson.
Please read the section 'How to build the best retail schedule in 5 steps'. As you read, think about how each step applies to your future beauty mini-market.
As the article outlines, the process is:
- Understand demand and peak hours.
- Collect availability and time-off requests.
- Assign shifts and balance workloads.
- Review for fairness and coverage gaps.
- Publish schedules and communicate changes.
This structured approach prevents most common scheduling headaches, such as being understaffed during a rush or creating friction with your team.
2. Defining Your Store's Staffing Needs
Let's apply Step 1 of the framework: understanding your demand. For your beauty mini-market, you need to plan coverage for three distinct needs: operational tasks, baseline customer service, and peak traffic.
- Operational Tasks: From our last lesson, we know opening and closing require dedicated time and, for security, two employees. This is a non-negotiable part of your schedule.
- Baseline Coverage: During operating hours, you must have at least one person on the sales floor at all times.
- Peak Traffic: You will need to anticipate your busiest times (e.g., weekends, lunch hours, evenings after 5 PM) and schedule a second employee to manage customer volume, preventing lost sales and ensuring a high-quality experience.
The Homebase article you just read provides a perfect model for a business like yours.
How to Create the Best Retail Schedule: Complete Guide - Homebase
Let's look at a concrete example that is highly relevant to your store.
Please read the section 'Small boutique retail schedule example'. Notice how it combines a core full-time team with part-time staff to cover the Saturday rush, a strategy you might adopt.
This example shows a simple, effective structure. For your store, a weekly schedule might look something like this:
- Opening Shift (e.g., 9:30 AM - 5:30 PM): Two employees to perform opening procedures, with one staying for the full day.
- Peak/Mid-Shift (e.g., 12:00 PM - 8:00 PM): A second employee arrives to cover the lunch rush and afternoon peak.
- Closing Shift: The mid-shift employee stays until close and is joined by the other full-day employee (or a new part-timer) to handle closing procedures.
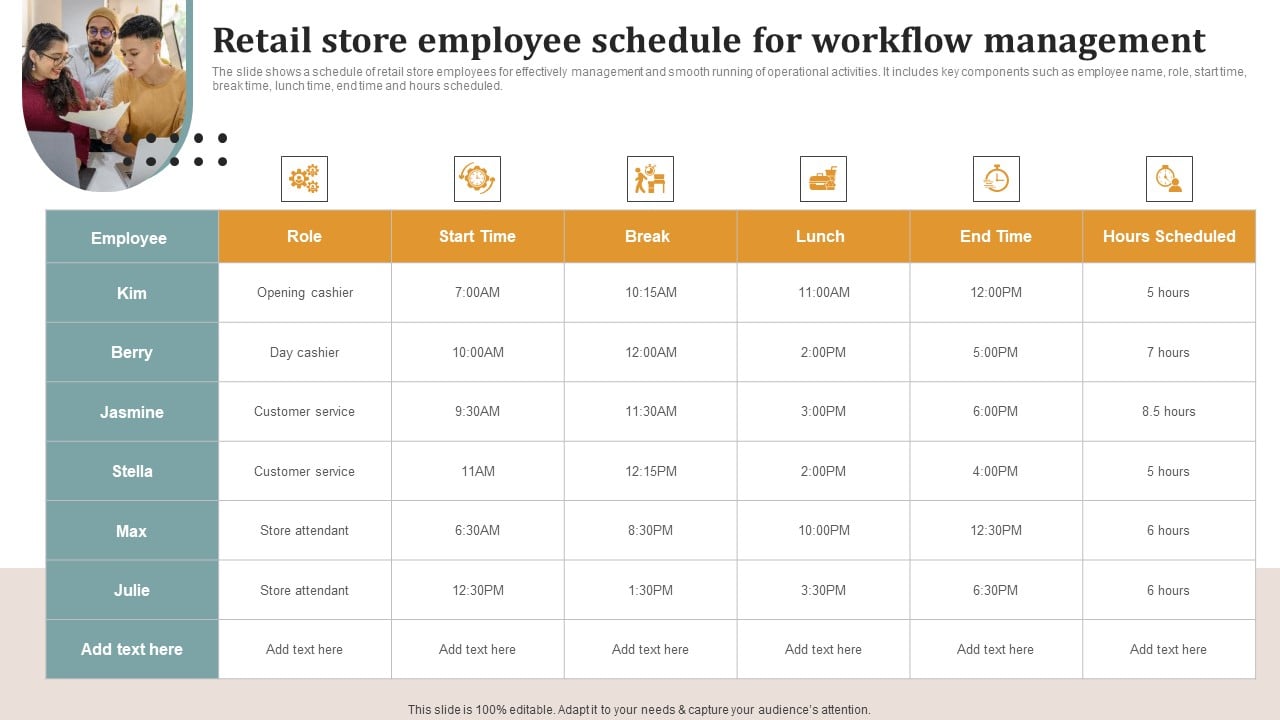
This layered approach ensures you always have coverage. The image below shows what information you'll need to capture for each shift.
3. Choosing Your Scheduling Tool
Now that you know what you need to schedule, you need to decide how you'll create and manage it. For a new small business, there are two primary paths: a manual spreadsheet or dedicated scheduling software.
Option A: The Spreadsheet Method (Low-Cost & Customizable)
This is the most common starting point. It's free and highly flexible. With a bit of setup, you can create a very functional system. This video provides a detailed walkthrough of how to build a robust schedule in Excel.
How to Build an Employee Schedule in Excel
This video from Spreadsheet Life is a masterclass in building a dynamic Excel schedule. You can follow it step-by-step to create your own.
Watch the following key segments to learn the core techniques: Initial Setup (00:32 - 02:04): Learn how to format the worksheet for clarity. Defining Shifts and Dropdowns (04:30 - 07:57 and 13:56 - 14:43): This is the most powerful part. You'll create a separate tab for your shift types (e.g., 'Open', 'Mid', 'Close') and then use data validation to create dropdown menus for easy shift assignment. Focus on understanding these setup steps. The more advanced formulas and conditional formatting discussed later in the video are useful but optional for your initial setup.
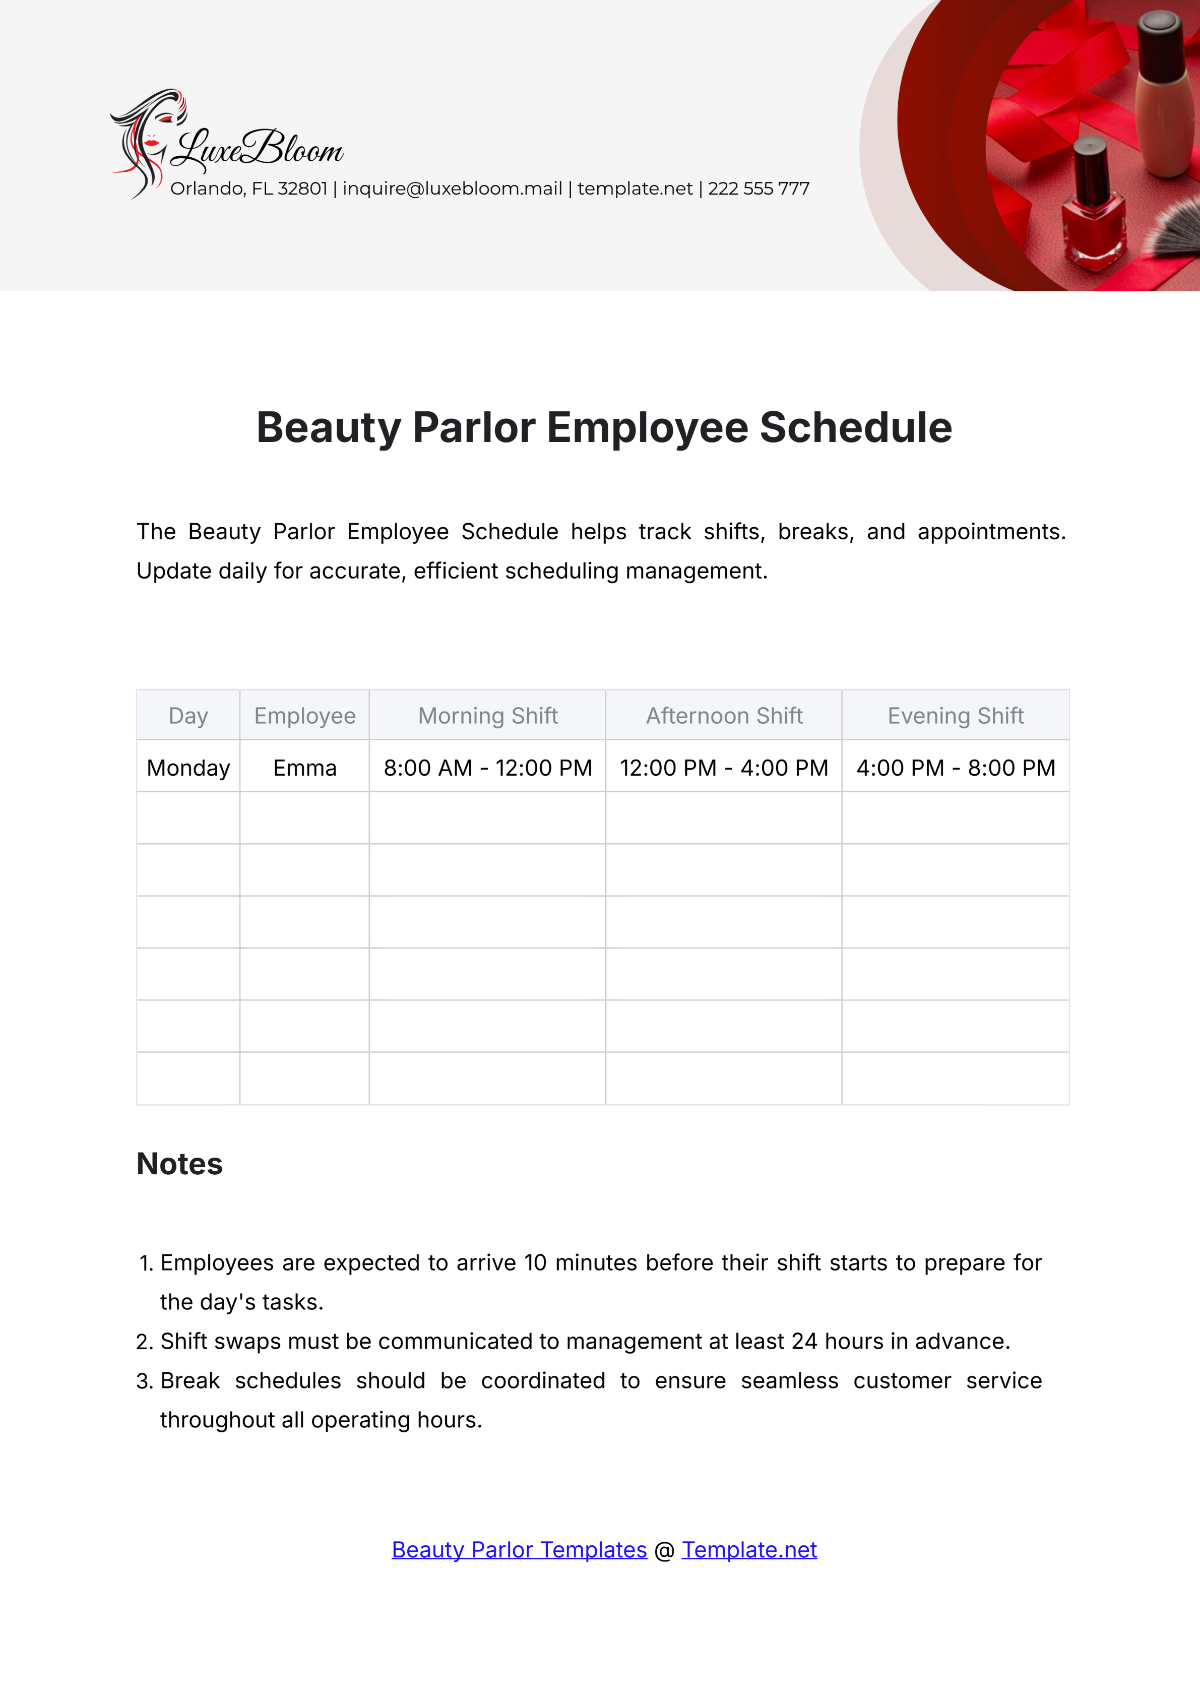
If the detailed Excel build feels too complex at first, you can start with a simpler visual template.
Option B: The Software Method (Efficient & Scalable)
While spreadsheets are free, dedicated scheduling software can save you significant time and prevent costly errors, especially as your team grows. These tools often integrate time tracking and can even project labor costs. It's worth understanding what they offer so you can make an informed decision.
Guide to Retail Staff Scheduling - TimeTrex
To understand the strategic value of software, let's turn to this in-depth guide from TimeTrex. It compares the two approaches.
Read the section 'The Technology Catalyst: From Manual Processes to Automated Workforce Management'. Pay close attention to the table 'Head-to-Head Comparison: Manual vs. Automated Scheduling Systems'.
To see what this looks like in practice, here is a demonstration of a popular scheduling tool. Treat this as a generic example of what software can do, not an endorsement of a specific brand.
This training video from When I Work demonstrates the key features of a modern scheduling platform.
Watch these sections to see the core workflow: Setup (02:05 - 05:42): See how you can add employees, define their roles (e.g., 'Beauty Advisor'), and create reusable 'shift blocks' (e.g., a 10am-6pm shift). Creating a Schedule (06:08 - 09:43): Observe how easy it is to assign shifts, see employee availability at a glance, and use copy-paste functions to build a week quickly.
Recommendation for you: Start with a well-structured spreadsheet based on the Excel tutorial. It's a no-cost way to get started and understand your own scheduling patterns. Once your business is established, you can easily transition to a paid software solution if the administrative work becomes too time-consuming.
4. Legal Considerations and Best Practices
Finally, creating the schedule is only part of the process. How you manage and communicate it is critical for legal compliance and team morale.
-
Legal Compliance: The TimeTrex article (LINK) mentions two key legal areas: the Fair Labor Standards Act (FLSA), which governs overtime pay, and "Fair Workweek" laws. While Fair Workweek laws only exist in specific cities and states, they mandate things like advance schedule notice and predictability pay for last-minute changes. It is vital that you research the specific labor laws for your city and state to ensure your scheduling policies are compliant.
-
Best Practices: A good schedule is fair and predictable.
How to Create the Best Retail Schedule: Complete Guide - Homebase
Let's revisit the Homebase article for a final set of actionable best practices.
Read the section 'Retail scheduling best practices that actually work'. These are simple habits that make a huge difference in employee satisfaction and retention.
In summary, always aim to:
- Post schedules at least two weeks in advance.
- Establish a clear, fair process for time-off requests and shift swaps.
- Distribute desirable and undesirable shifts (like weekends) equitably.
- Have a backup plan for call-outs.
Conclusion
You now have a complete framework for creating an effective staff scheduling system for your beauty mini-market. You understand that a schedule is a strategic plan that must account for operational duties, customer traffic, labor costs, and employee fairness.
Key Takeaways:
- A great schedule balances coverage, cost, and culture.
- Follow the five-step process: analyze demand, collect availability, assign shifts, review, and publish.
- Your staffing needs are driven by opening/closing tasks, baseline coverage, and peak traffic hours.
- You can start with a DIY Excel schedule and graduate to dedicated software as your business grows.
- Always publish schedules at least two weeks in advance and be aware of local labor laws regarding scheduling and overtime.
Preview of the Next Lesson:
With your core operational systems—daily procedures and staff scheduling—now designed, we can turn our focus from internal setup to external growth. The next module is all about attracting your first customers. In our next lesson, we will begin by learning how to "Outline the key components of a local marketing plan including objectives, budget, channels, and timeline." You'll get to apply your digital marketing expertise to the unique challenge of driving foot traffic to a physical store.