Hello! Welcome back to your capstone project on full figure illustration.
In our last session, you learned how to construct a proportionally correct mannequin figure over a gesture sketch. This gave you a solid, three-dimensional armature for your character, ensuring all the parts are in the right place and the right size.
Today, we will take that structural mannequin and begin to dress it with anatomy. Our learning outcome is to block in the major muscle groups over the mannequin structure based on the pose. Think of this as the next logical step in a construction process: you've built the frame, and now you're adding the major volumes. We won't worry about perfect, smooth outlines yet. Instead, we'll focus on placing the big, simplified shapes of the muscles, which is a critical step for creating a powerful and believable figure.
1. The Logic of Muscle Attachment
Before we start drawing muscles, it's helpful to have a mental model for how they fit together. They aren't just bubbles on a surface; they are distinct forms that attach to the skeleton and to each other in logical ways. Understanding this logic will help you move from simply copying a reference to constructing a figure from understanding.
Let's explore some key concepts of how muscles connect.
Easy studies to help you in creating of a muscular character
The article 'Easy studies to help you in creating of a muscular character' offers some excellent analogies for how muscles connect and interlock. This will provide the 'why' behind the shapes we are about to draw.
Please read section '▪️ Study 4: various ways in which muscle parts are attached to one another'. Focus on the sub-sections: 'by the means of wedging of the muscles': Notice the example of the back muscles and abdominals fitting between other forms. 'by the means of Interlocking of the muscles': Pay attention to the chain-link analogy for the arm. 'by the means of Mortise and tenon of muscles': This woodworking analogy is a great way to think about strong, supportive connections. Don't worry about memorizing every muscle mentioned; focus on the concepts of how the forms fit together.
These concepts—wedging, interlocking, mortise and tenon—give you a powerful framework. For example, knowing that the pectoral (chest) muscle tucks under the deltoid (shoulder) muscle, which in turn overlaps the biceps, immediately informs how you should draw the lines in that area.
2. The Process: From Mannequin to Muscle Blocks
Now, let's look at the practical process of applying these muscle forms to your mannequin. This is a layering process, moving from simple to complex.
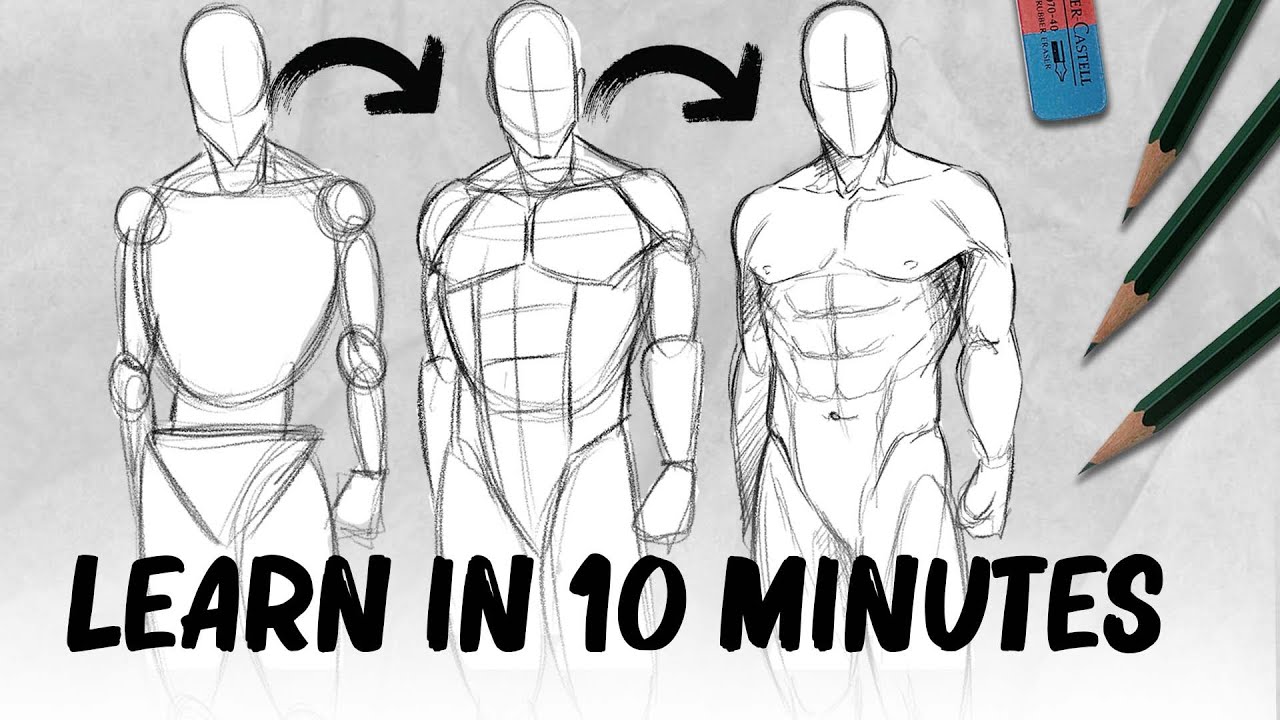
The key is to simplify the complex anatomy you've studied in previous modules into basic, manageable shapes.
The following video demonstrates this "constructive" method, showing how to think about muscles as simple volumes built on top of the skeleton.
Learning To Draw The Figure From Imagination | Build Up Muscles - Loomis - Comics - Manga
The video 'Learning To Draw The Figure From Imagination' by The Drawing Codex provides an excellent demonstration of this muscle-building process.
Please watch the following two clips: Start at 00:28:15 and watch until 00:34:08. The instructor discusses and demonstrates using 'chunky, blocky versions' of muscles. Notice how he treats the pectorals and deltoids as simple 3D shapes that he adds to the torso's egg-like form. This is the core of 'blocking in.' Next, watch from 00:34:08 to 00:39:14. This segment gives practical takeaways for how muscles layer and connect, reinforcing the 'interlocking' concept. The example of the pectoral-deltoid-bicep relationship is especially important.
This approach of using primary forms—cylinders, boxes, and egg shapes—to represent muscle groups is incredibly powerful. It ensures your figure has volume and mass before you get caught up in drawing small details.
3. Reviewing the Major Muscle Groups
As you block in the muscles, you'll be drawing on your knowledge from the dedicated anatomy modules. You don't need to draw every single muscle, but rather the large, superficial groups that define the surface form.
Here's a quick reference list of the main players we're concerned with at this stage. You can refer back to the resource Easy studies to help you in creating of a muscular character, specifically Section 5: "Fundamental muscle study: breakdown of human anatomy", for a more detailed visual breakdown.
- Torso (Front): Pectoralis Major (chest), Deltoids (shoulders), Rectus Abdominis ("six-pack"), and External Obliques (sides of the abdomen).
- Torso (Back): Trapezius (upper back/neck), Latissimus Dorsi ("lats"), and Erector Spinae (run along the spine).
- Arms: Deltoids, Biceps, Triceps, and the forearm muscle group (often simplified into a single tapered shape).
- Legs: Quadriceps (front of thigh), Hamstrings (back of thigh), and Gastrocnemius (calf).
Your goal is to represent these groups as simple, connected shapes on your mannequin.

4. Practice Exercise: Dress Your Mannequin (25 minutes)
It's time to apply these concepts in Procreate. For this exercise, you will build directly on the work you did in the previous lesson.
Your Task:
- Open the Procreate file with the mannequin figure you drew in the last lesson. If you prefer, you can quickly create a new mannequin from a reference photo.
- Lower the opacity of your mannequin layer to about 50%.
- Create a new layer on top of your mannequin.
- Using a distinct color (like blue or red), begin blocking in the major muscle groups. Work from large to small:
- Start with the torso. Draw the shapes for the pectorals, deltoids, and the abdominal area. Think about how the pectorals connect from the sternum and clavicle to the arm, and how they tuck under the deltoids.
- Add the large masses of the back—the trapezius and the lats, which create the "V" shape of the torso.
- Move to the limbs. Draw the egg-shape of the bicep and the C-shape of the tricep. Block in the quadriceps and hamstrings as large, simple forms wrapping around the cylinder of the thigh.
- Focus on the volume and connectivity of the shapes, not on creating a pretty drawing. Your result should be a structural diagram showing how the anatomy is layered over the mannequin skeleton.
Don't be afraid to keep it rough and schematic. The goal is to create a solid anatomical blueprint for the next stage.
Conclusion
Great work today. You've taken a significant step from a simple structural mannequin to a figure with anatomical mass and form. By focusing on blocking in muscles as simple, interconnected shapes, you're building a robust foundation for more detailed and dynamic figure drawings.
Key Takeaways:
- Muscles are 3D forms that are built on top of the skeletal mannequin.
- Thinking of muscles in terms of how they interlock, wedge, and overlap helps create believable connections.
- Simplifying complex anatomy into primary shapes (blocks, ovals, cylinders) is the key to the blocking-in stage.
- This process creates a structural blueprint that defines the volume and major forms of the body before any detail is added.
In our next lesson, we will move to the next stage of the process: Refine the muscle blocks into a clean contour drawing of the surface anatomy. You'll learn how to transform today's rough blocks into the final, elegant lines that define the surface of the figure.